A new look at Daisy Delight

Rumor has it there’s a new Daisy set (with a coordinating mid-sized punch) in the 2019-2020 Annual Catalog. I don’t have it yet, but seeing some of the images from our April Demonstrator Event sent me to the craft room to play.
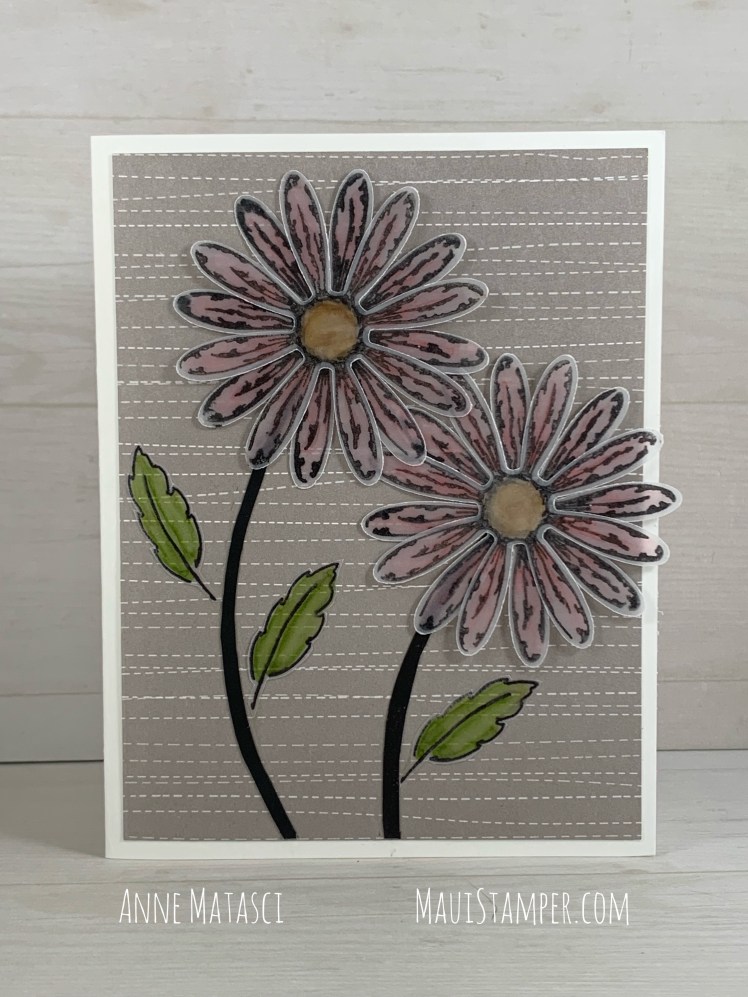
Maui Stamper Stampin' Up! Daisy Delight and the Daisy Punch

I’m starting to get a little neurotic about plant parts. I decided I didn’t like the stems that came with the Daisy stamp, so I cut my own out of Basic Black card stock with my Paper Snips and adhered them with the Fine Tip Glue Pen. I’m starting to feel kind of renegade about stems and leaves (do you remember my orchid leaves?)

Maui Stamper Stampin' Up! Daisy Delight and the Daisy Punch

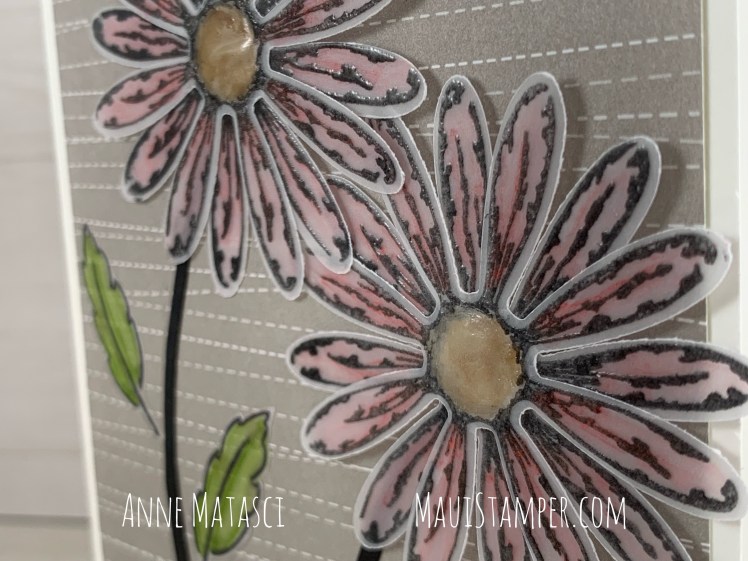
I embossed the daisy images on the Vellum so the lines wouldn’t run when I colored them. In retrospect, I could have stamped them with Stazon ink and colored them on the REVERSE side and gotten a very similar look. I call that Delayed Intelligence. When you’re coloring with Stampin’ Blends, you need to use Memento Ink to avoid smearing, but Stazon will dry much faster on Vellum and since it’s translucent, you can color from behind.

The Fine Tip Glue Pen dries clear behind Vellum so it’s the perfect adhesive, but it also leaves a lovely clear lacquer effect if you’re patient and allow it to dry.

Maui Stamper Stampin' Up! Daisy Delight and the Daisy Punch

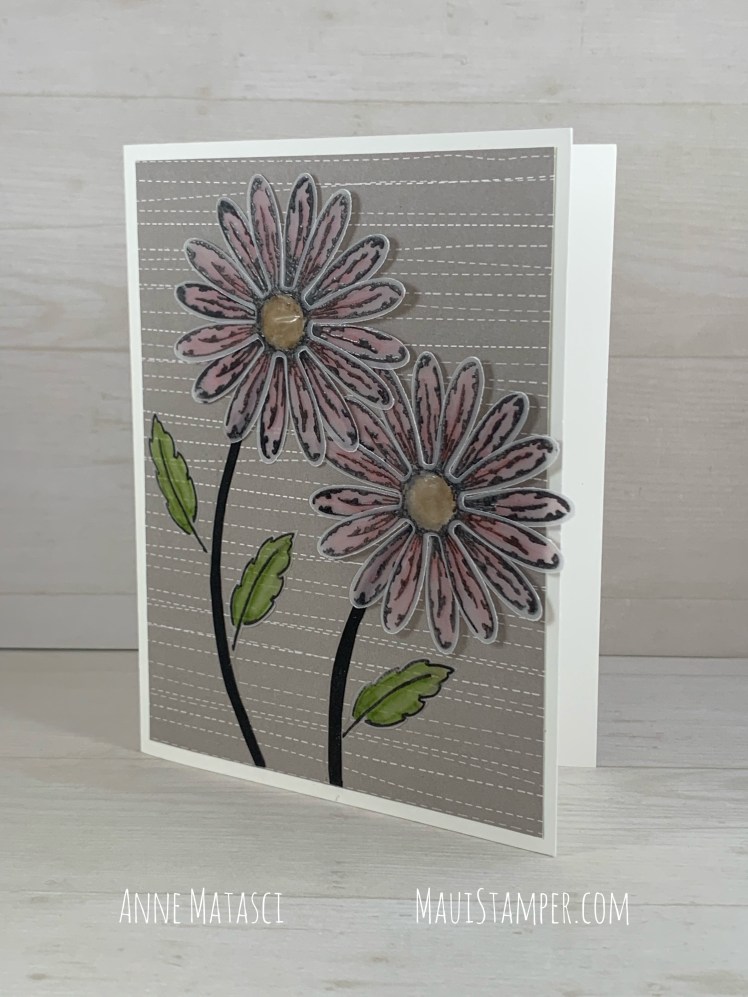
I’m leaving this one without a sentiment for now. I like to have a few cards ready-to-personalize for last minute card needs. What would you choose for this one?

If you’d like to purchase any of these products, please shop HERE.

Spooky Nights

I don’t have kids at home any more, and there aren’t too many kids in my neighborhood. As a result, my Halloween decorating and crafting has dwindled to just a few projects. My dear friend Robbie absolutely LOVES Halloween, and in her honor we did some spooky themed projects at our monthly meeting.

Maui Stamper Stampin' Up! Spooky Suites Night Owl Holiday 2018

I loved how this one turned out. It’s a little more grown up than a typical Halloween card, and the Galvanized Metallic Paper really sets that tone. It has a gorgeous matte gleam, and I used my first package up so quickly that I immediately ordered several more. If I were you, I would do the same! This is going to have lots of uses.

Maui Stamper Stampin' Up! Spooky Suites Night Owl Holiday 2018

Spooky Suites and the Spooky Bats punch are available in a discounted bundle. I love that there are such great punches available in the Holiday and Annual catalog this year – punches are a quick and easy solution.

The gorgeous branches from the Night Owl Thinlits are dramatic and lend themselves to a variety of uses. When we were making this particular card, everyone kept referring to them as antlers.

Maui Stamper Stampin' Up! Spooky Suites Night Owl Holiday 2018

That little tag is the happy result of double cutting. It’s a nice long thinlit, about twice that size. If you stamp your image and cut it out with the words justified to one end, it’s really easy to place the thinlit on the opposite end and run the tag through a second time, cutting it down.

What else would you do with that gorgeous starry night DSP? I might have stocked up on that when I placed my order for “several” packages of the Galvanized paper. Need a little for yourself? Shop HERE.

Little Gray Elephant: Colour INKspiration 38

I missed the last Colour INKspiration challenge, and creating something for #CI38 was a high priority this weekend. The Little Elephant bundle has been on my desk this week and it didn’t take me long to imagine how it would work perfectly with the palette of Gray Granite, Petal Pink, Berry Burst, Basic Black and Whisper White:

Maui Stamper Stampin' Up! Little Gray Elephant #CI38

Maui Stamper Stampin' Up! Little Gray Elephant #CI38

Stampers in the know might have already spotted that Berry Burst Tropical Elements flower. They don’t come in that color, and I had to get pretty creative to make it happen! Stampin’ Up! doesn’t currently sell a Berry Burst Stampin’ Blends marker, which would have been my first choice. I used a Sponge Dauber to add Berry Burst ink to the button, then lightly tapped it into the Versamark Ink and dusted it with Clear Embossing Powder. When I heat set that combination, the color was too light. I ended up repeating the process two more times with just the Berry Burst Ink and the Embossing Powder to get the color I wanted. I used the end of a wooden skewer to hold the button while I blasted it with the Heat Gun.

Maui Stamper Stampin' Up! Little Gray Elephant #CI38

I also used Sponge Daubers to color the edge of the Pearlized Doily, and I used a Gray Granite Stampin’ Write marker to tone down the Linen Thread. I keep a nice little stash of Sponge Daubers because they are such a quick and easy solution to coloring just about anything. Need some – or need to make a last minute order of Designer Series Paper before the Buy 3 Get One Free sale runs out on July 31? Shop HERE if you’re in the United States.

Here’s the inspiration photo for the Colour Inkspiration challenge. It’s a Facebook group and you don’t need a blog – you can upload directly to their page to participate. It’s an absolutely lovely group of crafters, and the projects are always top notch.  Be sure to tag your post with #CI38.  Enjoy!

Maui Stamper Stampin' Up! Colour INKspiration 38