My Seriously Paper Pumpkin

I didn’t have my own April My Paper Pumpkin kit in hand when I got a sneak peek of the stamps in the kit.  SERIOUSLY.  No, seriously, that’s one of the stamps!  I was over-the-mango-tree excited.

When my kit hit the front lanai, I was ready.  For a warmup, I made the card JUST LIKE THE KIT:

Maui Stamper May My Paper PumpkinSeriously…I’m crazy about this kit!  What’s not to love?  It would be easy and satisfying to make all four cards just like this – no extra bits and pieces required – and have 4 great cards to send.  But seriously, who would want to read a post about that?  And I’m always ready for a little challege – so without further ado, we have cards 2 through 4:

Stampin' Up! Maui Stamper May My Paper Pumpkin(OK, I lied, there is a little further ado…)

A couple of circle punches, a doily sponged with More Mustard ink, a little snippet of Baja Breeze ribbon and some jewels made this mine.  That “FABULOUS” stamp is from an exclusive set we were given last year at Convention and I love the words and the fonts Stampin’ Up! chose for us.  (Looking forward to seeing our swag this year for our 25th Anniversary Convention!!)

Stampin' Up! Maui Stamper May My Paper PumpkinThis one is my second favorite – turned that big panel into flags with a couple of snips, wrapped the self-adhesive tag with the twine, and switched up the button.  DId you notice that I used the “splatter” stamp from the My Paper Pumpkin Welcome Kit?  Best all purpose stamp ever!

It’s hard to see, but I used my Midnight Muse marker on the edge of that button so that it would be a better match:

Stampin' Up! Maui Stamper May My Paper PumpkinI also dragged my Pokey Doodle through the ends of the Linen Thread to make them more whispy.

And now, my FAVE:

Stampin' Up! Maui Stamper May My Paper Pumpkin
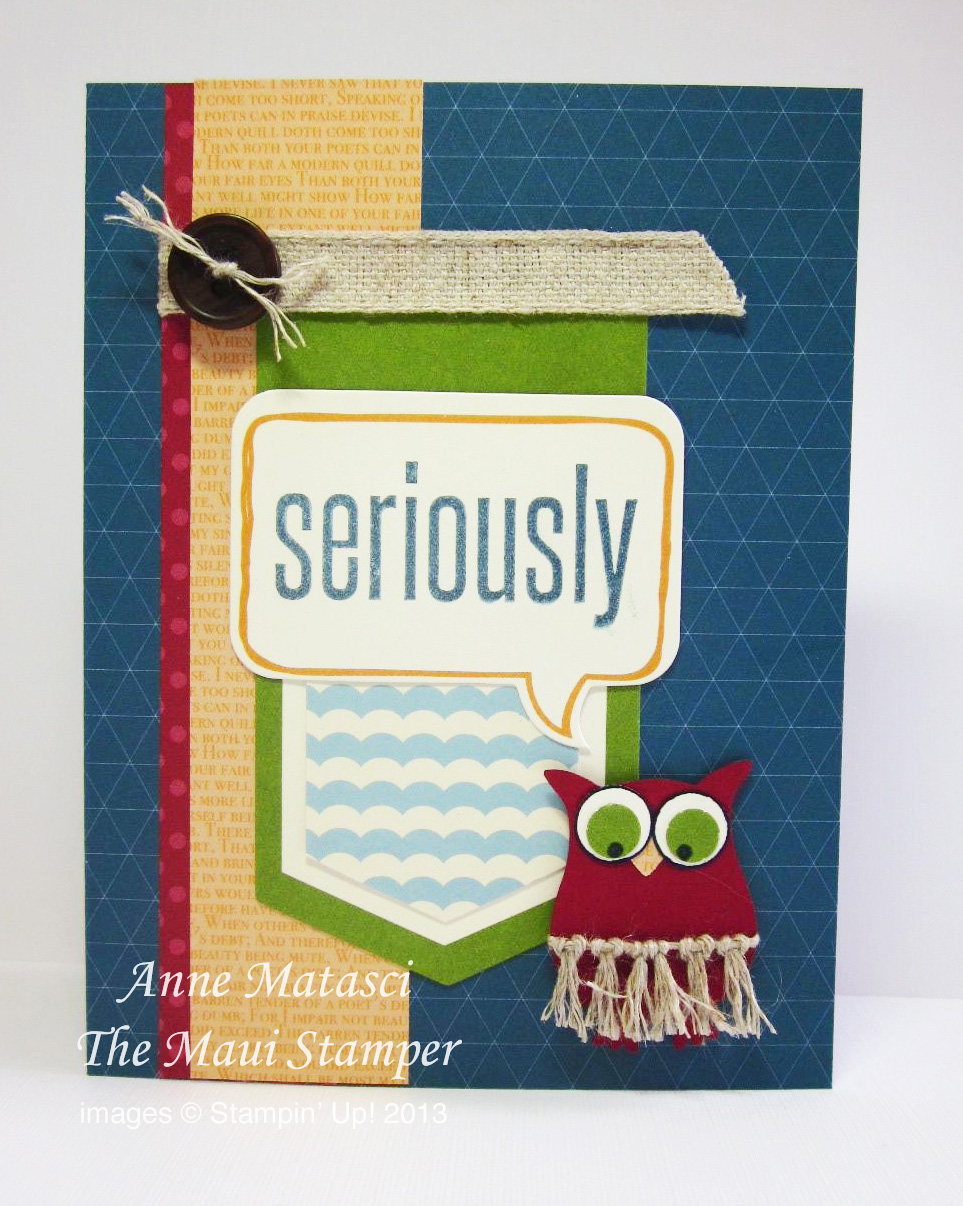
SERIOUSLY!!!  Who would put an owl in a grass skirt??  (Ummm…me!)  There were a number of cards on Pinterest (the biggest black hole on the planet) from this May Paper Pumpkin set that added a person or animal under the thought balloon, and I decided I would add the owl.  I kept looking for the right paper/DSP to use with the “clothes” that are on the punch but nothing was working for me.  I had the Linen Thread in my hands and before I knew it that poor owl was in Luau mode.  Considered a lei, but since s/he doesn’t have a neck that wasn’t working for me.

Stampin' Up! Maui Stamper May My Paper PumpkinBy now you must be thinking “How do I get my Seriously stamps?”

I’m sorry to tell you this, but My Paper Pumpkin is exclusive each month, and when it’s done, it’s done.  Seriously is done.

The good news is, you have plenty of time to sign up for the subscription service and never miss another!  Sign up before the 10th of June, and every month, the box will appear on your doorstep with everything you need except adhesive.  Your box will have  stamps, ink, paper, and/or accessories to complete the project, plus clear, step by step instruction.  Just open the box and make the cards!

Your welcome kit will include a clear block, and I’ll post ideas like these for you to play with.  Cost is $19.95 and that includes shipping – sign up or learn more at My Paper Pumpkin.

Perseverance

Bless you all for your perseverance!  Over the past few weeks, as I’ve found a minute or two to sit in front of the computer, I’ve been amazed to see the stats that tell me you are STILL checking in on the Maui Stamper!  Of course, I’ve gotten some odd spam-comments during the same time period.  My favorite was “check it out, Bro”.  Gotta love it.

How about we get straight to the card?

Birthday Owl

  • Sock Monkey accessories and Vintage Vogue stamp sets
  • Whisper White, Real Red, Early Espresso, So Saffron and Crumb Cake card stock
  • Real Red patterns Designer Series Paper
  • Early Espresso Classic ink pad; Real Red Stampin’ Write marker
  • Two Step Owl XL and 2 1/2 inch circle punches
  • Big Shot, Petal Cone Bigz die, Backgrounds Texturz plates
  • Piercing tool and mat; Linen thread

I’ve been on a Manly Card kick lately.  You’ll see more over the next week or so, as we did Manly cards at this month’s 2-5-10 card class.  This particular card was for my son’s birthday, and the owl was meant to convey wisdom as he was taking the SAT for the first time a couple of days after his birthday.   I decided to hand write the sentiment because I wanted it to fit Just So.  And yes, I pierced holes for the linen thread so I could tie the bow directly on the card.  And if you like the “DSP” on the center pennant, it’s the leaves from Vintage Vogue with little red berries added with my Stampin’ Write marker.

Renovation has been just short of complete insanity but I think we’re finally on the road back to normalcy (or what passes for normal in my life).  Perseverance in the face of adversity is one of my headstrong traits – some people might call it stubbornnes..

Builder Dan started making “I think we’re gonna wrap up this week” noises on Wednesday but I told him I’d heard that before.  Was I ever surprised on Friday when they packed up all their stuff and moved out!  I have to say that Dan, Les and Rick were truly a Dream Team.  They did a beautiful job and if you can believe it, I never heard a bad word from any of them!

Mr. Maui Stamper and I still have a lot of rearranging to do before everything will be 100% but it’s lookin’ good around here.  We have a new family room – although the guys were referring to it as the Media and Entertainment room.  Truth is, it’s a Man Cave, but it won’t be finished until the GINORMOUS flat screen TV arrives.  We are going to have life sized NFL players bashing their heads together in the Media and Entertainment room this fall; won’t that be exciting?!

I’ve started to move into the Maui Stamper Studio (please, help me find a better name than that) but it’s taking longer than I thought.  I’ve discovered that I keep way too much junk, so as I move across the hall from the Room Formerly Known as Carol’s Bedroom into the Room Formerly Known as Sara’s Bedroom I am getting rid of ridiculous stuff I am embarassed to admit I have kept (and I have no intention of embarassing myself by telling you!).  The space is luscious, though:

Big Shot storage

A Cupboard of its Own.  Can you believe it?  I’m going to need a different system for storing those dies, and fortunately the Stampin’ Up! catalog has just the thing.

Time to get going…there’s still work to do.


Whoooo are you waiting for?

These owls make me giddy.  I have a bunch of little jars on my craft table with Owl Bits in them…bodies, vesties, and eyeballs.  I punched out a bunch of the medium circles in white and the bitty eyeballs in Espresso and Chocolate and Black.  I discovered if I put that part together in a big batch that it saved a lot of trouble when it was time to finish my owls – I just reached into the eyeball jar and poof! there they were.  Now when I finish a project I check the scraps of paper before I brush them into the trash – anything big enough for Owl Bits gets punched and put in the jars.

Who Owl You Waiting For?

  • Word Play and Wood Grain stamp sets
  • Whisper White, Chocolate Chip, Old Olive, and So Saffron card stock; Playdate Designer Series Paper
  • Chocolate Chip and Crumb Cake Classic ink pads
  • Old Olive Stampin’ Write marker
  • Two-Step Owl and Bird XL  punches; Large oval  punch
  • Big Shot and Top Note Bigz die

There are a couple of little punchy tricks in this card that you might not notice.  One owl is sitting on branches that come from the Bird punch, but if you look carefully, the other owl is sitting on a little green patch that happens to be the wing from that Bird punch.  I’m sure all of you are much smarter than me and had this figured out already, but I recently discovered that the little heart that you get from the Owl punch makes a great owl-beak.  I’ll bet the punch geniuses did that on purpose.

You could make this card over and over again in so many colors…just keep an Owl Bits jar on your craft table and you’ll have Owls-in-a-Flash!

Owl Love You Forever

Is it me, or has this whole stamping business gone to the birds?

Owl Love You Forever

  • Woodgrain, Cheep Talk and Whimsical Words (retired 2010 SAB) stamp sets
  • Whisper White, Crumb Cake (Kraft), Riding Hood Red, Chocolate Chip and  Shimmer White card stock
  • A scrap of retired Riding Hood Red Designer Series Prints Pattern paper
  • Crumb Cake and Chocolate Chip Classic ink pads
  • Two-Step Owl XL punch; Curly Label punch
  • Big Shot;  Scallop Circles #2 die;  Movers & Shapers Curly Label XL Bigz die
  • Crop-a-dile and Kraft taffeta ribbon (retired)

This Two-Step Owl punch is hilarious and addictive.  I sat in my craft room the other night with a basket full of scraps and started punching out bits and pieces.  This is something you could play with for a very long time, mixing and matching colors and crossing and uncrossing the eyes.  Oh, yeah – you better believe I played with those eyes!  (Note to self:  tweezers are required for those itty bitty eye-bubs that go in the middle.)  And it wasn’t until I got everything all put together that I realized you could use the bottom of the heart for a little beak.

The mat on the Curly Label punch is the piece that is cut out when you use the Movers & Shapers XL die with the Curly Label insert.  It works the same way with all the other magnetic inserts – isn’t that tricky?  I made the hole for the taffeta ribbon with the Crop-a-dile since my favorite double rectangle punch is now retired.  I am TRYING to be a good demo and use only current supplies, but I’m tellin’ you, it’s not easy!  Take that kraft ribbon as an example.   Stampin’ Up! is an awesome company and I’m thrilled with the Color Renovation and all the cool new goodies we’ve seen added to the catalog, but what was wrong with leaving us a little bit of Kraft Taffeta ribbon?   They could even re-name it Crumb Cake Taffeta Ribbon – that would be OK.  There’s a little stash in the ribbon drawer, so you may see it from time to time.

You’ll be seeing more of these owls, too.