LLAMA CHRISTMAS OR LLAMA CELEBRATION??

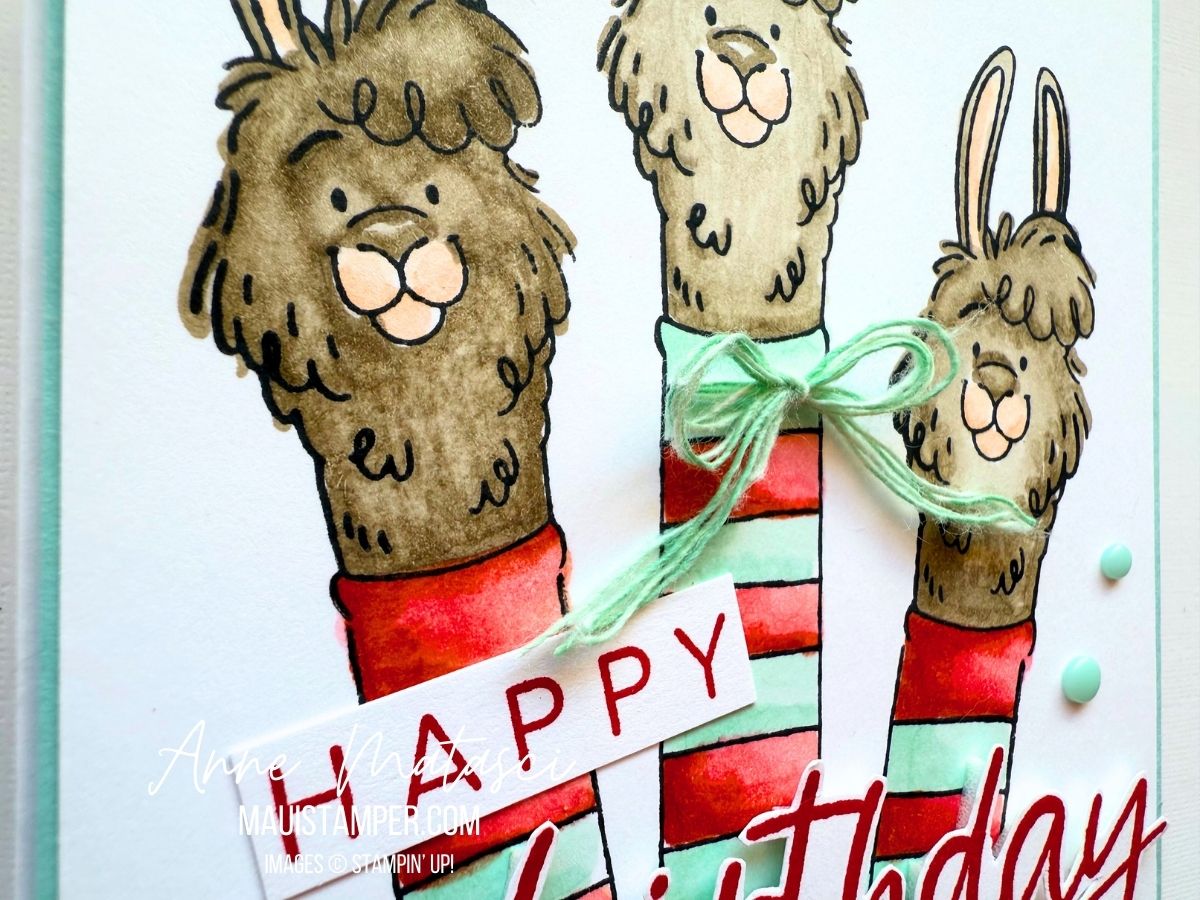
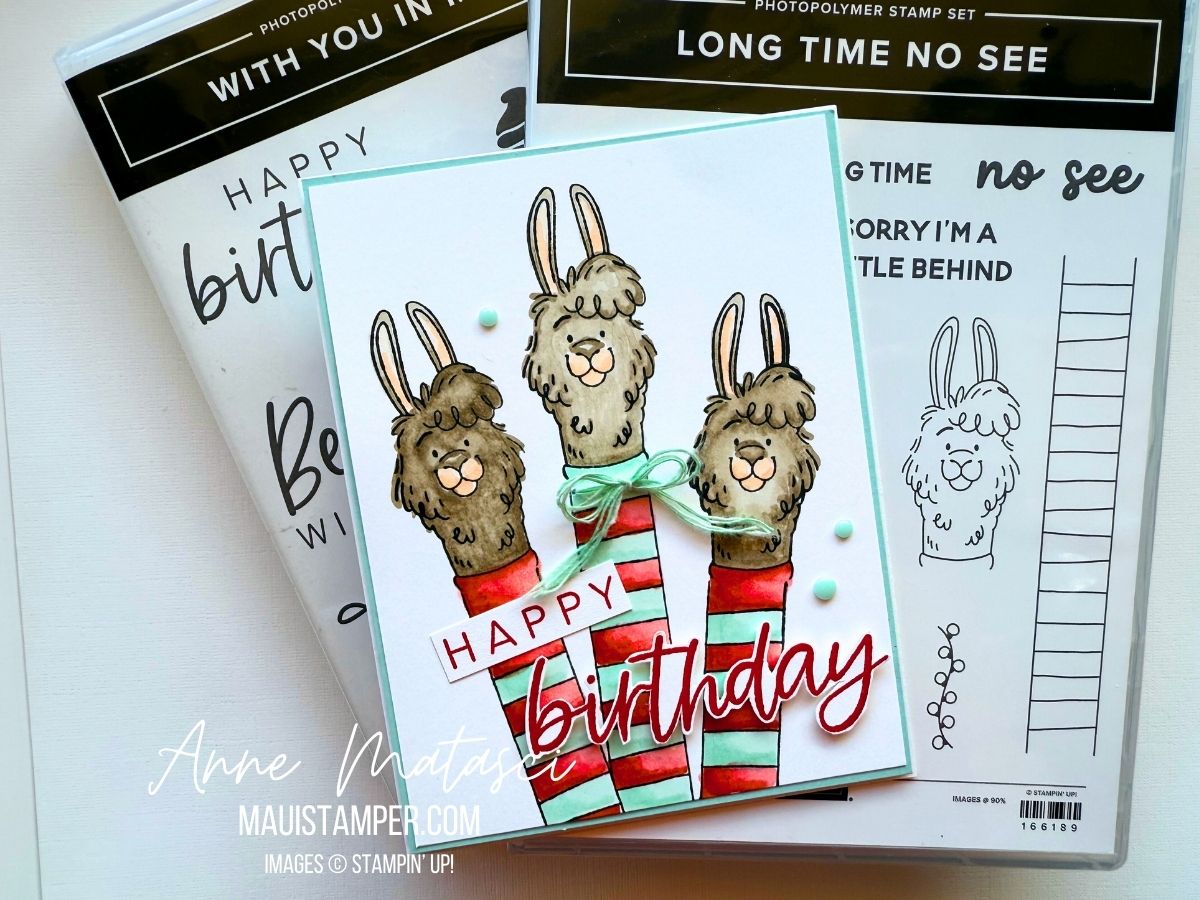
Llamas are back – this time in landscape! Their necks aren’t quite as long, but there’s room for more of them, and more llamas can only be a good thing. Please tell me you agree.

  • Stamps: Long Time No See, Spooky Halloween
  • Color Palette: Basic White, Memento Black, Gray Granite, Smoky Slate, Lost Lagoon, Granny Apple Green, Poppy Parade
  • Accessories: Stampin’ Blends, Paper Snips (no longer available), Sweet Sorbet Bordered Ribbon (retired)

I really wanted this to be a Christmas Card, but when I switched out the sentiment I had second thoughts. This sentiment is from Coneflower Celebrations, and I think it fits better. Ugh. I need to find order a Christmas sentiment this shape!

Either way, this card was colored with Stampin’ Blends much the way Tuesday’s card was. The llama-neck-sweaters have 3 colors, and if you look closely you’ll realize that some of the llamas are Smoky Slate and some are Gray Granite. Those funny starry background bits are from Spooky Halloween, because it was sitting on my desk begging to be included (Yes, the stamps talk to me, and I respond. And yes, that probably means I’m certifiable.)

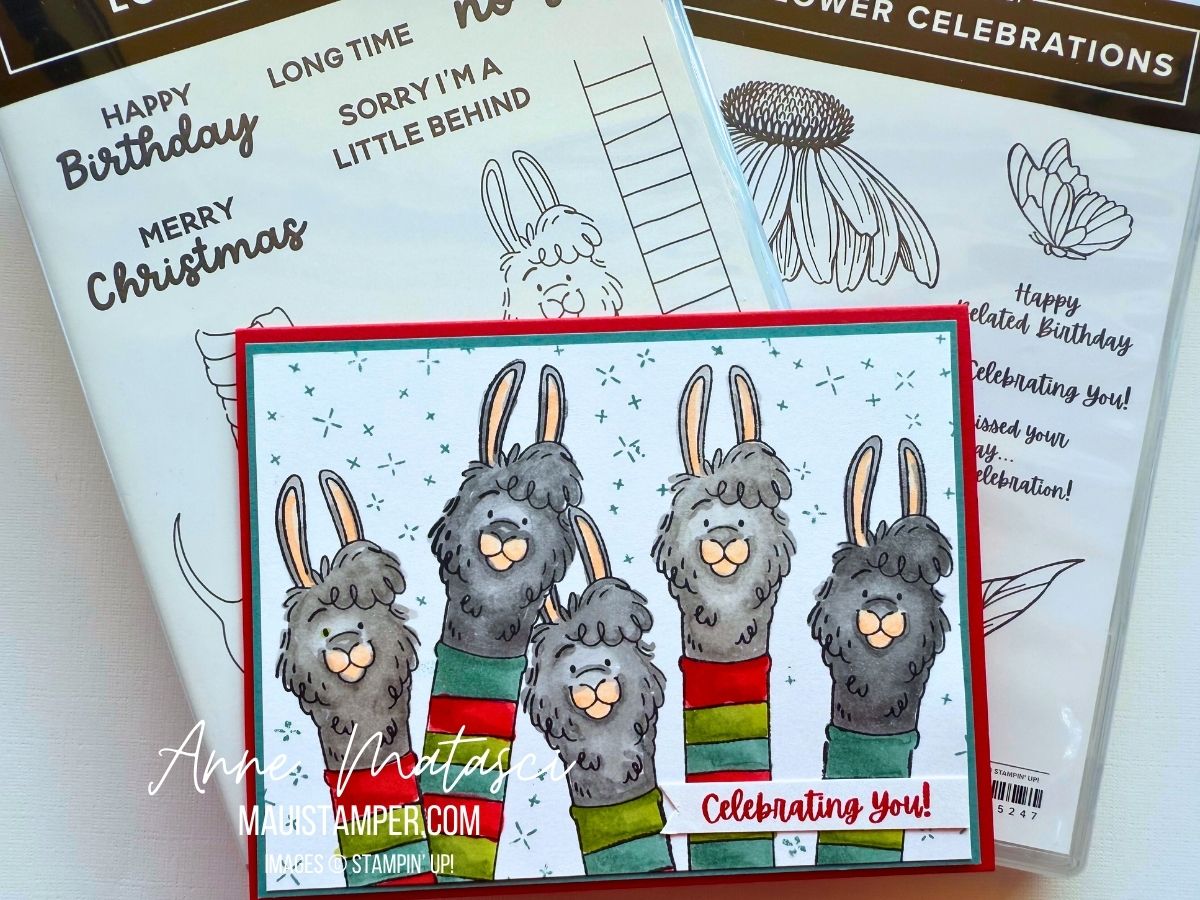
Look at their perky ears! They’re waiting for you to tell them how handsome they are!! Go ahead, make their day. And then shop the Online Store for your own perky llamas.

Processing…
Success! You're on the list.

LONG TIME NO LLAMA!

The only reason there isn’t a llama on my September DIY Calendar is that even without a neck it’s too tall. But there’s plenty of room on a card, especially a portrait-oriented card: check out my llamas from Long Time No See!

  • Stamps: Long Time No See, With You In Mind
  • Color Palette: Basic White, Memento Black, Crumb Cake, Petal Pink, Poppy Parade, Pool Party
  • Accessories: Stampin’ Blends, White Bakers Twine, Party Dots, Stampin’ Dimensionals, Take Your Pick tool, Paper Snips (no longer available)

I took my time with this one, and it was really fun. I shaded each of the llamas a little differently, but kept their llama-neck-sweaters the same colors. (Please tell me you get the joke.)

I used the Pool Party Stampin’ Blend to color some White Bakers Twine, then poked holes to wrap it around the tallest neck. For some reason, I’ve been obsessed with deconstructing the twine lately – no idea why, I just do it.

I also indulged a whim and fussy cut the word BIRTHDAY from With You In Mind. I tried a number of sentiments on labels and banners, but this is what the card told me it needed. (Yes, I talk to the cards. And they answer me.)

Long Time No See is an Online Exclusive from earlier this year, so who knows how long it will be around. I’m happy to have it as I love these dorky faces with their dorky noses! Add a little whimsy to your crafting. It’s good for your soul.

Processing…
Success! You're on the list.

PATTERNS OF FRIENDSHIP: THE BIG DIE YOU DIDN’T KNOW YOU NEEDED

I initially overlooked Patterns of Friendship because the stamps didn’t stand up and shout at me. But when I started seeing projects with this amazing texture, I went back to the Online Store and looked again, and there she was: the Patterns of Friendship die.

  • Stamps: Gallery Blooms, Elements of Text, Country Flowers (retired)
  • Color Palette: Basic White, Cloud Cover, Fresh Freesia, Daffodil Delight, Granny Apple Green
  • Accessories: Stamp Cut & Emboss Machine, Patterned Friendship dies, Gallery Blooms dies, Textured Notes dies, Stylish Shapes dies, Cloud Cover Faux Linen Ribbon, Floral Impressions DSP, Stampin’ Dimensionals

Have you added one of the In Color Faux Linen Ribbons to your crafty stash? Oh, my – it’s gorgeous! I sliced this one lengthwise and used just a single strand to secure the bundle. That keeps the bow a little softer and mailing-friendly.

Gallery Blooms are perfect for coloring, and I used Stampin’ Blends this time. This closeup reveals a little detail: I used a scrap of Floral Impressions DSP behind the sentiment. It’s a little extra bit of texture in a card that’s already bursting with texture.

The Patterns of Friendship die is 6″ x 6″ so you can cut your panel to run either horizontally or vertically. If you look closely, you’ll see that the rows of little dots are balanced so that a 4″ card stock panel lands exactly between the rows. I love those kind of (semi-OCD) details.

I’m a bit of a texture nerd, so you can imagine how pleased I am with this new die. (Bonus: when you peel the card stock off the die, it makes a very satisfying noise.) There are multiple layers here: the dies, the paper layers, the DSP, and that big crazy ribbon. Have fun with it! You can find everything you need in the Online Store.

Processing…
Success! You're on the list.

USE UP THAT DESIGNER SERIES PAPER STASH!

If you’ve been crafting for a minute or two, you probably have a stash of Designer Series Paper (DSP). Maybe you bought the pack for one design that you loved and the rest has been untouched. Maybe you’ve used most of the pack but there are just a *few* sheets left. Or maybe you just bought too much and need to use it before you buy more. (Ugh, the truth can hurt.)

  • Stamps: Perfect Pears
  • Color Palette: Basic White, Daffodil Delight, Flirty Flamingo, Mossy Meadow
  • Accessories: Stamp Cut & Emboss Machine, Textured Note dies, Painterly Pears DSP, Daubers, Blender Pen, Low Profile Dots, Stampin’ Dimensionals

I am obsessed with coloring the pears with Daubers, and love that every time it’s just a bit different. I pulled the color palette from the DSP and added a bit of Mossy Meadow to the edge for a little drama. The sweet row of blossoms under the writing panel is stamped in Daffodil Delight and has a little center added with a Blender Pen.

If I may be so bold as to say it, if you don’t have the Textured Notes dies, Do Not Pass Go, Do Not Collect $200, just click on ADD TO CART. (There. I feel better.)

My dear crafty buddy Sharon showed me this great fun fold. Score a standard 8 1/2″ x 5 1/2″ in the center (4 1/4″) and also 1 1/4″ from either end (that’s 1 1/4″ and 7 1/4″ if you need the exact numbers). It creates a perfect canvas for DSP.

Everything else is just cut-and-mat DSP! This is another quick and easy card to assemble, and it features my favorite “just enough room for I-Love-You” writing panel. Those Low Profile Dots are a great product for cards you intend to mail, too. I usually put a piece of card stock over the front of a card when I mail it, but it’s almost not necessary with these Dots.

The Perfectly Pears bundle is a great option to add color and variety to your crafty stash. There are flowers, sure, but they’re quite understated. It’s all about the pears – and of course, that gorgeous Painterly Pears DSP. Try it, you’ll like it.

Processing…
Success! You're on the list.

SUNFLOWER TOTE

The Sunflower 3D Embossing Folder was at the very top of my July Online Exclusives list. It’s the large format 6″ x 8″ folder, so the options are endless for cards as well as 3D projects. I turned it into a sweet little tote.

  • Stamps: Spring Corners
  • Color Palette: Basic White, Darling Duckling, Timid Tiger, Mellow Moss
  • Accessories: Stamp Cut & Emboss Machine, Sunflower 3D Embossing Folder, Spotlight on Nature dies, Spring Corner dies, daubers, 25-27 In Color Flat Pearls, Paper Snips (gone 😭), Mossy Meadow 1/4″ Gold Ribbon, Stampin’ Dimensionals

It’s quick work to color the embossing folder with daubers. I began by dragging my Mossy Meadow ink pad lightly across the side of the embossed card stock where the sunflowers were recessed. (It’s called the debossed side, but who knows that?) Add ink to the design using daubers, and the result is a rustic, homespun look. If that’s not your style, use Stampin’ Blends, Watercolors, or Watercolor Pencils – but it will take a lot longer!

The handles are two big Spotlight on Nature circles, cut with a smaller circle centered inside. TIP: if you use washi tape across the circles, you can get an even and repeatable ring. Just be sure to take some of the stickiness off the washi by pressing it onto whatever you’re wearing once or twice so it doesn’t tear the paper when you remove it. There’s something about sending it through the Stamp Cut and Emboss Machine and smashing the daylights out of it that makes it want to stick to paper.

My tag is hand cut. I used a piece of chipboard from the back of a DSP package to make a pattern for the angles at the top. I snipped the corners with my Paper Snips and added the corner die cut from Spring Corners, along with a tiny 25-27 In Color Flat Pearl. A bow with the Mossy Meadow and Gold ribbon finishes it off!

Paper Snips, we will miss you. 😭😭😭 They sold out in a hot minute after Stampin’ Up! announced that they would no longer be available from the manufacturer. Stay tuned for an update on a replacement. In the meantime, take good care of your Snips!

Processing…
Success! You're on the list.

CHARMING (BIRTH) DAY

Have you seen Charming Day? It’s a new Online Exclusive, and yes, it’s another flower set. Telling myself “NO more flowers!” doesn’t seem to be working very well. In this case, it was the sentiments and the fonts that pushed me to Add To Cart. 😆

  • Stamps: Charming Day, Spotlight on Nature
  • Color Palette: Basic White, Strawberry Slush, Pretty in Pink, Daffodil Delight, Granny Apple Green
  • Accessories: Stamp Cut & Emboss Machine, Charming Day dies, Impressions Abloom dies, Floral Impressions DSP, Stampin’ Blends, Blending Brush, Stampin’ Dimensionals

I used a couple of tricks to make this easy. I used a Blending Brush with Pretty in Pink ink to create a light wash of color on my Basic White card base, then added a few textural elements from Spotlight in Nature. I inked the words on the sentiment separately so that I could offset them on the card front.

I cut the DSP and the mat to size and used just a little adhesive to hold them in place, then ran them through the Big Boss together. DSP is lighter weight than card stock, so the two pieces cut through cleanly. I pulled out the center ovals, then finished adhering the card stock and DSP and added them to the card front. The stitched frame on the inside fits inside the opening, so it needs to be carefully glued into place.

The Floral Impressions DSP is all about gorgeous florals, but the “B” sides of the papers are gorgeous tone-on-tone designs. So many options! Time to get crafting, friends.

Processing…
Success! You're on the list.

DIY CALENDAR BLOG HOP: JULY 2025

I blinked and it was July. We have 6 months of beautiful DIY Calendars behind us, and 6 ahead – so let’s get started with this one! I’m featuring a brand new set, available today, called Perfectly Pears.

  • Stamps: Perfectly Pears
  • Color Palette: Basic White, Old Olive, Granny Apple Green, Daffodil Delight, Lemon Lolly, Darling Duckling
  • Accessories: Stamp Cut and Emboss Machine, Perfectly Pears dies, DIY Calendar Template, Daubers, Blender Pen, Masking Paper

Not much to this one! The outlines were first, done in Old Olive. I inked the pears in Darling Duckling, then added some Granny Apple Green with a dauber. I gave them the lightest of mists before I put them to paper. The flowers are outlined in Darling Duckling, colored with a Blender Pen in Daffodil Delight and Lemon Lolly. I added Granny Apple Green to the centers because there was a lot of yellow.

I die cut the leaves and added them across the top for a little dimension. I considered die cutting the “front” pear but yeah, nah. The leafy branch isn’t included as a stamp, so it had to be a die cut.

You can find Perfectly Pears in the Online Exclusive release for July. But I’m warning you, there are a lot of glorious new products in the Online Store!

Ready to see what the rest of the DIY team has done? Click the button below to see! And thanks for stopping by this month.

2026 Calendars will be available in September!

Processing…
Success! You're on the list.

HAPPY HIBISCUS WITH THE FOREVER PLAID EMBOSSING FOLDER

Happy Hibiscus looks great in shades of yellow, but don’t you think it’s gorgeous in Fresh Freesia?

  • Stamps: Happy Hibiscus, Ice Cream Swirl (sentiment)
  • Color Palette: Basic White, Fresh Freesia, Petunia Pop, Highland Heather, Lemon Lime Twist, Granny Apple Green
  • Accessories: Stamp Cut & Emboss Machine, Happy Hibiscus dies and Hybrid Embossing Folder, Forever Plaid 3D Embossing Folder, Changing Leaves dies, Iridescent 1/2″ trim, Stampin’ Dimensionals, Paper Snips

I did a bit of fussy cutting on the sentiment and set it on the small oval from Changing Leaves. I added Iridescent 1/2″ trim to soften the leaves – it’s a beautiful accent trim.

Happy Hibiscus is an Online Exclusive– search for it by name in the Online store and add it to your crafty toolbox!! It’s a great choice for Sale-a-bration 😉

(Between the two of us, I bought an extra bundle for myself just in case I lose anything. This one is a keeper!)

Processing…
Success! You're on the list.