Welcome to 2019, Bloom by Bloom

Happy New Year!

I thought an auspicious beginning to 2019 would be bold and happy color, and the new Bloom by Bloom set that debuts on Thursday (January 3) seemed like the perfect choice for such energy:

Maui Stamper Stampin' Up! Bloom By Bloom 2019 DIY Easel Calendar January

Don’t you love it?? I’m delighted to have this on my desktop all month! Bloom By Bloom is a photopolymer stamp set and it was at the top of my list for the 2019 Occasions catalog. My color palette is Pineapple Punch, Mango Medley, and Gray Granite – a perfectly tropical confection! The images are masked using sticky notes, adding a sense of depth with a single layer project.

Maui Stamper Stampin' Up! Bloom By Bloom 2019 DIY Easel Calendar January

The DIY 2019 Calendar is available as a PDF – you print and cut – for $5. If you’d like to make your own calendar, send me a message and we’ll get the calendar in your hands.

Click on over to see what Cheryl and Crystal have done for January!

And if you’re ready to shop, click HERE.  What a great way to start the New Year!

(Gift) Wrapping up Holiday 2018

<OH MY.  This was scheduled to publish a week ago…but things happen. Enjoy!>

Ah, it’s been a glorious few weeks! At this stage of my life, the holidays are all about relationships. I’ve celebrated with my beloved family and dear friends and my precious church community as well, and my heart is full. There are things that I didn’t finish this year, but when all is said and done, I reflect on 2018 with deep gratitude.

But let’s have one last Holiday post, shall we? You can file this under “tags to make now so I’ll be WAAAYYY ahead of schedule in 2919. LOL.

Crystal came up with this tag – I think it was a CASE – and I absolutely love it. It has a stepped up clean and simple aesthetic and is perfect for any gift recipient. The Candy Cane Season stamps and punch (available as a bundle) are retiring on January 2, so if you love this one, don’t delay.

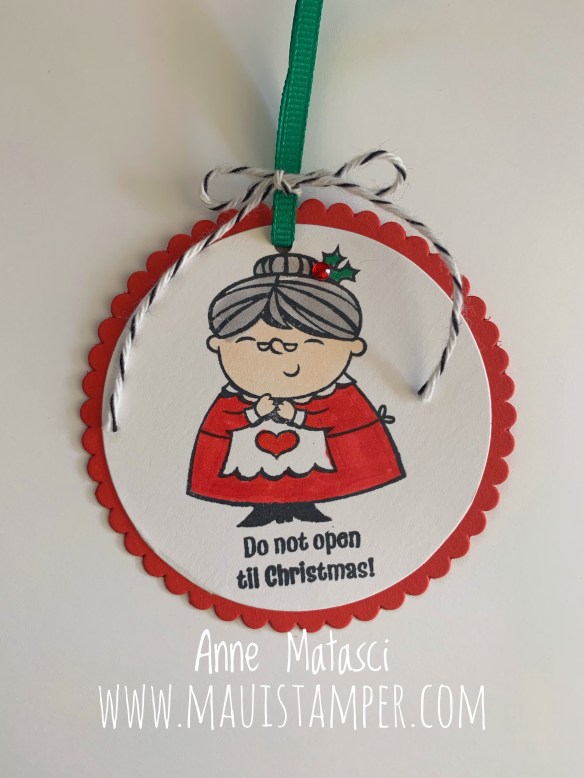
Same shape, entirely different feeling! Mrs.Claus looks pretty gleeful about this whole gift-giving deal, and this tag would be perfect for sweet treats or a gift to that person who always peeks (you know who you are – I have a few of those people in my extended family!)  She’s part of Signs of Santa.

This is also Crystal’s design. The tag is vellum and it is oh-so-elegant. The Pretty Label is re-purposed as an ornament, punched out of shimmer white with extra detail from the Quilt Top TIEF. A few Soft Seafoam sprigs and an Old Olive tiny bow complete the look.

I was invited to exchange with a group that has been at it for years, and it was a delightful experience! They all bring tags under wraps and then the tags are distributed so that everyone in attendance can guess the crafter. As the New Kid on the Block, I was clueless, so I assigned the tags based on the order we were seated around the table and got a score of 4 out of 12 correct!! Not bad for desperation, I’d say.

JoAnn made a gorgeous tag with a retired ornament stamp and silver embossing powder.

Iris used cupcake papers for this charming Christmas tree tag!

Donna used the retired red Glimmer Paper (oh, how I’ve missed that this year…hint, hint, Stampin’ Up!) for this sparkly tag.

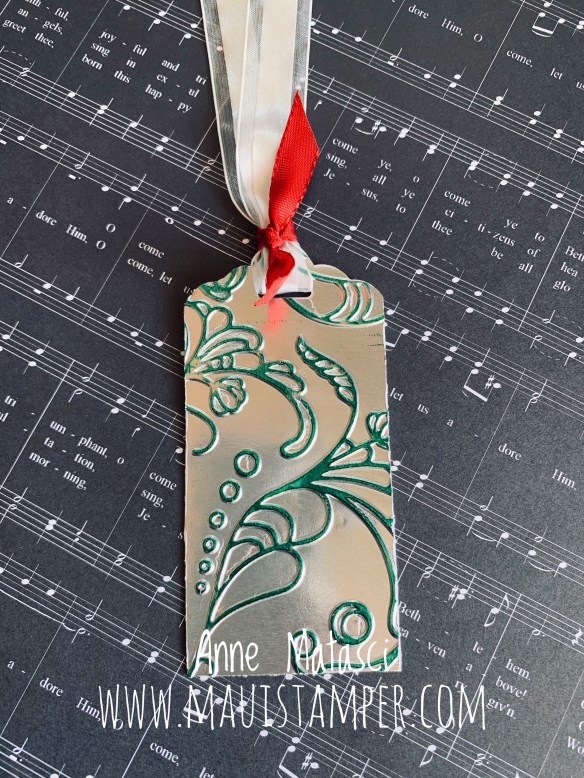
Helen made this elegant rage with a retired TIEF and silver foil paper.

Caroline featured the red Glimmer Paper with this gorgeous poinsettia overlay from the Detailed Poinsettia Thinlets.

Diane brought out the silver foil and red jewels for this classic stunner.

Crystal made this gift card envelope with the retired but immensely popular Santa Hat punch.

Gloria used the gorgeous wreath and bow from the Wishing You Well set and took the time to cut out all those bows!

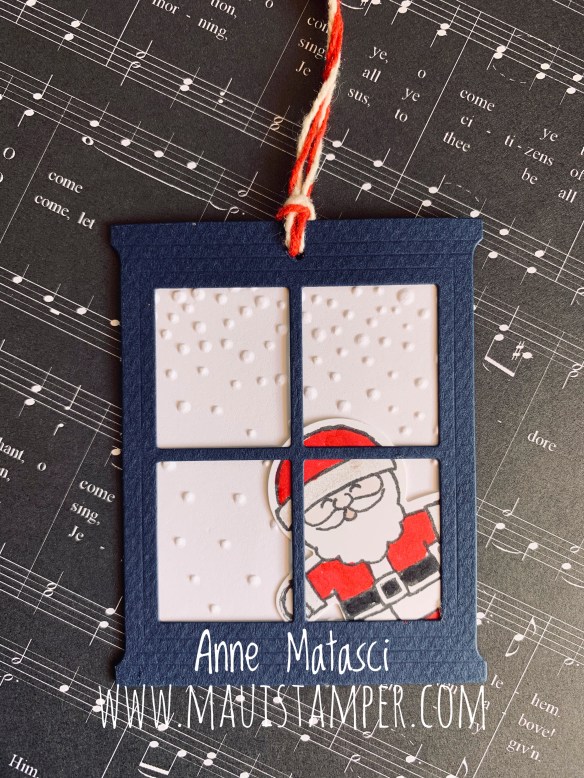
Harriette also brought out a retired favorite framelit and used the Cookie Cutter Christmas and Softly Falling TIEF for this classic holiday tag.

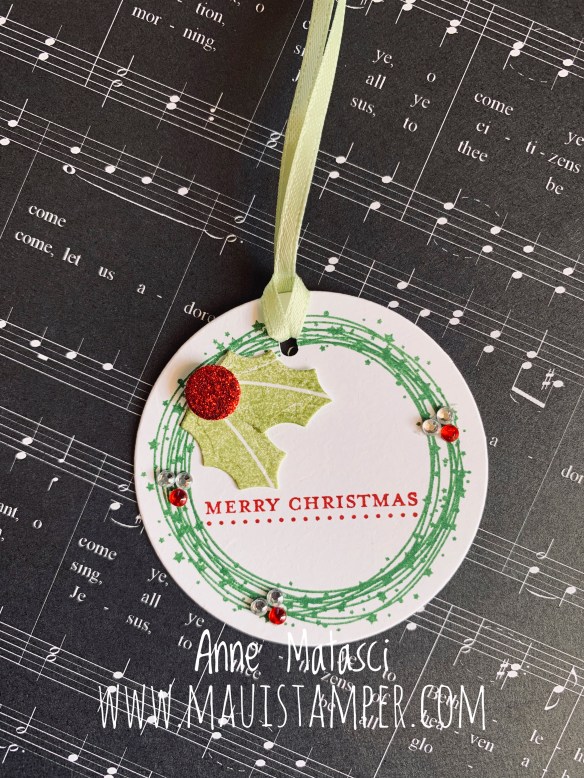
Joyce created this beautiful Christmas wreath with holly embellished tag. I think we need another holly punch in 2919, don’t you?

Alice creates this charming snowman tag with the retired Warm Wishes set.

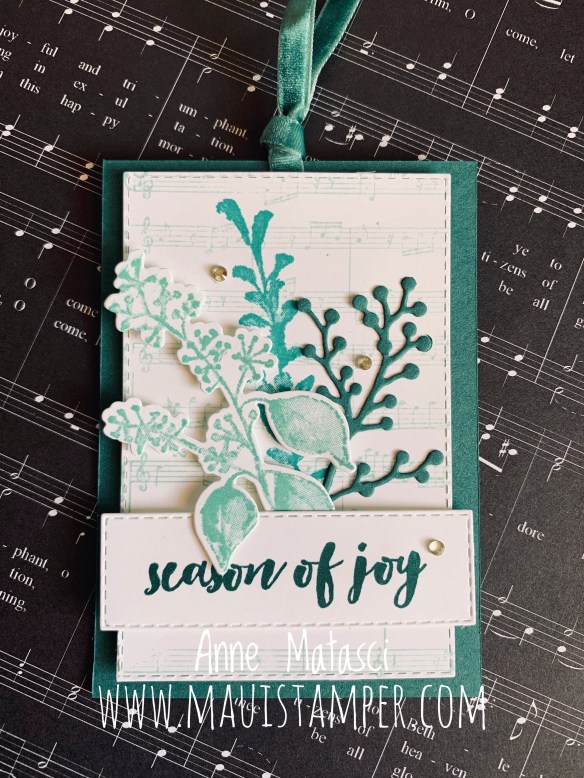
This was my contribution. I used First Frost and my favorite color palette of Tranquil Tide, Bermuda Bay and Coastal Cabana.

Tuck these ideas away for next year – it will be time to start those projects before you know it!  Shop for supplies HERE.

Holiday Goodies!

We had a little Christmas fun last week:

Maui Stamper Stampin' Up! Holiday Goodies

This Host Club is BIG ON GOODIES!  This year we had a gorgeous selection of treats to share while we crafted holiday tags and gift card holders.

Maui Stamper Stampin' Up! Holiday Goodies

Robbie made these adorable boxes full of Kisses. She’s the Mother of Holiday Goodies, with treats for us all through the year. It’s fun to see what she brings, because she usually has a selection of crafting supplies “from the archives”. There are some fond memories in these crafty little packages!

Maui Stamper Stampin' Up! Holiday Goodies

Vicki assured me that these little houses are Stampin’ Up!, and they probably are – I just don’t remember them. (That seems to be happening a little more often lately…) I know I recognize that DSP, although I can’t begin to tell you where it appeared.

Maui Stamper Stampin' Up! Holiday Goodies

I do my best to be current, so this is the Takeout Thinlit dies from the 2018 Holiday catalog (hurry, they’re retiring!). If you look closely, you might spot some retired embellishments, though. It’s amazing what you find when you’re cleaning out your stash! These boxes are crafted in vellum and are perfectly sized for Ferrero Rocher.

There are still great deals in the Year End Closeouts.  Supplies are limited.

Merry Christmas Thinlits

I have a weakness for die cut words. When I spied the Merry Christmas Thinlits in the Holiday catalog, my radar went PING PING PING.

Maui Stamper Stampin' Up! Merry Christmas Thinlits

I used a pencil to trace the inside of the Stitched Shape Oval die on the front of the card. It’s a smaller oval than the actual die cut, so it won’t show once the card is completed, but it provides a stamping guideline to get all of those branches in place before adhering the oval.

Maui Stamper Stampin' Up! Merry Christmas Thinlits

You’ll definitely want to use the Precision Base Plate for these foil letters. The foil shows any little bump or bruise, but the Base Plate smooths all of that out.

I used the Shaded Spruce sprigs as they were, but I cut the Silver Foil sprigs in half. The silver is an accent here!

Maui Stamper Stampin' Up! Merry Christmas Thinlits

These elegant card bases are quick and easy to use, and come with a coordinating envelope that really finishes the look. If you haven’t quite gotten to your holiday cards, these will step up your design in a flash! They would make fabulous New Years cards as well, and there’s no shame in sending those, either.

Need supplies?  Shop HERE.

Goodies and Crafties and Santas, oh my!

The elves have been very busy – and on Saturday, we’re setting up our tables and hoping you’ll come shop with us! The 4th Annual Waikapu Gardens Christmas Street Fair is this Saturday from 8am until noon on Ulu Kanu Street. Santa will make an appearance, and the Maui High School choir will be filling the air with holiday music.

I’ve been a busy elf myself, making cards, gift packaging and a few small gifts for your shopping pleasure. These deluxe gift card holders are created to showcase your gift card and provide space for your handwritten note of appreciation:

Maui Stamper Stampin' Up! First Frost Deluxe Gift Card Holder

I’ve added a strip of adhesive to the back of the note card – just peel and stick your gift card. The envelope is a beautiful, heavy weight foiled paper from a few years ago that I’ve had stashed.  I should have made these a long time ago!

Maui Stamper Stampin' Up! First Frost Deluxe Gift Card Holder

The Merry Merlot band slides smoothly over the envelope to create a smooth, elegant finish to your gift.

If you’re on Maui this weekend, stop by and see us!  Shop local, shop your community!

It’s hard to believe December is here…

…the past few weeks have been such a blur! Travel, events, and a few unexpected moments have kept me on my toes.

As a result, I’m focusing on the comment a friend shared recently. She said she finds herself saying “At least…” quite often. As in, “I missed every green light on the Pi’ilani Highway, but at least I wasn’t in an accident.” It’s an attitude of gratitude I try to cultivate.

So I’ve been busy, but at least I’ve been healthy, happy, and even productive. Here’s the last calendar of 2018 – I hope you’ve been inspired!

Maui Stampers Stampin' Up! DIY Easel Calendar 2018 Santa's Workshop

  • Stamps: none!
  • Color Palette: Whisper White, Real Red, Garden Green
  • Accessories: Big Shot, Santa’s Signpost Framelits, Red Glimmer Paper (retired), Santa’s Workshop Specialty DSP (sold out), Everyday Label Punch, 1/2″ circle punch, Stampin’ Dimensionals

Maui Stampers Stampin' Up! DIY Easel Calendar 2018 Santa's Workshop

I was preparing to stamp images on this calendar when this DSP caught my eye. I have to confess that since it’s sold out of the Holiday Catalog, I’ve been reluctant to use it. But how could I not?

Maui Stampers Stampin' Up! DIY Easel Calendar 2018 Santa's Workshop

Would you like to make your own DIY Easel calendar? The calendar pages are 3 1/2″ square and are available as a PDF complete with cover pages (should you want to make them for gifts) and cutting instructions. You may print as many as you like for your gifting needs. Cost is $5, and all I need is your email to get you started.

Stop by and see what Crystal and Cheryl have done for December!

Snowflake Showcase Final Hours!

There are just a few hours left for these elegant snowflakes!

Maui Stamper Stampin' Up!  Snowflake Showcase Limited Edition 2018

I paired the snowflakes made with the Snowfall Thinlits with images from Beautiful Blizzard.  The sentiment is embossed with White Embossing Powder, and the snowflakes are inked in Versamark for a more understated look.

Maui Stamper Stampin' Up!  Snowflake Showcase Limited Edition 2018

The white snowflake is cut from Shimmery White. It’s such beautiful paper, and it really adds another layer of grace to an already elegant image. The silver Glimmer Paper is a luxurious touch as well.

Maui Stamper Stampin' Up!  Snowflake Showcase Limited Edition 2018

I struggled with layering the snowflakes – and which jewel to put in the center. I guess it’s kind of a mom thing: I love them equally.

You’ve got until 11:50pm Mountain Time tonight (November 30) to order the thinlits. Get them HERE.

The month of gratitude

Every month, every day is an occasion for gratitude, but November makes it official. I’m not consistently faithful to journaling, but this month I’ve made a commitment to observe and reflect, keeping a daily journal to record the process.

I’m tremendously grateful for the opportunities that I’ve had through Stampin’ Up! I’ve made amazing friends, traveled to wonderful events, and found incredible inspiration through this craft medium. I LOVE working with paper – it’s cheap! If you don’t like something you’ve made, THROW IT AWAY. I’m a bit of a hoarder, and it’s taken me a while to learn that one, but that’s my nugget of wisdom for today. If you don’t love it, pitch it. Don’t keep it around to make you crazy.

I also love where I live – Maui is a very special place – and I’ve chosen to celebrate Hawaii in my November calendar:

Maui Stamper Stampin' Up! Waterfront DIY November 2018 Easel Calendar

  • Stamps: Waterfront, Love What You Do
  • Color Palette: Whisper White, Crumb Cake, Early Espresso, Tranquil Tide, Bermuda Bay, Coastal Cabana, Pool Party, Daffodil Delight, Calypso Coral
  • Accessories: Sponge Daubers

The Waterfront stamp set is one of the most versatile in the entire catalog. If I lived on an island in the middle of the ocean, this would be one of my keepers. (LOL. Obviously, it’s a keeper!)

Maui Stamper Stampin' Up! Waterfront DIY November 2018 Easel Calendar

I inked up the round shape in Waterfront with Daffodil Delight and daubed some Calypso Coral on one side to hint at a setting sun. I’ve tried creating sunset skies and been unhappy with the results (see above: they are history!). I’ll let the sun set on its own.

Maui Stamper Stampin' Up! Waterfront DIY November 2018 Easel Calendar

This year, I’m selling the 2019 calendar PDF. You’ll get the calendar itself, a page of covers to print if you’re making gifts, and a cutting guide. Cost is $5. Leave a comment if you’re interested and I’ll send you an invoice!

Go find a little more joy with Cheryl and Crystal – they’ve also created November calendars for your delight.

Need Waterfront or any other fabulous Stampin’ Up! products? Shop HERE.

Apron of Love in Lovely Lipstick: CI43

I hinted in my Guest Designer post (oh, it’s luscious to say that!) that I’d made other versions for the Colour INKspiration #34 challenge. The challenge is to use the 2018-2020 In Colors – 1, 2, 3, 4, or all of them – combined with neutral colours.

I’ve seen some gorgeous cards done with multiples of the In Colour palette, and I must acknowledge that it was a lack of inspiration on my part to find them difficult to use together. The 2018-2020 colours are bold, and I’m typically not a bold-combo crafter. That said, I created a card using Lovely Lipstick that’s kind of fun:

Maui Stamper Stampin' Up! Apron of Love CI43

I have a couple of tips for you. The first one is regards to the Buffalo Check stamp. I’ve always bought my background stamps as wood mount, and that’s what I did with this one. I’ll be honest: you can get a great impression with the wood mount stamp, but it takes some effort. My technique is to lay the stamp on the wood side, rubber up, and thoroughly ink it with an ink pad. Inspect the inked stamp for even application. Carefully place your card stock panel onto the inked rubber, and cover with a piece of scrap paper. (This step keeps you from getting ink on your brayer.) Use a rubber brayer over the surface of the paper-covered-stamp to thoroughly transfer the ink to the paper. You can use your fingers, but the brayer is more accurate.

If I were to do it again, I’d buy the clear mount stamp and use the Stamparatus.  It’s a much quicker, easier process!

To get those apron strings and fabulous kitchen utensils to release from the Apron Builder Framelits, you need the Precision Base Plate.  I know, I know, your craft budget is limited. But this is a paper-saving, time-saving, hunk-a-hunk-a paper-crafting love, and you will thank yourself again and again for this small investment. I bought one when they first came out, and have used is constantly ever since, and it’s still working like a champ.

However, our Standard Cutting Pads need to be replaced more often. They’re acrylic, and the dies really chew them up. Do yourself a favor and get new ones with your next order. I know you can put them in the oven and run them through your dishwasher and send them to the dry cleaners (not really!) to give them another life. But get the new ones. You deserve it.

Maui Stamper Stampin' Up! Apron of Love CI43

Don’t overlook the Make a Difference stamp set. It has both block and italic letters, and it’s photopolymer, so you can see just where you’re placing them. You know you’ve got something special you want to say!

If you’re still with me, well, thanks for reading along. And be sure to check out the Colour INKspiration Facebook page. You won’t meet a nicer, more supportive group of creative people! You’re welcome to join the group and contribute, and I recommend it!

Need stamps? Shop HERE.

Spooky Nights

I don’t have kids at home any more, and there aren’t too many kids in my neighborhood. As a result, my Halloween decorating and crafting has dwindled to just a few projects. My dear friend Robbie absolutely LOVES Halloween, and in her honor we did some spooky themed projects at our monthly meeting.

Maui Stamper Stampin' Up! Spooky Suites Night Owl Holiday 2018

I loved how this one turned out. It’s a little more grown up than a typical Halloween card, and the Galvanized Metallic Paper really sets that tone. It has a gorgeous matte gleam, and I used my first package up so quickly that I immediately ordered several more. If I were you, I would do the same! This is going to have lots of uses.

Maui Stamper Stampin' Up! Spooky Suites Night Owl Holiday 2018

Spooky Suites and the Spooky Bats punch are available in a discounted bundle. I love that there are such great punches available in the Holiday and Annual catalog this year – punches are a quick and easy solution.

The gorgeous branches from the Night Owl Thinlits are dramatic and lend themselves to a variety of uses. When we were making this particular card, everyone kept referring to them as antlers.

Maui Stamper Stampin' Up! Spooky Suites Night Owl Holiday 2018

That little tag is the happy result of double cutting. It’s a nice long thinlit, about twice that size. If you stamp your image and cut it out with the words justified to one end, it’s really easy to place the thinlit on the opposite end and run the tag through a second time, cutting it down.

What else would you do with that gorgeous starry night DSP? I might have stocked up on that when I placed my order for “several” packages of the Galvanized paper. Need a little for yourself? Shop HERE.