Did you receive some lovely gifts?
 You know what comes next!
- Dotty Angle and Mixed Bunch
- Hello Honey, Whisper White and Mossy Meadow
- Hello Honey Ribbon
- Pearls
- Punches: Blossom and 3/4 inch circle
Shop HERE!

Did you receive some lovely gifts?
You know what comes next!
Shop HERE!
No snow-women here…nope, we have sand-women:
 Warm Wishes was featured in last year’s Holiday catalog and although it’s retired I couldn’t help but share this idea. You could get pretty creative with some Stampin’ Sponges and come close to this – but Warm Wishes was faster.
Only two more sleeps til Christmas!
I love this wreath – it’s so versatile:
 This goes together more quickly than you would think, and I love the layers of texture. The Pool Party layer is embossed with the Perfect Polka dots TIEF that echos the gold embossed berries on the wreath.
 The gold Bakers Twine is just pressed into a glue dot on either end, then pressed onto the back of the wreath and the Gold Glimmer heart. Quick, I tell you!
And as you can see, it’s possible to just stamp that wreath all willy-nilly and have it come out ok. At least in my eyes {wink}
Shop HERE
Love this Bright and Beautiful set of stars:

The inspiration for this card came from Sandy MacIver. I had initially hoped to make the card with the top point of the star a continuous piece of paper front to back (rather than punching a hole to secure the front to the back) but I learned that the point is too narrow to make that work. I don’t like to add bows with glue dots, so I needed to figure out a way to make this one go through the card stock and still “tie pretty”.
 This is the back of the card. I put the Silver Taffeta Ribbon through a hole punched at the top of the stars and tied it once in front, then wrapped it around the back and tied it once again (when I say tied, I mean like the first step in tying a shoelace – what’s that called? an overhand knot?) Those two “overhand knots” stabilize the ribbon so that when you bring it back around to the front the bow is straight, not catty-wompus. (Which IS a word, despite spell check trying to tell me it is not.)
 I stamped a single word inside and added a few small stars to the envelope. The envelope itself was made with the Envelope Punch board to fit a 5×5 card. This card looks a lot more time-consuming than it is – give it a try and tell me what you think.
Stop by the Maui Masonic Lodge this Saturday, November 22 for the Maui Stamper and Friends Craft Fair! Paper crafts, jewelry, baked goods, embroidered linens, loads of gift items – we’d love to see you! 9am til 2pm

Just cause it’s called “Tag It” doesn’t mean you can’t use it on a card!
 I took a page right out of Pam Morgan’s stamping demonstration at convention and just used the image – no coordinating framelit – to keep it simple. The images in this set are VERY versatile – it’s awesome if you have the framelits, but you DON’T HAVE TO HAVE THEM to use the set. (I KNOW. What a SHOCK.)
I inked the image twice – once with Gumball Green (my new fave green) and once with Primrose Petals. I cut the Primrose Petals image up to get the “Celebrate” flag and the accent balloon, then added the Summer Starfruit Dahlia with a glue dot.
 That eyeball is begging for embellishment but I held back. Make a note – that doesn’t happen often with me.
Of course, the stamp set is called TAG It. In my book that mean’s it’s just begging to be a tag, and while I was at it I tossed in the coordinating Chalk Talk Framelits for good measure (you knew I had them – when I said you didn’t need them I meant it in the most hypothetical sense. Of course you need them.)
 This little tag just makes me happy. Same color scheme with a little bit of Soft Suede, cuz now we’re talkin’ dirt. And take a closer look at the pearls in the middle of the flowers:
 Yellow Sharpie Marker to the rescue! Had to be done.
I used the negative of the Chalk Talk Framelit to create an opening in this tag. If you jumped on the Magnetic Cutting Pad bandwagon before we sold 13 weeks of inventory in 3 weeks (Yes Ma’am!!) it will be a snap to get that tag image cut squarely in the center of the Gumball Green tag. (If you didn’t jump on the bandwagon, don’t worry, they are coming – you just have to be patient. I’m not good at that.)
Layer a piece of Very Vanilla card stock behind with some dimensionals to keep it floating and you’re good to go:

It’s a special priviledge to feature the Tag It! stamp set for this month’s RemARKable blog tour. This set is the 2013-2013 Ronald McDonald House Charities fundraiser stamp set. For every set sold, Stampin’ Up! donates $3.00 to RMHC in support of the good work that organization does to support families in crisis. Learn more about the Stampin’ Up! giving program and RMHC.
Your next stop on the tour is the Trinity Design Studio – I know Robin has a treat for you!

Here are all the tour participants should you want to make your own itinerary:
Nancy Amato http://stampinallnight.blogspot.com
Melissa Bolinger http://www.stampinup.net/blog/2089191
Jackie Bottomley http://www.jackiebottomley.blogspot.com
Susan Carlson http://stampinmomoffour.blogspot.com
Tamra Davis http://www.thecardladies.com
Connie Deibler http://www.conniestamps.com
Danielle Denhardt http://www.purrfectlycreative.com
Sherri Eddleblute http://www.sweetestdesigns.blogspot.com
Crystal Kondo http://www.card-ed.com
Deb Lehigh http://thestampinhut.typepad.com
Anne Matasci http://www.MauiStamper.wordpress.com
Robin Merriman http://www.trinitydesignstudio.blogspot.com
Audra Monk http://thecraftyyogi.blogspot.com
Maria Pane http://www.stampinandscrappinwithriri.blogspot.com
Andi Potler http://www.absolutekreations.com
Michele Reynolds http://www.inspirationink.typepad.com
Vicki Soni http://www.paperinkle.com
Pam Staples http://www.sunnygirlscraps.com
Jeri St. John https://jerrisgemtastics.blogspot.com
Jeannette Swain http://www.stampsnwhatnot.com
Janet Wakeland http://www.remarkablycreated.com
Have you gotten your hands on the gorgeous burlap ribbon in the Holiday catalog?
The Flower Shop stamp set has one Pansy shape in 6 different textures – this one is burlap! It’s a little thing, but it matters to me.
The little yellow centers in the flower are applied with Mini Glue Dots. They give more lift than Tombo, less lift than Stampin’ Dimensionals, and fit better behind the small circles than a dimensional would. Another little thing…
Did you see my un-tutorial on using the Pansy Punch? Check HERE to simplify your life 🙂
This is a very quick card and it is USPS friendly!! It would be easy to switch that sentiment out to suit your need. I often make cards like this without the sentiment inked in. Having them on hand gives me an instant custom card when the moment strikes.
Stop by on Sunday for another RemARKable Stamp of the Month tour!
 I love the textures and colors of the This n That Designer Series paper (that’s DSP to those who’ve ever cracked a Stampin’ Up! catalog). I love how Stampin’ Up! DSP – and every other product that we sell – coordinates perfectly. And I love making cards 🙂

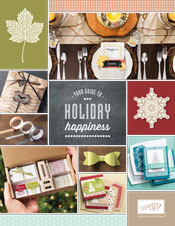 Have you seen the new Holiday catalog? There’s a link right over there in the sidebar – or you can just click HERE! LOTS of great holiday decorating and packaging options to make your holiday planning and preparations enjoyable and easy! Let me know if you need a copy.
And keep your eyes here on the Maui Stamper – I’m expecting my new Thinlets Flip Card dies this week! They were announced at convention, but we had to wait for August 1st just like the everyone else to order them!
