One Last #Elfie

I may have finally crossed the line into Crafty Craziness. I was inspired by a card in a private demonstrator group, which was fine, but then I decided to make multiples. You’ll see:

Maui Stamper Stampin Up #Elfie Hand Cut

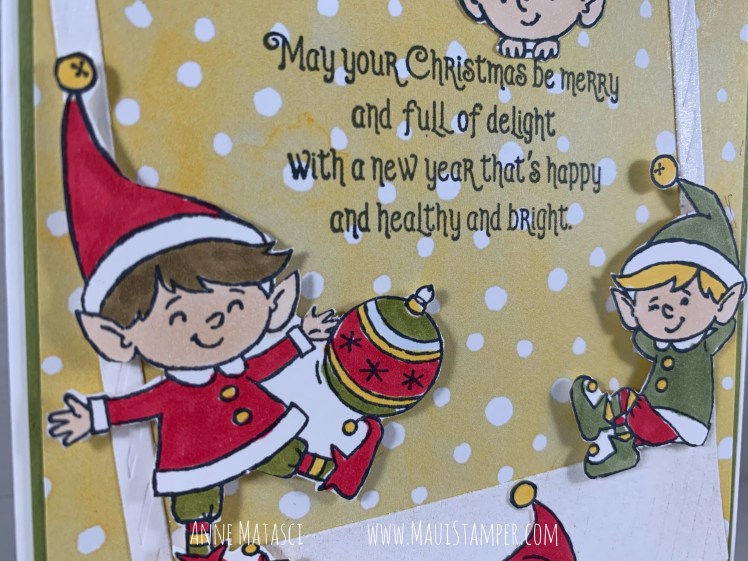
There’s a LOT of coloring and an absolutely RIDICULOUS amount of fussy cutting in this card. I don’t think I would make this many again (I made more than 10, less than 20).

Maui Stamper Stampin Up #Elfie Hand Cut

But it sure is cute! I’m smitten with these elves, and I know their time is almost up. Stampin’ Up! has had versions of elves for the last 3 or 4 holiday catalogs, and they never carry over so I’m not expecting to see #Elfie after Thursday.

Maui Stamper Stampin Up #Elfie Hand Cut

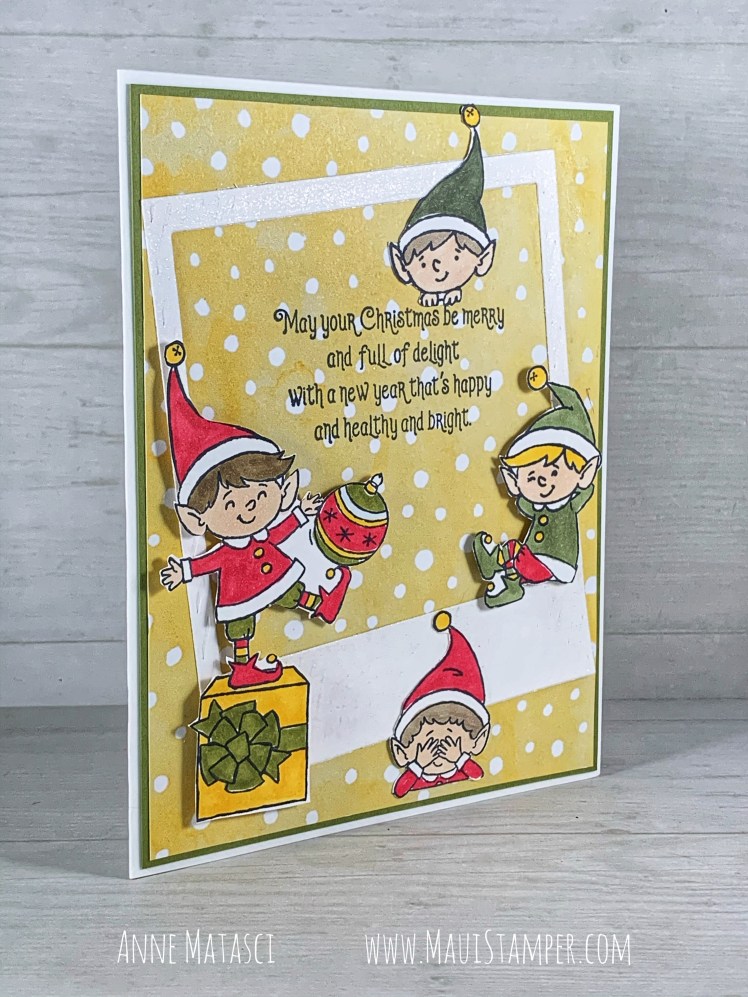
That said, if you want an #Elfie of your own, you’d better skedaddle on over to the Online Store and order one ASAP. You’ve got until close of business Mountain Time on January 2, 2020.

Never enough birthday cards

Have you checked out the Stampin’ Addicts web site?  It’s a wonderful FREE resource for anyone who likes stamping, especially Stampin’ Up! stamping!  There are discussion forums, inspiration galleries, all sorts of weekly challenges, and a very positive attitude that will lift your spirits every time you log in.  Check it out!  They’re celebrating their first birthday.

It’s a good thing to need birthday cards – it means there are wonderful people in your life that you want to acknowledge.  I just wish I could get my act together sufficiently to send birthday cards on time.  Ah well.  As Popeye says, “I yam what I yam.”  And I “yam” sure there will always be room for improvement.

  • Upsy Daisy and Vintage Labels (SAB) stamp sets
  • Chocolate Chip and Bermuda Bay Classic ink pads
  • Very Vanilla, Chocolate Chip, So Saffron and Bermuda Bay card stock
  • Scallop Circle and 1″ Circle Punch
  • Champagne Mist shimmer paint, piercing tool, needle and Linen Thread

You don’t see the shimmer paint in the photo, but it’s there on the image panel, trust me.  Love that stuff.  It’s done wonders for my marriage, too — now, don’t go getting ideas — my husband HATES glitter.  Shimmer paint is the Anti-Glitter that keeps us both happy!  No more glitter in the furniture finish, correspondence or laundry!

Clean and Simple

I’m not sure that I have an identifiable style, but whatever it is I do, it is generally NOT clean and simple.  Clean and simple (CAS) cards have few if any layers.  They use limited embellishment and generally have a lot of white space.

When Kellie came over last week, she brought a few photos she’d printed from various websites as inspiration.  Kellie really likes clean and simple cards, and  she showed me was THIS beautiful design from Ronda Camire.  It was such a pretty card that I had to give CAS a try.

Vintage Vogue Clean and Simple

  • Vintage Vogue Clear Mount Stamp set
  • Whisper White card stock
  • Pretty in Pink, Sage Shadow, and Chocolate Chip Classic Ink pads
  • Pretty in Pink taffeta ribbon, Stampin’ Dimensionals, and the Stamp-a-ma-jig
  • Fine Supernova Stampin’ Glitter in Chocolate Chip and Tombo Multipurpose Adhesive
  • Champagne Mist Shimmer Paint and rubbing alcohol – Shimmer Spray
  • Scoring tool

I know, I know, it’s kind of a long supply list for a CAS card – but there’s only ONE color of card stock!!  And yes, I know they are Clear Mount stamps and I shouldn’t need the Stamp-a-ma-jig, but I stamped the sentiment in Pretty in Pink and we agreed it was kind of wimpy, so I had to line up the sentiment in Chocolate Chip.

Do you know that the Shimmer Paints are still available from Stampin’ Up! ??  I was planning on buying a case of Champagne Mist Shimmer Paint (#116806, $5.95) and keeping it in my fridge so it wouldn’t dry out.  I’m really pleased it’s been extended beyond the Holiday Mini catalog.  I was going to have to label it “Champagne” to get away with keeping it in the fridge.

If you somehow missed making Shimmer Spray, it’s as easy as can be.  Put a few drops – literally – of Shimmer Paint into a fine mist spray bottle and add ordinary household rubbing alcohol – my bottle holds 3 oz.  Shake and spray onto your projects for a subtle shimmery sparkle that doesn’t come off on your clothes, furniture, pets, or other items that shouldn’t shimmer.  You can add more Shimmer Paint if you prefer, but you get plenty of sparkle from just a few drops.  Not that we have to hoard it anymore!

Looking back, looking ahead

I know I repeat myself…certain persons in my household have accused me of it on multiple occasions just to be sure I’m aware of that flaw.  Guilty as charged.

There are some sets on the Stampin’ Up! Dormant List that will retire in January which I will be very sorry to see leave.  One of the challenges of being a demonstrator – yes, we DO have challenges – is when a stamp set retires, we have to decide if we will allocate precious storage space to stamps we can no longer demonstrate.  If you’ve followed this blog at all, you know I don’t often do a very good job of letting go of retired things.  It’s partially because I get attached to the images, and partially because I’m something of a pack rat.  Eventually, I have to let go to make room for all the wonderful images being released.  It’s that time of year.

Wonderful Watercolors SC 260

  • Wonderful Watercolors and En Francais stamp sets
  • Whisper White, Regal Rose, and Pretty in Pink card stock
  • Mellow Moss Designer Series Paper from the Hostess Prints Pack III
  • Mellow Moss and Regal Rose Stampin’ Write Markers and Ink Refills
  • Champagne Mist Shimmer Paint and Aquapainter
  • Mellow Moss taffeta ribbon and Mini Glue dots
  • Scallop Trim Border (SAB  sneak peak) and Stamp-a-ma-jig
  • Big Shot, Beautiful Butterflies Bigz Die and Elegant Bouquet Embossing folder

This is a SplitCoastStampers Sketch Challenge layout, SC260.  I’ll add the sentiment later when I’m ready to sent the card.  The little flowers look like the flowers on what I only know as Butterfly Bush, although I think the originals only come in lavender.  Artistic license! There’s Shimmer Paint mixed in with the Regal Rose ink refill on those little flowers.

The crazy Mainland weather has created some chaos in our household.  My middle daughter had an epic journey home from university in Boston, and her dear roomie who was to spend Christmas with us will instead arrive Christmas night.  They’re laughing about it now, in agreement that it will be one of their best college memories, but on Sunday as they dealt with cancellations, delays, and planes that loaded and de-planed without going anywhere, none of us were laughing much.

Safe travels.

Shimmer Paint! Shimmer Paint!

I am happy as a Diva in Glitter.  Hoo Baby!

Stampin’ Up! has announced that Shimmer Paint will continue to be offered beyond the end of the Holiday Mini Catalog.  Those of you who know me have heard me tell you to order up, because I was planning on stocking up and I WASN’T GOING TO SHARE.

  • Champagne Mist Shimmer Paint   116806     $5.95
  • Frost White Shimmer Paint              116854    $5.95
  • Platinum Shimmer Paint                   116807    $5.95

Oh Happy Day!  Now we’ll all have plenty of Shimmer Paint to go around.

Who’s that in my Pear Tree??

Yesterday I had a big ol’ lightbulb go on.  I was playing with Cheep Talk and thinking about some submissions I’d seen in response to this week’s Color Challenge at SplitCoastStampers.  One card in particular kept coming to mind – I liked the geometry and the color balance.  Suddenly, it got really, really bright inside my head:

  • Cheep Talk and Teeny Tiny Wishes stamp sets
  • Old Olive, Pretty in Pink and Bermuda Bay Classic ink pads; Encore Gold ink pad; Champagne Mist Shimmer Paint
  • Whisper White, Pretty in Pink, Old Olive and Bermuda Bay card stock
  • Pretty in Pink Taffeta ribbon, Clear Embossing powder and heat tool, and the Stamp-a-ma-jig

I gotta tell you, there is no way I could have done this without the SAMJ.  I ruined my first attempt because I stamped a pear the wrong color and that was enough for me.  It makes me cranky to make a mistake like that at the end of the process, which of course is the logical time for that to happen.  It’s just paper though – I say that often.  Stamping is so forgiving that way.  Make a mistake and start over.  No big deal.


Sometimes simple is best

I’m a huge fan of the Clean and Simple (CAS) look…I just can’t seem to pull it off myself.  I come from the “More is More” school of card design, finding it hard to hold back from adding just one more ribbon, brad, or texture.

Today’s card is more of a CAS style than anything I usually do, although it still has more layers than a purist would use.  It’s a pretty card, and an easy one to make in quantity.  (Did I mention I haven’t made my cards yet?  Are we wondering where all this recent discussion about “production” has originated?  No mystery there.)

Clean and Simple Petals a Plenty Tree

  • All Holidays stamp set
  • Shimmer White, Brushed Gold, Real Red and Always Artichoke card stock; Vellum
  • Real Red Classic Ink pad; Champagne Mist shimmer paint
  • Big Shot and Petals a Plenty embossing folder
  • Small star punch; 1/16″ hand held circle punch; gold brads; sponge dauber

You can stamp on vellum with Classic ink – just be sure to give it plenty of time so it doesn’t smear.  The Plenty Petals on the tree are brushed with my favorite Champagne Mist Shimmer paint and a sponge dauber.

To create the tree, cut your triangle piece first, then run it through the embossing folder.  You’ll get a cleaner edge than if you try to cut that heavily embossing paper with your paper trimmer.

And that Petals a Plenty folder is GOING AWAY, girls and boys!!!  That’s a mini-catalog item and if you want one, you’d better get yourself to my Online Store and click that Shop Now! button and order one!  Pronto!

Shimmery pines

It amazes me how quickly days pass by.  It’s always been that way for me.  I’m sure  I thought Christmas or my birthday or whatever longed-for day in the future would never arrive when I was small, but I don’t remember that.  I just know that every day I wake up thinking “How am I going to do everything I want today?” and every night I wonder where the day went.

This card has been waiting patiently in the To-Do list of my mind for a while.  A few days ago, it actually made it to the paper To-Do list, which is a significant step on the road to “git ‘er done”.  This was going to be a Dasher Snow Globe, because I had a lovely comment which put that idea into my mind, but Dasher is off visiting Crystal and his Snow Globe Debut will have to wait.

Shimmer_Pines_Snowglobe

  • Patterned Pines and All Holidays Stamp sets
  • Whisper White and Brushed Gold cardstock
  • Old Olive and Tempting Turquoise Classic Ink pads; Chocolate Chip Stampin’ Write Marker
  • Champagne Mist Shimmer Paint, Old Olive wide grosgrain ribbon, Irridescent Ice Embossing Powder, Heat Tool, Stampin’ Sponges

Cards are SO difficult to photograph!  You can’t see the Shimmer mixed in with the Tempting Turquoise sponged on as background, but I promise you it’s there.  The First Star just to the left of the center Pine is stamped in Shimmer Paint too.  And the base of the globe is gold, not olive.   Really.

I’m working on posting the template for the Snow Globe card since so many of you are interested, but for now, leave me a comment with your email address if you would like a copy.   The template is now available HERE

If you’re interested in an Over-The-Top Snow Globe, check out THIS tutorial over at SplitCoastStampers.  But don’t say I didn’t warn you.  Your To-Do list will languish for days if you get hooked on those.

The Aquapainter, and Why You Need Ink Refills Part III

I wanted some paper with Almost Amethyst and Summer Sun accents for a birthday card for my Mom.  I had some old Amethyst Designer Series Pattern paper, but it was much too understated for the look I wanted.  I wanted stripes.  I could visualize the stripes!  I pulled out my Aquapainter and some Whisper White cardstock and some Ink Refills, and I started to play.

Wonderful Watercolors birthday'

  • Wonderful Watercolors and Crazy for Cupcakes stamp set
  • Almost Amethyst, Summer Sun, Lovely Lilac and Whisper White cardstock
  • Lovely Lilac Classic stamp pad; Almost Amethyst and Summer Sun ink refills
  • Almost Amethyst, Summer Sun and Lovely Lilac Stampin’ Write markers
  • Champagne Mist Shimmer Paint,Scallop Circle punch, hand held rectangle punch (retired)
  • Uniball Signo Gel Pen, Piercing tool and mat, Stamp-a-ma-jig and White Taffeta ribbon

Don’t you like my stripes?  The Summer Sun should have been a little more intense, but I like the haphazard, random look of the pattern.  I’m playing with some other stripe combinations.  I’ll share them if I like them.  If I don’t…well, it’s just paper.

There’s a little Shimmer Paint mixed into the Summer Sun ink refill for the centers of the flowers.  Honestly, if that stuff doesn’t make it into the next Idea Book and Catalog I’ll be so disappointed.  Are you listening, Stampin’ Up!?


Super Simple Halloween Treats

This is a quick and easy treatment for some simple Halloween goodies…the stamped image is 3″ square, the mat is 3 1/4″ square, and the packaging is 3 1/2″ wide x 8 1/2″ long.  Punch holes in the center of everything and double punch some Only Orange cardstock to create a ring and you’re almost done.  It doesn’t show in the photo, but I used the absolutely magical Champagne Mist Shimmer Paint to give it all some sparkle – a couple of drops in a small spray bottle with some rubbing alcohol and you are ready to sparkle…and it doesn’t come off the project!

Sweet_Centers_Halloween_Treats

  • Sweet Centers Stamp Set
  • Only Orange, Basic Black and Whisper White card stock
  • Old Olive Classic Stampin’ Ink
  • 1 3/4″ and 1 3/8″ circle punches
  • White Gel pen, Champagne Mist Shimmer Paint, Crop-a-dile, Sticky Strip and small cello bag
  • Pumpkin Pie and Old Olive 1/4″ grosgrain; non-SU 1/8″ black grosgrain

These would be easy to make in quantity!  Trick or treat!