Thankful

And a very belated Happy Thanksgiving to you all:

Happy Thanksgiving

  • Just Believe and Thankful For stamp sets
  • Very Vanilla, Peach Parfait and Chocolate Chip card stock
  • Early Espresso, Peach Parfait and Cajun Craze Classic ink pads
  • Chocolate Chip taffeta ribbon (retired)
  • Big Shot, Top Note Bigz die and Beautiful Wings Embosslit

The problem with taking an extended blogging leave of absence is that when I return I have WAY too much to tell you in one post, plus there’s always the extraneous blather I ladle over the top.  It’s sort of like a Thanksgiving dinner plate, overloaded with food and drowned in gravy.

I feel obliged to begin by saying that I took a number of photos using a new set up and I don’t much care for the results.  I am too lazy to go back and re-take the photographs, so I ask your indulgence and hope you’ll forgive the odd tint these photos share.  I don’t want you to get the impression that my “set-up” is anything sophisticated.  It consists of a couple of sheets of foam core (which have just about reached the end of their useful lives) and my much-abused Casio point-and-push camera.  I normally take the photos in the morning downstairs in my kitchen, because the light is absolutely gorgeous.  For some unfathomable reason I decided to change something that wasn’t broken and tried taking them upstairs at night in my stamp studio with the Ott light.  Bad decision.  If it’s not broken…and all that.  I’ll go back to the kitchen.

And back to the kitchen is what I really want to talk about.  I’ve worked and sat and talked in a lot of kitchens in my life.  They’ve been places to cook, eat, talk, confess, cry, laugh and make memories.  This past Thanksgiving I shared a kitchen with two wonderful friends and can’t wait to repeat the experience.  I’ve been the Thanksgiving Executive Chef for most of the past 20 years we’ve lived in Hawaii, and it was a tremendous joy to share the responsibilities this year.  Three talented cooks joining forces yielded one fabulous meal – and we were all relaxed and able to enjoy the meal.  I know – what a concept!

Meanwhile, a quarter of the way around the world my firstborn was preparing her first solo Thanksgiving feast.  We held a number of consultations online and on the phone as we tried to compensate for her lack of resources – some due to finances and being in that “just starting out” stage of life, and some due to location.  Her 11 pound Thanksgiving turkey cost $85 – in Perth, Australia!  The one store that carried canned pumpkin (at $8 a can) was sold out, and the frozen cranberries had seeds.  A little Yankee ingenuity and shared effort throughout her international community of friends yielded marvelous results, and I’m looking forward to seeing the photos (hint, hint, Carol!)

I hope your Thanksgiving kitchen was rich in love and memories.

Autumn Birthday Garden

I hope you aren’t weary of this set because I can’t believe I’ll ever be:

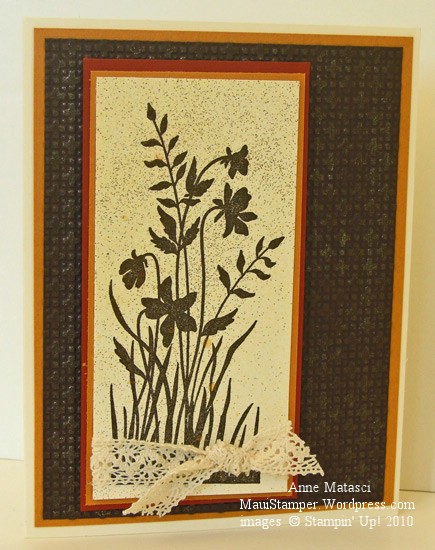
Happy Birthday, Mom

  • Just Believe stamp set
  • Very Vanilla, More Mustard, Cajun Craze and Early Espresso card stock
  • Early Espresso Classic ink pad
  • Gold Glow and Log Cabin Smooch Spritz
  • Champagne Mist Shimmer Paint; Sponge dauber
  • Big Shot and Lattice Textured Impressions folder
  • Victoria Crochet Trim

This card was designed specifically for my Mom for her birthday.  She’s a gardener with a November birthday and this image paired with these colors seemed to fit together just right.  I left the front without a sentiment to keep it cleaner but stamped her birthday wishes inside.

The Shimmer paint is applied to the top of the Lattice texture with a sponge dauber.  I’m not sure how we made ANYTHING before Shimmer paint.  The fact that it lends sparkle without leaving traces that float throughout the house has created a truce in the Glitter Wars in my household.

Exploring In Colors

A couple of weeks ago a friend asked me to do a Thank You card for her workshop.  She wanted it to be something simple and reproducible.  She was looking for inspiration for gifts, and thought if she could take the same card and produce it in a few different colors she could make sets.

No problem, I said.  That’s an easy one, I said.

Famous last words.

Maybe the muse was on vacation.  (I live on MAUI, for goodness sakes.  Where would my muse want to GO already?)  Maybe I was putting too much pressure on myself.  Shoot, maybe it was the hormones – they’re responsible for everything else that goes wrong in my life!!  It took much longer than it should have, but I came up with something that made us both happy:

Vintage Vogue Thanks in Poppy

  • Vintage Vogue and A Note of Thanks stamp sets
  • Very Vintage Jumbo Stampin’ Around Wheel
  • Whisper White, Poppy Parade and Early Espresso card stock
  • Early Espresso and Poppy Parade Classic ink pads
  • XL Decorative Label and Bitty Circle punches
  • Crop-a-dile; Stampin’ Sponge; Early Espresso 3/8″ taffeta ribbon

My goal for this card was to come up with a design that could be made in the 2010-2011 In Colors.   I think that’s what made it challenging for me.   I wanted to highlight the great value in the Card Stock and Classic Pad In Color kit –  5 Classic ink pads plus a 20 sheet assortment of the 2010 In Color papers for $29.95 (item 120952).  If you haven’t done the math yet, I’ll do it for you; that’s getting the paper assortment (valued at $6.95) for free.  It’s even in the catalog on page 165, but it doesn’t jump out at you so I like to point it out at workshops…or even in blog posts.


Turning lemons into lemonade

One more for the tag stash – and this one will fit in a mini envelope:


Jolly Santa

  • Jolly Old Saint Nick and Teeny Tiny Wishes stamp set
  • Whisper White, Basic Black and Always Artichoke card stock
  • Basic Black and Cherry Cobbler Classic ink pads
  • Cherry Cobbler, Basic Grey, Blush Blossom and Crumb Cake Stampin’ Write markers
  • Basic Rhinestones

I don’t like to color in large areas, and Santa’s suit gave me fits, but that weird pink spot is from my poor, weary camera.  The sack o’ toys was doing the same thing til I decided to make the lines perpendicular and create a woven pattern.  BFO, as Jan Wakeland says – Blinding Flash of the Obvious.  Lemons to lemonade and all that.

Building up the tag stash

I like to have a healthy stash of gift tags long before I start my Christmas shopping.  You could consider it a security blanket; if I have the tags, the packages will follow.  I mail a lot of gifts (thank you USPS for Flat Rate Boxes!!) and they need to be purchased, wrapped and tagged before they’re mailed.

I had a few extra tags from the Two Tags die sitting on my DISASTROUSLY messy desk and started to play with the Tags Til Christmas stamp set:

Pine Tag

  • Northern Hearts, Jolly Old Saint Nick and Tags Til Christmas stamp sets
  • Riding Hood Red and Naturals Ivory card stock
  • Vellum and Deck the Halls Designer Series paper
  • Riding Hood Red and Early Espresso Classic ink pads
  • Always Artichoke Stampin’ Write marker and Frost White Shimmer paint
  • Ornament and XL Decorative Label punches; Blender pen
  • Hemp twine and Linen thread

I inked “Merry Christmas” on the sentiment from Saint Nick and stamped it on the vellum, then set it aside to dry for a while.  For some reason I find the red inks take longer to dry – must be something to do with the pigment – and the vellum makes them slower still.  I trimmed it to a long strip and then set it in place over the Designer Series paper before I punched the ornament shape.  A couple of drops of Tombo the Wonder Adhesive hold it in place.

On the inside…OH!  Here:

Open Pine Tag

As I was saying…on the inside I just stamped a few more of those cheery little snowflakes from Northern Hearts and added that snazzy XL Decorative Label.  I inked the stamp in Espresso and Blender penned (yes, it’s a word, I just made it up) the ink off the branches so I could marker it back in Artichoke.  I painted the tops of the pine cones with lots of Frost White to look like piled up snow.  We do have some pine trees (and cones) growing on Maui, but snow – well, not so much.  You have to imagine that part.


A cheery little tree

One more Crystal design from ACACCE:

This was based on a swap that I received at convention, and I changed my version from the version Crystal did.  Hers said Happy Holidays, and although that’s a perfectly acceptable greeting I don’t generally like to use it.  It’s one of my little quirks – one of many, I might add.  The stamp set is Holiday Happiness, and here’s another version:

We had a substantial stash of that red gingham ribbon – it’s retired now, but this card would be just as pretty with any number of other ribbon choices.  Crystal had the ribbon tied across the base and I decided to make a bow instead, but I think my bow got a little carried away with itself .  Ribbon has a way of doing that to me!

By the way, if this was your swap I would be very happy to acknowledge you.  I think this was packaged in a clear envelope with the swapper’s name on a separate slip.  You can guess how long that stayed together, especially with a half dozen women looking through my swaps when I got back to Maui.  We had a swap viewing frenzy!

Something old, something new

Last year we fully intended to use the Tree Trimmings stamp set for ACACCE (see prior posts, I’m lazy).  As often happens, we fell in love with another design and Tree Trimmings lost out.  This year we moved it forward because Crystal was inspired with all sorts of shimmery goodness:

Tree Trimmings Concord Crush

  • Tree Trimmings and Many Merry Messages stamp sets
  • Concord Crush, Brushed Silver and Shimmery White card stock
  • Bashful Blue, Concord Crush and Pale Plum Classic ink pads
  • Concord Crush Stitched-Poly ribbon

A couple of stamp sets from last year’s catalog suddenly look a lot different when you put them together with a brand new color like Concord Crush!  And if you haven’t checked out that new ribbon yet, don’t be afraid that it’s poly.  It is very soft to the touch and easy to work with, and it has great body.  It’s perfect for a big feature like this.

Now that I look at it, this card should have had a couple of rhinestones.  Stay tuned – you may see it again!

Kellie is wicked cool

One last hurrah for Halloween:

It’s the ever-talented Kellie again – I think we need to get that girl her own blog!  She’s kinda busy though, and she’s generous enough to let me share her artwork with you.  This is the Fancy Favor Bigz die for the Sizzix Big Shot.  She put vellum windows on either side and stamped them with the bats and spider web from the Wicked Cool stamp set.  One of those little battery operated tea lights would be just the thing inside this luminaria, don’t you think?

She shared one more card with me, too:

This is Cajun Crazy card stock with the Wicked Fun Specialty paper.  Those folds are such an easy technique but boy do they make this card pop!

Have lots of fun and stay safe this Halloween night!

Smoochin’ Santa

I’m determined to get my personal Christmas cards done early this year.  (OK, STOP IT!  I hear you laughing.  Get off the floor and back up onto your chair!!)  I have excellent intentions but seldom seem to accomplish getting things finished ahead of schedule, and I’ve set a personal goal to make this one happen.

As a result, you’re going to see a LOT of Christmas card designs as I work through my options.  This one is actually one of Crystal’s designs, and we offered it last weekend at Anne and Crystal’s Annual Christmas Card Extravaganza (ACACCE).  This was a popular card, as everyone loved painting Santa’s beard with Stampin’ Up!’s new Smooch® Illuminate Top Coat Pearlized Accent Ink (wow – say that 3 times really quickly!!):

Smoochin' Santa

  • Holiday Hoopla and Teeny Tiny Wishes stamp sets
  • Very Vanilla, Old Olive,  and Cherry Cobbler card stock
  • Jolly Holiday Designer Series Paper
  • Chocolate Chip, River Rock and Cherry Cobbler Classic ink pads
  • Blush Blossom Stampin’ Write marker
  • Smooch® Illuminate Top Coat Pearlized Accent Ink
  • Cherry Cobbler Seam Binding

I’m very fond of the little whirly-deal on the top of Santa’s hat – I think it’s just the right touch.

Cookin’ with Cherry Cobbler

Cherry Cobbler has won me over.  When I first saw it, I thought it was too dark.  Silly me.

Cherry Cobbler Peaceful Wishes

  • Peaceful Season stamp set
  • Naturals Ivory, Cherry Cobbler and Always Artichoke card stock
  • Cherry Cobbler and Always Artichoke Classic ink pads
  • Champagne Mist shimmer paint
  • Always Artichoke Seam Binding; Linen thread; Deck the Halls buttons
  • Piercing tool and mat

This was one of the cards we did at Anne and Crystal’s Annual Christmas Card Extravaganza.  I know some of the ladies grumbled because my assembly instructions were to sew on the button – one lady even asked for the “Glue Boogers”.  But those big ‘ole buttons are gonna take an elephant trunk full of glue boogers to stay on, and if you pre-punch your stitching holes with the piercing tool and mat the sewing is as easy as pie.

If you missed the card class, we still have a couple of spots in the afternoon session of the Bag and Tag Extravaganza – send me an email for details.