Valentine Kisses

Happy Valentines’ Day!  Take a moment to say “I love you” to the ones who are near and dear.  Oh, and the ones who are far and dee-ah, too!

A Valentine's Kiss for the sweetest

  • Pretty in Pink and Whisper White card stock
  • Teeny Tiny Wishes stamp set
  • Chocolate Chip Classic ink pad
  • Sweet Pea Stitched Felt, Sending Love Notes Hugs and Small Square Glassine Envelopes
  • Big Shot and Perfect Polka Dots Textured Impressions folder
  • Regal Rose 5/8″ grosgrain ribbon, Word Window punch and Mini Glue dots

Crystal made this for me – she has the best ideas.  I stopped by to see her on Friday – the baby is due in two short weeks and I got to consult on the bedroom decor.  It was a no-brainer – she’s put together the cutest baby room you can imagine.  This is gonna be one lucky little boy.

I’m a Big Fan

I love Becky Roberts’ blog, Inking Idaho.  She has great projects, great photos, and a very “in-person” writing style that makes you think she’s sitting right next to you.  I find loads of inspiration on her blog and am a faithful follower.

That said, I have a shameless CASE of an Inking Idaho project, her Cute Clothes Pins.

Valentine Clothes Pins

These little gems are for the members of my hostess club tonight.  They were so quick and easy to do!  Here’s a closer look:

One Cute Clothes Pin

You just need a tiny strip of paper, a button, some linen thread and a few tissue paper flowers.  I used Tombo to put everything together – attach the paper to the pin, add the tissue flowers, and stick the button on top.  I could have used Mini Glue dots which would have probably been quicker and not so sticky on my fingers, but shoots,  the Tombo was out and my fingers were deep into it!

Here’s a hint for punching tissue paper.  It’s so thin and formless that it will shred in a punch by itself, but if you fold up a few layers and stick a scrap of cardstock in the back, it punches beautifully!  I only used 3 tissue flowers, and only stamped 2 of the 3 to keep it from looking too dizzy.  You could use an abundance of tissue flowers for that full ruffly look, or you could use other papers.  Cardstock would need some serious abuse to get soft enough to scrunch, but Designer Series Paper should be easy  to work with – just check Becky’s February 10 post!

I’ll try more later, but it’s time to get set up for tonight.

Grids ‘n Dots

Participating in the ColourQ challenge yesterday really helped motivate me, so I went looking for a challenge for today.  I found two – the Splitcoast Sketch Challenge and the Color Dare.  (And no, I am not going to look for 3 challenges tomorrow.  That would be totally unsustainable.)

Sometimes sketch challenges are too Out-Of-The-Box for me, but yesterday’s SCS Sketch Challenge (SC267) was just right.  I’ve been looking at repeating elements in cards and turning over some ideas in my head, so the timing was perfect.  When I sat down to put my ideas to work, I couldn’t settle on a color combination.  A quick search turned up the Color Dare site.  As you might guess, this is not a challenge for the faint of heart!  This week’s color challenge was Crushed Curry, Brilliant Blue, Kiwi Kiss and Kraft:

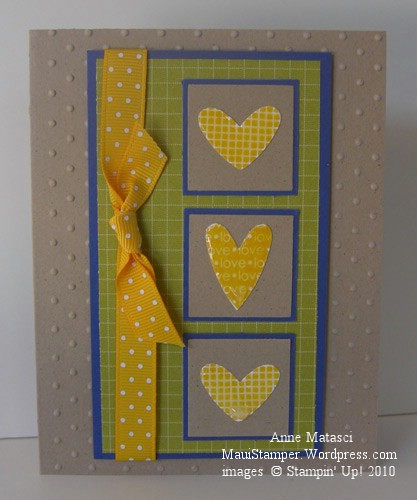
Grids and Dots

  • I {Heart} Hearts Clear Mount stamp set
  • Kraft, Brilliant Blue, and Whisper White card stock; Kiwi Kiss Designer Series Paper (retired)
  • Crushed Curry Classic ink pad
  • Crushed Curry polka dot ribbon
  • Big Shot and Perfect Polka Dots Textured Impression folder
  • 1 3/8″ and 1 1/4″ Square punches; Heart to Heart punch
  • Stampin Dimensionals, Tombo Adhesive, Mini Glue dots and Crystal Effects

The coolest thing about this card is that with the exception of the card base, the entire thing came from my scrap basket!!  That basket is out of control, and the more I use from it the happier I am.  There’s a Mini Glue dot holding the knot of the ribbon in place – with so much linear action it needed to be pegged down.   One more hint:  Use Stampin’ Dimensionals to hold a large panel on a deeply embossed card front.  Those dots are awesome, but they make it hard for adhesive to get a grip.

I didn’t see the grids emerge until I started to play with the hearts.  The Perfect Polka Dots textured impression folder was a natural once I realized I needed that Crushed Curry polka dot ribbon.  It was fun to play off the geometry of the repeating squares.

Keeping your feet firmly planted

Whew.

The past week has been so full.  Early Saturday morning we took Carol to the airport, said our goodbyes (a few extra times for good luck) and put her on the plane for Perth.  Getting to that point was physically and emotionally exhausting, but once we were there, it felt much better than I’d anticipated.  Of course we shed tears, and continue to do so (like right now, typing this post).  Her dad and I know this is the right move for her, and after all the sorting, packing and problem solving of last week we are ready to let go.  She’s ready too – sorry to leave Maui, but happy to finally live in the same time zone as her boyfriend.

I haven’t accomplished much since Saturday.  I did engage in something of a cleaning frenzy yesterday.  My son grumbled that it was his sister’s fault that I suddenly needed all his stuff  Put Away Now, but he knows I’ll get over it.  My next task is to clear out the debris that remains in Carol’s room, clean it up, and return it to the purpose it fulfilled so well for 4 years of university:  My Stamp Room.  Ah yes.  Every cloud does have its silver lining.

In the meantime, I sat down at the disaster area that currently functions as a stamp space and made a card.  Boy, did that feel good.  So good, I think I’ll make another later on!

Plant your feet firmly and let your heart have wings

  • Fifth Avenue Floral, Vintage Vogue, and Hope Happens Stamp sets
  • Whisper White, Regal Rose, Blush Blossom and Close to Cocoa card stock
  • Chocolate Chip, Blush Blossom and Regal Rose Classic ink pads
  • Big Shot and Beautiful Wings Embosslit die
  • Chocolate Chip taffeta ribbon, Aquapainter and the Scallop Trim border punch
  • Stamp-a-ma-jig, Embossing Buddy, Fine Supernova Stampin’ Glitter and Tombo Adhesive

The color inspiration for this card came from colourQchallenge – this is ColourQ 19.  I used the same embellished leaf stamp from Vintage Vogue on the Blush Blossom card base and the Whisper White focal image, but I stamped it off on the Whisper White panel to make it more subtle.  To get the mixed colors with the glitter, I dotted Tombo adhesive in the center of the flower a few times and dusted with the Chocolate glitter, then repeated and dusted again with the Pink glitter.  Don’t forget to use your Embossing Buddy on your cardstock before glittering – it really makes a difference!

You’ve got a friend

Today’s post is an auto post, set earlier in the week to post today.  Today is the day my oldest daughter leaves for Australia.  Her dad and I are really happy for her, but it’s very  hard to say goodbye.  It’s going to be a tough day.

This week, my friends have been so supportive, calling and asking how I’m doing.  They don’t let me get too emotional, and they assure me they’ll be there for me next week.  I have wonderful, generous, loving friends.  I am so grateful for them.

Kind and wonderful friends

  • Vintage Vogue stamp set and Very Vintage Jumbo Wheel
  • Naturals Ivory, Soft Suede, Ruby Red and Mellow Moss card stock
  • Soft Suede, Ruby Red, Mellow Moss and Sahara Sand Classic ink pads
  • Button Latte, Linen Thread and Paper Snips
  • Big Shot and the Backgrounds I Texturz plates

I prefer to sew my buttons on whenever possible.  They stick pretty well with glue dots, but I like the authenticity of sewing them on, and they don’t come off unless you really yank on them.

Thanks, friends.

Sweet Heart

Some friends visited last week and brought along their 20 month old daughter.  We were enchanted with Kendall and marveled at how quickly we have forgotten the intense energy that is a toddler.  Kendall was bright, funny and very busy, and we enjoyed her immensely.  We were also grateful that the days of parenting toddlers are behind us.

I created a little something for Kendall and her mom and dad just for the fun of it.  I have to admit that I miss having little girls around – it’s such fun to craft for and with them.

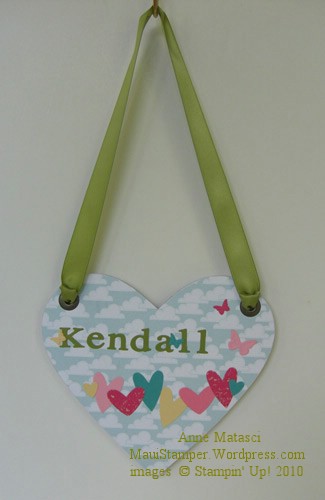
A Sweet Heart for Kendall

  • On Board Heart Book
  • Welcome Neighbor Designer Series Paper (SAB)
  • Bermuda Bay, So Saffron, Regal Rose, Pretty in Pink and Old Olive card stock
  • Heart to Heart punch and Sanding blocks
  • Big Shot, Beautiful Wings Embosslit and Naturally Serif Sizzlit Decorative Strip die
  • Old Olive 5/8″ Satin ribbon, Jumbo Eyelets and Crop-a-dile

And here’s the other side:

A Big K for Kendall

All the above plus the XL Two-Step Bird Punch, Serif Essentials Bigz dies and Sweet Pea Stitched felt.  Oh, and I sponged the edges of the bird!

Love You Much

In my humble opinion, the Medallion stamp is one of the best values in the Stampin’ Up! catalog.  It can be a background or a focal point, it can be a single image or multiple layers, and it works in any color you can imagine.  Not only that, but it is really fun to dress up – kind of a Stamper’s Barbie doll.

Love You Medallion

  • Medallion, Well Scripted and Vintage Labels (SAB) stamp sets
  • Bashful Blue, Tempting Turquoise and Whisper White card stock
  • Bashful Blue and Tempting Turquoise Classic Ink pads
  • 3/4″ and Scallop Circle punches, Bashful Blue Satin ribbon, and Pretties kit
  • Stampin’ Sponge and brayer

I inked the Medallion stamp with Bashful Blue ink using a brayer.  Larger stamps with anything bolder than line art really need to be inked with the brayer to get even converage.

(I place the stamp rubber-side-up and roll the brayer on the ink pad and then on the stamp, repeating until I’m sure my coverage is complete.  I carefully position the cardstock on the inked rubber and put a large piece of scrap paper on top.  You need a steady hand to keep from moving that cardstock!  I use a separate brayer to run across the scrap paper, transferring the ink to my cardstock.  You can use the same brayer if you like, but I like to use a clean one when I’m creating multiple images because it doesn’t waste the ink.)

Back to this image – once I applied the Bashful Blue ink with the brayer, I used a Stampin’ Sponge to add Tempting Turquoise ink all the way around the outside of the Medallion.  I used a heavy hand since there isn’t a huge contrast between the two colors.  When I had both colors applied, I put the cardstock onto the stamp, layered the scratch paper on and used the brayer across the top.

The Vintage Labels image is stamped with Tempting Turquoise on Whisper White and punched with the Scallop Circle.  The last layer is the center of the Medallion inked with Bashful Blue, stamped on Bashful Blue cardstock and cut out with the 3/4″ circle.  A half pearl from the Pretties Kit is the finishing touch.

I think this is sort of a Wedding Barbie kind of Medallion.  One of these days I’m going to sit down and make this same card in a variety of color schemes.  The possibilities are endless.

Vintage Style

I’ve always liked old things, whether they qualify as genuine antiques or not.  My grandmother had a house full of vintage furniture and glassware, and I inherited her appreciation for old things.   I have some of her furniture in my home now, and it makes me feel connected with her.

Her Victorian love seat is in my living room, and after Christmas as I was putting away decorations,  I remembered how we were never allowed to sit on it.  She had three straw hats that she would place across the seat to keep us from sitting  – I’m not sure if that was just for the summer when my sister and I would visit, or if she kept them there year round – but I’m sure that she was convinced they looked chic sitting there.  Of course, we weren’t fooled, but the memory makes me smile either way.

These hearts have nothing to do with those hats, but the kraft card base and the softer shades of red and pink give this card a look of comfortable age:

Vintage Style Valentine Hearts

  • I {Heart} Hearts, Bella Toile and Always stamp sets
  • Sahara Sand, Ruby Red, Close to Cocoa and Pretty in Pink Classic ink pads
  • Kraft, Ruby Red, Close to Cocoa and Naturals Ivory card stock
  • Stampin’ Sponges, Heart to Heart  and Scallop Trim punches and Kraft Taffeta ribbon

I think my grandmother would have liked this card.

My favorite feathered friend

I’ve always had a fondness for birds.  Well, most birds – I’m not so fond of the ones that swoop down and scold me (or my ‘fraidy cat).  One of my absolute favorites is the cardinal.  Growing up in California, we seldom saw them, but here in Hawaii we have both the North and South American cardinals.  (The North American male is all red with a black mask, the South American male is grey and white with a scarlet hood, just in case you were wondering.)

It’s the North American Cardinal I enjoy the most.  Early in the morning, the male is usually the first bird to greet the sunrise.  He has a long, low call that begins when the sky is light but the sun has yet to peak over Haleakala.  It’s a lovely thing to hear as you’re lying in bed, trying to decide if you really do have to get up.

Watching my daughter go through her cupboards and closets has inspired me to do a little sorting of my own, and the other day I came across a bunch of tiny wreaths made from vines.  I’m sure they’ve been in my craft cupboard for years, and they were clearly waiting for This Moment.  As soon as I saw them, I visualized this:

My Maui Cardinal

  • Real Red, Kiwi Kiss, Chocolate Chip,  and Pretty in Pink card stock
  • Chocolate Chip Stampin’ Write marker, Signo White Gel pen
  • XL Two Step Bird punch and Pop-Up Glue dot
  • Heart to Heart punch, Tombo adhesive and Linen Thread
  • Real Red narrow grosgrain ribbon and LSS vine wreath

Yes, I know the real deal doesn’t have a brown wing, and yes, I realize I left off his mask.  But that’s ok because this is MY bird.  You can make YOUR bird however you like!

The Red Bird is attached to the wreath with one ginormous, super-sticky Pop-Up Glue dot, and the little hearts are stuck to the medium sized hearts with Tombo, the wonder-adhesive.  I stuck the green leafy bits to the Red Bird with Tombo before I put the glue dot on his backside.

I am very, very sorry to tell you that the XL Bird punch is currently back-ordered through Stampin’ Up!  Clearly this item was a big hit!  It’s currently set to ship the week of March 8 (I know!!).  You’ll just have to look at this one until then.
Cheery little birds

We’re staying positive here…working with cheery colors and cheery subjects!  I spent the afternoon with my oldest daughter on Saturday culling through heaps of papers, books, photos, and other accumulated mementos.  I also ended up with the challenge of reuniting a huge box of cd cases with the discs that belong inside.  It’s amazing how many cd’s have nothing more than a photo on the front – no band, no songs, no disc title.  I did very well, all things considered.

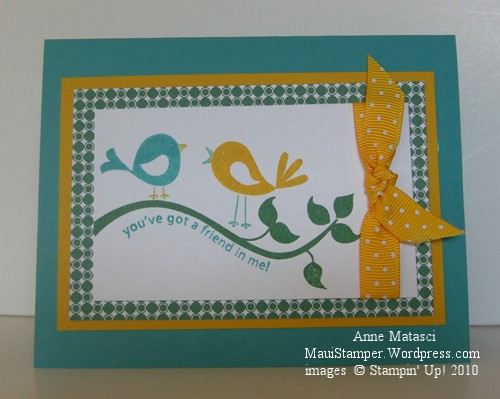
OK – now on to a card!  These chubby little birds really sing in bright colors.  I don’t think either one of them has met a shocking hue they didn’t love.

Bright Little Birdies

  • Cheep Talk stamp set
  • Bermuda Bay, Crushed Curry and Whisper White card stock
  • Garden Green Prints Pack 6×6 Designer Series Paper
  • Bermuda Bay, Crushed Curry and Garden Green Classic ink pads
  • Bermuda Bay and Crushed Curry markers and a Blender Pen
  • Crushed Curry Polka Dot ribbon

I was feeling oh-so-confident and I stamped this WITHOUT the Stamp-a-ma-jig.  I know.  Can you believe it???  That Crushed Curry bird is floating a little, but if it was any closer to the branch those leaves would be tickling its tail feathers. And we wouldn’t want that now, would we??