LAST CHANCE for SEASIDE WISHES

Welcome to my April Last Dance/Last Chance series! I have to tell you, saying goodbye to Seaside Wishes is going to hurt a bit. It’s not leaving my craft room, but once it’s no longer available in the Online Store, I don’t usually share it in a blog post. Farewell, beautiful images!

  • Stamps: Seaside Wishes
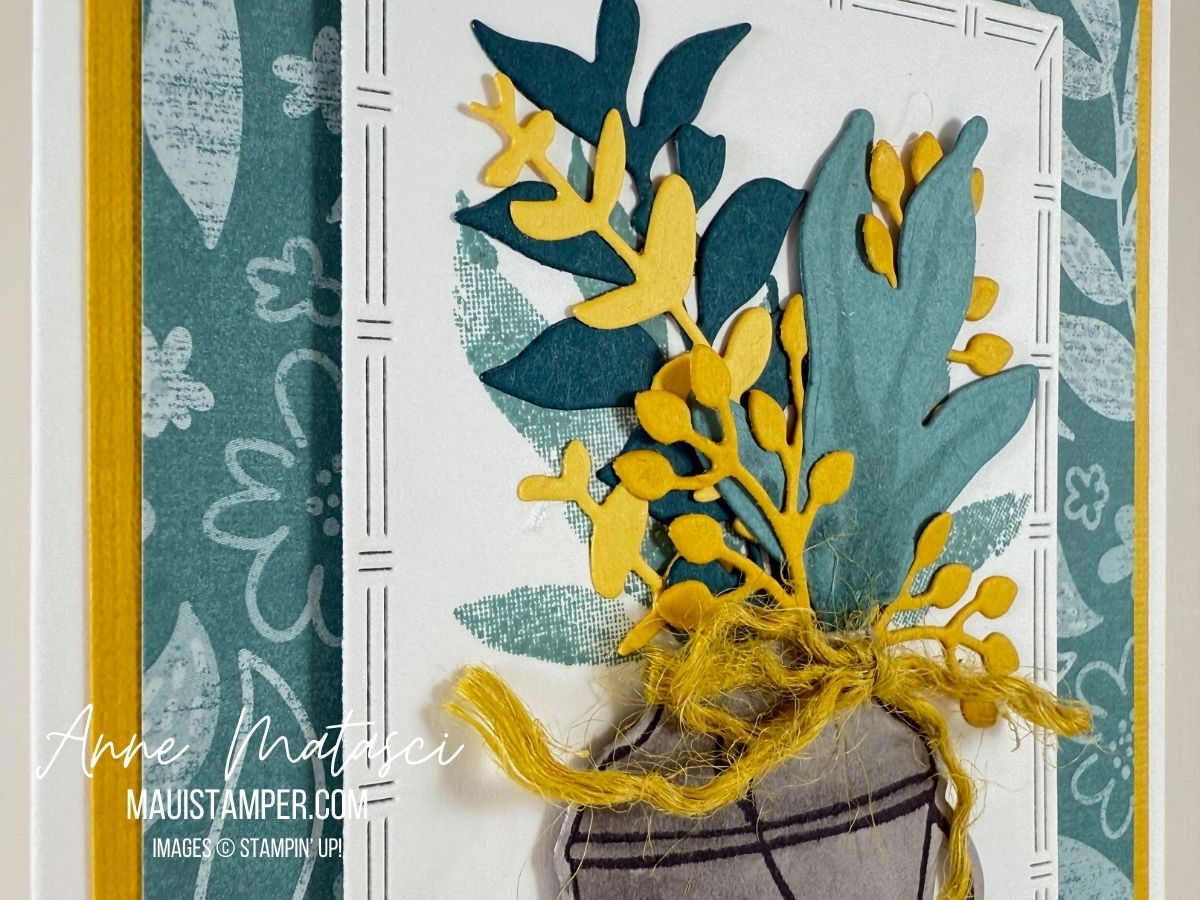
  • Color Palette: Basic White, Pool Party, Coastal Cabana, Summer Splash, Calypso Coral
  • Accessories: Stamp Cut & Emboss Machine, Seaside Wishes dies, 24-26 In Color Shimmer Gems, Linen Thread, Glue Dots, Stampin’ Dimensionals

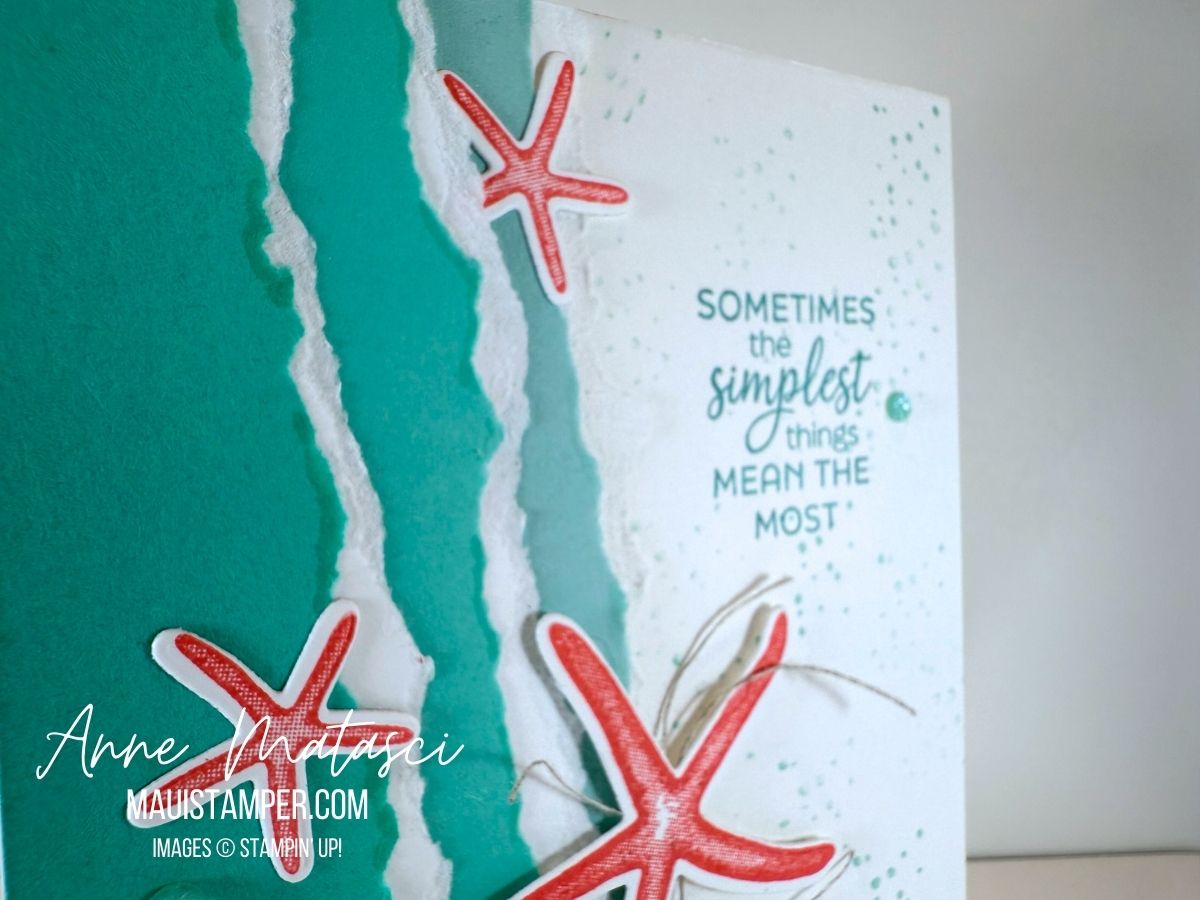
I’ve made more than a few cards with these stamps – you can see some of them HERE and HERE and even a very simple one HERE. For this one, I tore the edge of the card stock. I used strips about 7 1/2″ long so that I could play with the angles on the card front, and I put a piece of Basic White torn card stock between the color layers to bring sea foam to mind. A couple of gems, a sentiment, and the “dits” from the stamp set finish this one off.

As I write this, the Seaside Wishes stamps are low inventory. There’s also a gorgeous Hybrid Embossing Folder that you won’t want to miss. I’ve said it all month: don’t wait!

Processing…
Success! You're on the list.

LAST CHANCE FOR COUNTRY FLOWERS + TEXTURED FLORAL

Welcome to my April Last Dance/Last Chance series! Today’s card is another “two-for” featuring Country Flowers and Textured Floral. I’ve designed this card with Lost Lagoon and Daffodil Delight, and I’m “delighted” with the way the two colors complement each other.

  • Stamps: Country Flowers, Textured Floral
  • Color Palette: Basic White, Lemon Lolly, Daffodil Delight, Lost Lagoon, Pretty Peacock, Gray Granite
  • Accessories: Stamp Cut & Emboss Machine, Country Flowers dies, Textured Floral dies, Textured Notes dies, Stampin’ Blends, Subtles DSP Pack, Jute Twine, Glue Dots, Stampin’ Dimensionals

That beautiful rectangular die is from Textured Notes – it’s fairly new, and it’s not Last Chance. I slipped in a little Wild Wheat Jute trim, and I think it works well with Daffodil and Lemon Lolly. I love the way Country Flowers and Textured Floral stamps and dies coordinate with each other! Both the stamps and dies for these two versatile sets are discounted.

I’ve left this card without a sentiment. I like to have a few of these on hand for that last minute, “I need a card” moments (oh, you bet I have those!). Visit the Online Store to see all the great Last Chance choices. And thanks for visiting today.

Processing…
Success! You're on the list.

LAST CHANCE: TRANSLUCENT FLORALS

Welcome to my April Last Dance/Last Chance series! I’ve created a soft card using Crumb Cake and Boho Blue. Crumb Cake is such a classic color and plays well with almost every other color, while Boho Blue is a classic mid-range blue that I am going to miss terribly when it retires in May. Sigh.

  • Stamps: Translucent Florals, Country Flowers (Both LAST CHANCE)
  • Color Palette: Basic White, Crumb Cake, Boho Blue (Retiring 23-25 In Color)
  • Accessories: Stamp Cut & Emboss Machine, Greetings of the Season dies (sold out), Translucent Florals dies, Exposed Brick 3D Embossing Folder, Linen Thread, In Color Jute Twine, Blending Brush, Stampin’ Dimensionals

I am very sorry to report that the Greetings of the Season dies are SOLD OUT. The Exposed Brick 3D Embossing Folder is NOT on Last Chance, which means it will be around for a while. Good thing because I use it a lot. It’s a larger format, square folder, which makes it easy to put an entire card front through the Stamp Cut + Emboss Machine.

I used a Blending Brush to add a little depth to the dry embossing with Crumb Cake ink. The larger leaf images are stamped off, but the smaller stem is stamped full strength. This makes a lovely sympathy card, but it could just as easily carry a different sentiment.

I hope you’re tracking all of these Last Chance beauties. They really are Last Chance, so if you’re smitten, head on over to the Online Store and make them yours! Both Country Flowers (the sentiment) and Translucent Florals are a better value if you purchase them separately as Stamps + Dies vs. buying them as a bundle. Be akamai and save!

Processing…
Success! You're on the list.

LAST CHANCE: PLAYING IN THE RAIN

Welcome to my April Last Dance/Last Chance series. If you love cute critters, check out Playing in the Rain. The dies include delightful clouds, a fence, a kite, and of course those cute critters!

  • Stamps: Playing in the Rain, Translucent Floral
  • Color Palette: Basic White, Petal Pink, Azure Afternoon, Soft Sea Foam, Old Olive, Memento Black
  • Accessories: Stamp Cut & Emboss Machine, Playing in the Rain dies, Bright Skies dies, Toadstool Gardens DSP, Brights DSP pack, Colored Pencils, Stampin’ Dimensionals

These are not the Playing in the Rain clouds, they’re Bright Skies clouds. They’re much bigger, and that worked best for this layout. I colored that bunny with our colored pencils to achieve a softer appearance. I think that bunny has serious Easter Bunny energy!

Check out the Playing in the Rain Stamps and Dies to see if that’s your kind of Bunny (or Turtle, or Foxy) Energy. And thanks for stopping by!

Processing…
Success! You're on the list.

Last Chance Craft Bundle: Attention Shoppers Review

Welcome to my April Last Dance/Last Chance series! Today’s Last Chance bundle is Attention Shoppers, and I’m playing with that shopping cart. I used the same basic layout, but ended up with two rather different cards. See what you think.

  • Stamps: Attention Shoppers, Elements of Text, Translucent Florals
  • Color Palette: Basic White, Memento Black, Smokey Slate, Flirty Flamingo, Peach Pie
  • Accessories: Stamp Cut & Emboss Machine, Attention Shoppers dies, Deckle Circle dies (retired), Stampin’ Blends, Stampin’ Write markers, Petal Pink Scalloped Ribbon, Glue Dots, Stampin’ Dimensionals

I die cut the bottles and shopping bag, then colored them to coordinate with my card. I’m still having a lot of fun using Stampin’ Write markers to splatter, but the only other embellishment is a tiny bow that’s held in place with a Glue Dot. The shopping cart is almost an embellishment all by itself!

Compare the first version with this second one. I’ve got plants in pots, an embossing folder as texture for the card base instead of stamped images, and some Designer Series Paper strips for additional texture. The bow is made from the 25-27 In Color Bordered Ribbon, which I cut into 3 strips and tied into a satisfyingly messy bow.

What do you think?

Either way, you’ll be happy to add Attention Shoppers stamps and dies to your crafty stash. Here’s a money saving tip: Instead of ordering the bundle, order the parts as individual items and save! Individually they’re on sale, but the bundle hasn’t been further discounted. You heard it here first!!

Processing…
Success! You're on the list.

LAST CHANCE/LAST DANCE FOR BIRD’S EYE VIEW

Welcome back to my April Last Dance/Last Chance series! Bird’s Eye View was an early choice for me back in 2023, and I was delighted to have it in the catalog for a second year. But it’s time to make room for new birdies.

  • Stamps: Bird’s Eye View, Ice Cream Swirl, Attention Shoppers (all Last Chance)
  • Color Palette: Basic White, Timid Tiger (25-27 IC), Darling Duckling (25-27 IC), Strawberry Slush (25-27 IC), Balmy Blue, Memento Black
  • Accessories: Stamp Cut & Emboss Machine, Circle dies (I used the retired Layered Circles), Window Sheets, Blending Brushes, Masking Paper, Stampin’ Write Markers, Paper Snips, Stampin’ Dimensionals

I started by stamping each of the birds on Masking Paper and cut each one out with my snips. After stamping each bird on the card front panel I covered it with its masked image. I created a mask by using a circle die and a window sheet (I tried to punch it, but it was too thick and I was unhappy with the results). I used washi tape to secure the mask over each bird, then created a “color halo” with a Blending Brush. The Balmy Blue Stampin’ Blends added a touch color to the wing on each bird.

I also stamped the “Make A Wish” sentiment from Ice Cream Swirl three times and cut out each word. I could probably have done it with one image, but I’m lazy and didn’t want to pay that much attention to my fussy cutting. There’s a few flicks from the Stampin’ Write marker around behind the sentiments.

I used the birthday cake image and sentiment from Attention Shoppers on the inside. And sharp eyes will notice that the front panel is on Stampin’ Dimensionals. I don’t remember the last time I made a card without them!

Timid Tiger, Darling Duckling and Strawberry Slush are 25-27 In Colors and will be available on May 7th. In the meantime, skit-skat-skoodle-doot* off to the store to pick up Bird’s Eye View, Attention Shoppers, and Ice Cream Swirl before they disappear for good!

*Any Chicka Chicka Boom Boom fans out there??

Processing…
Success! You're on the list.

Last Chance for Painted Lavender & Something Fancy Stamps

Welcome to my April Last Dance/Last Chance series! Today’s a double-dipper: both Painted Lavender and Something Fancy are retiring. There are deep discounts on the Painted Lavender dies and stamps!

  • Stamps: Painted Lavender, Something Fancy
  • Color Palette: Basic White, Petunia Pop, Bubble Bath, Granny Apple Green, Daffodil Delight
  • Accessories: Stamp Cut & Emboss Machine, Mini Corrugated 3D Embossing Folder, Hexagon Punch, Petunia Pop Bordered Ribbon, Blender Pen, Stampin’ Dimensionals

I’ve CASEd this from a card I swapped with the AH-MAZING Fiona Carson at OnStage 2025 in Brisbane, Australia. If you need an energy boost, check her out. She is a dynamo!

The images from Painted Lavender are stamped first, then embossed with the Mini Corrugated 3D Embossing Folder for texture on texture 💕 I used Petunia Pop on the larger flowers, but I stamped them off before adding them to the card panel. And I added a touch of Daffodil Delight to the center of those flowers with the Blender Pen. Blender Pens are indispensable -you can add a little or a lot of color by controlling how much ink you add to the brush.

Don’t take your time shopping, as these stamps are gone for good when they sell out. Shop LAST CHANCE before it’s too late.

Processing…
Success! You're on the list.

DIY CALENDAR BLOG HOP: APRIL 2025

Welcome to our April DIY Calendar Blog hop. Sharon, Cheryl, Malia and I hope you’ll be inspired. Our designs are designed for the DIY Easel Calendar, but you’re so crafty, we know you can do more with them. Let us know how you use our ideas!

  • Stamps: Impressions Abloom, Elements of Text
  • Color Palette: Basic White, Daffodil Delight, Pretty in Pink, Boho Blue, Lemon Lime Twist, Granny Apple Green
  • Accessories: Stamp Cut & Emboss Machine, Impressions Abloom dies, Gold Open Weave Trim, Low-Profile dots, Stampin’ Dimensionals

Impressions Abloom will be available on May 5th in the Online Store. It’s part of the May 2025 Online Exclusives release, but don’t be overly concerned about that. The best way to see ALL the new things is to log onto the Online Store and click on “What’s New” – don’t worry if it’s in a catalog or an Online Exclusive, it will all be there!

I used Elements of Text (currently available) to create a muted background. The leaves are stamped on top of the text, but the flowers are each die cut and adhered to the calendar. You could mask them if you’re not a fan of die cutting, but I like the additional dimension they have when they’re an added layer.

I’ve also added a bit of the Gold Open Weave Trim and some Low-Profile dots for extra shine. I absolutely love that trim, especially for wrapping packages! It’s ideal for a card as it’s very lightweight and adds no bulk.

If you’d like the 2025 template, please contact me. Be sure to tell me that you’d like the template and that you’re a real person – you’d be amazed how much junk is out there. The template is $5 (no April Fools, just five bucks!) You can print copies for yourself. I take it to my local printer and have them print on Basic White card stock.

Thanks for stopping by! Click below to visit the other blogs on the hop.

Processing…
Success! You're on the list.

DOUBLE POINT CARD: HAPPY HIBISCUS

When I started the Winterly Treetop Double Point card, I made two sets of the DSP. The second set sat around until I decided to try it with the Happy Hibiscus.

  • Stamps: Happy Hibiscus
  • Color Palette: Basic White, Blueberry Bushel, Garden Green, Daffodil Delight, Lemon Lolly
  • Accessories: Stamp Cut & Emboss Machine, Happy Hibiscus dies and Hybrid Embossing Folder, Spotlight on Nature dies, Adhesive-Backed Shiny Sequins, Stampin’ Blends, Natural Tones Linen Thread, Stampin’ Dimensionals

I chose a different die from Spotlight on Nature. I doubled up the gorgeous Natural Tones Linen thread for a simple bow, and added a few shiny sequins for sparkle. And I really, really love the Happy Hibiscus Hybrid Embossing Folder. 💛

I left the interior of this one black too. When it’s time to add the sentiment, I’ll pencil a couple of marks with the interior panel in place so my sentiment falls behind the focal point.

What do you think? Does this one work? It’s a lot of white, but seriously, have you ever seen a blue hibiscus? I’ve seen lavender, but not blue.

Either way, you can shop for supplies in the Online Store.

Processing…
Success! You're on the list.

DOUBLE POINT CARD: WINTERLY TREETOPS

I came across the Winterly Meadow Designer Series Paper in my craft room the other day and started to play. The card design is called Double Point, and it’s apparently been around for a while – but it’s new to me! It’s a perfect way to use our beautiful paper.

  • Stamps: Winterly Treetops, Elements of Text
  • Color Palette: Basic White, Memento Black, Lost Lagoon, Pool Party, Wild Wheat, Blueberry Bushel, Shaded Spruce, Pretty Peacock
  • Accessories: Stamp Cut & Emboss Machine, Winterly Treetop dies, Spotlight on Nature dies, Stampin’ Blends, Iridescent 1/2″ trim, Stampin’ Dimensionals

I colored this birdie with Blends to make sure there was a perfect match with the DSP. I might have gotten a little silly with the Iridescent trim – I sliced it up into little strips. Can you use your imagination? Does it look just a little bit like a nest? Humor me.

The interior panel slides right out. I’ll add a sentiment in the center when I decide to send the card. I often leave off a sentiment if it’s easy to add at the last minute to give myself options.

I’m wondering if it’s worthwhile to make a tutorial for this card. I’m away from my craft desk for a few more days, but if you’re interested, leave a comment. In the meantime, you can shop for supplies in the Online Store.

Processing…
Success! You're on the list.