Punching out the Angry Birds

Recently, one of my regular stampers requested projects for kids.  I looked at what I had on my shelf and found stamps suitable for feminine or baby cards, but not really for KIDS.

Off to Pinterest, the Black Hole of the Internet!

PinterestSaladInJars

I found some great ideas and they weren’t even in mason jars!! Score.

Maui Stamper Angry Birds Punch Art Treat Bag

This was inspired by THIS great card, and I CASED it pretty liberally.  The Red Bird is punched from the 1 3/4″ circle, and the Yellow Bird is the old style Heart Punch.  I think you could get that shape using a square and a corner rounder.AngryBirds2

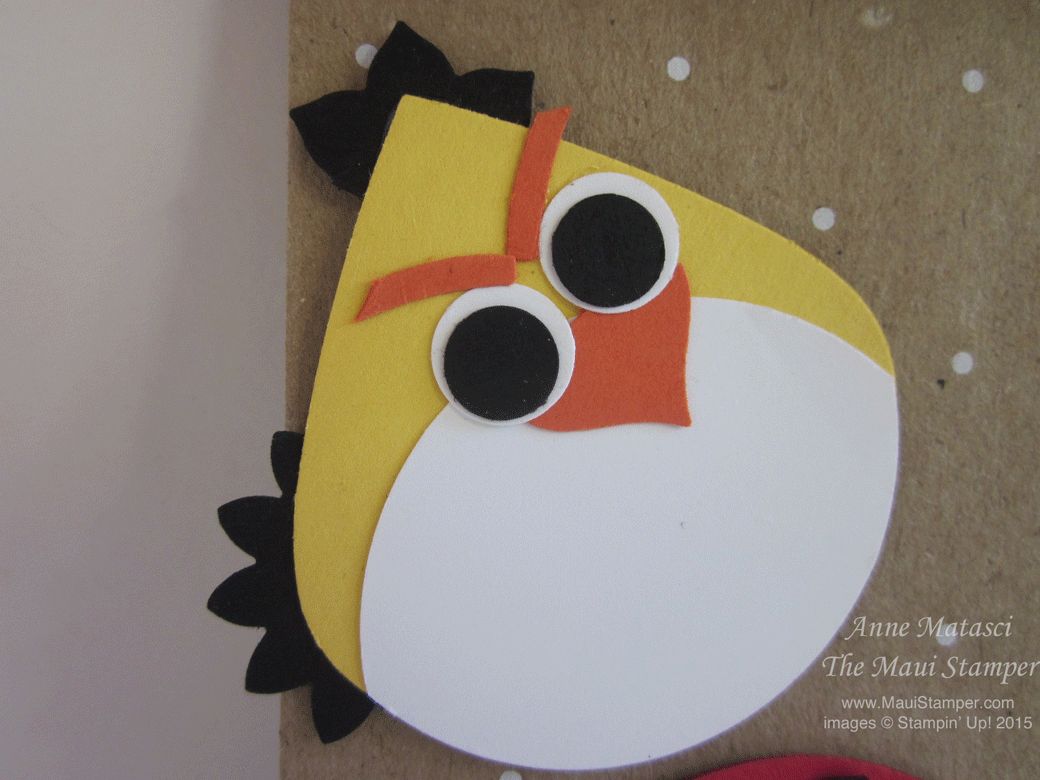
The white body portions are 1 3/4″ circles punched twice.  The orange beak is the Itty Bitty Heart (trimmed) and the head and tail feathers are from the retired Boho punch.  I think you could get the same look from the Flower Fair framelits.

AngryBirds3

The eyebrows are the end of the stem from the bird punch.  The birds aren’t angry until you add those eyebrows, so work them!!  The eyes are from the Owl punch, and I used the 1″ square for the yellow beak.

The Word Window and the Woodgrain TIEF make up the slingshot, and the linen thread finishes it off.  I trimmed a strip of Garden Green with Fringe Scissors, and the embellishment at the top is from Amazing Birthday.  We had to stamp SOMETHING!

These are last year’s bags – the current bags are plain, so you could even add some clouds as Sarah-Jane Rae did to her card.

Everyone loved the end result – but we agreed that these birds take a lot of little pieces!

So much simpler than it looks…REALLY!

We made this card at club last week.  When I pulled it out, everyone ooh-ed and aah-ed, but when I told them this was the card du’jour, they were all SHOCKED.  Once I demonstrated how you pull it together, they gave me a bad time about how many little flowers they were going to have to punch, but they were ready to give it a whirl:

Floral Cascade card

Doesn’t it look like a flower garden at its peak in the middle of summer?  Here’s what it looks like opened up:

Floral cascading card open

No supply list – it’s any and all paper and texture stamps you have around plus every floral punch you own (and the XL Bird).  Pull out EVERYTHING and you’re ready to rock and roll!

Here’s what it looks like from the top when it’s open:

Floral cascading card  top view

I encounted this card on Pinterest and you can see Sonia’s post HERE.  She offers a tutorial for the card, and shares how thrilled she was to have it published in Papercraft Inspirations.  Prety fabulous stuff, if you ask me!

Stampinella

This summer has been so busy that I haven’t been able to set aside playing around time in my studio for a while.  However, the stars lined up and today was the day.

Mr. Maui Stamper likes to come by and see how “Stampinella” is doing.  It always cracks me up when he calls me that – I’m not sure if it’s because I’m covered in ink, or because my studio looks like the wicked Stepsisters came crashing through, tossing bits of paper everywhere.  What I really need are those cute little mice and birds from Cinderella that come in and finish her dress for her (they would clean up for me, thank you), but what I end up getting is an orange tabby with a shedding problem who wants to spread across my workspace.

Mice, birds, and cats aside, here’s one of the projects I finished today:

Best Friends Forever Crumb Cake

  • Best Friends Forever and Teeny Tiny Wishes stamp sets
  • Crumb Cake, Marina Mist, Naturals White and Soft Suede card stock
  • Crumb Cake, Marina Mist and Soft Suede Classic ink pads
  • Log Cabin Smooch Spritz
  • Antique Brads
  • Stampin’ Sponges
  • Big Shot and Fun Flowers Bigz L dies
  • XL Two Step Bird Punch

I am quickly falling in love with that Best Friends Forever stamp set, one of the sets we received in our convention bags.  I initially thought it would be more of a teen set with that “BFF” image but THOSE LEAVES.  Oh my goodness.  I love those leaves.  I put them on EVERYTHING.   I hope you like them because you are going to see a lot of them.

I wanted a more bronzed Antique brad but this was all that was left.  There are more on the way, but I didn’t feel like waiting.  Maybe I’ll change it out and maybe I won’t.   Sometimes the serendipity of the moment is just the thing, and I’m a big believer in Carpe Diem – Sieze the Day.  If I waited, who knows what those Stepsisters would be up to?  Letting the mice and birds in to torment the cat, that’s what they would do.

And how about that Smooch?  It’s been sitting on the side of my desktop just waiting to be noticed.  Good thing I looked.


Happy Easter

I saw this card a couple of weeks ago on Regina’s blog and knew it would be perfect for this week:
Lattice cross

  • NO Stamps!
  • Whisper White, Shimmer White, Marina Mist, Pear Pizazz and Daffodil Delight card stock
  • 1/8 inch white taffeta ribbon
  • Blossom Petals and Two Step Bird punches
  • Big Shot, Lattice Bigz die and Square Lattice Textured Impressions Embossing folder
  • bone folder
  • Tombo the Wonder Adhesive

I immediately visualized this card as a tall slender card instead of the traditional 4 1/4 x 5 1/2 inch card – it fits inside a small, open-end envelope.  I made changes to the color scheme and put the greeting on the inside, but this is actually quite faithful to Regina’s version.  The Lattice Bigz die is the basis for the cross.

The lilies are the sort of thing that you could do quickly, or you could agonize over for thirty minutes, and in the end you wouldn’t be able to tell the two apart.  (Choose the first option.)  I curved the edges of the smaller, rounder petal from the Blossom Petals punch with the bone folder, used tweezers to put a sliver of Daffodil Delight in the center, and then pinched the base together to form the lily shape.  It works best if you trim the point from the bottom of the petal.

Side view lattice cross

I’m a cradle Catholic, born and raised.  Went to Catholic elementary school, participated in youth organizations through high school and college, married a cradle Catholic boy and continue an active practice of my faith.  Being Catholic is as much a part of me as my goofy sense of humor and the shape of my face.  Every once in a while, a card takes on a meaning larger than just paper and accessories, and this was one of those cards.   Making this card was a meditation and  I hope you enjoy it.  To my Christian friends and readers, Happy Easter.  To all, Happy Spring.

And an Owl in a Heart Tree

Ho man…this card…the title…it just gets dopier and dopier:

I {Heart} Hearts

  • I {Heart} Hearts and All Holidays stamp set
  • Whisper White, Pretty in Pink, Pear Pizazz, Chocolate Chip and Daffodil Delight card stock
  • A random scrap of Real Red Designer Series Paper
  • Real Red Classic ink pad; Pear Pizazz Stampin’ Write marker
  • XL Two Step Owl, XL Two Step Bird, and XL Blossoms Petal punches
  • Full Heart and Heart to Heart punches
  • Whisper White 3/8 inch taffeta and Real Red 1/4 inch grosgrain ribbon
  • Big Shot and Lattice Textured Impressions folder

Do you want my honest opinion?  This one needs to go back to the drawing board.  I was thinking of the Partridge in the Pear tree (yes, I have a Christmas Carol hangover) and a goofy owl in a tree/bush made from hearts came to mind.  I think it was cuter in my head.

The Owl’s little “thought bubble” is the wing from the XL Bird punch.

Dopey, dopey, dopey!


The cutest little flower pot you’ll ever see

I was in my local hardware store the other day and spotted the cutest little clay pot you have ever seen – all of 1 1/2 inches tall.  It was $2 which almost caused me to pass it up, but I’m glad I was feeling extravagant:

Tiny Bouquet

Don’t you love it?  I’m not a huge punch-art fan, but I love the flowers you can make with punches.  These are made from the 5 petal flower (the pointed one) and the 1 inch and 3/4 inch circles.  The tiny pale ones are made with the Bitty Punches, and the leaves are from the XL Two Step Bird punch.  I had to put int a few butterflies from the Beautiful Wings Embosslit too.  Here’s another view:

Tiny Bouquet

I attached the flowers with E-6000 adhesive because it’s super-goopy, and the butterflies and Bitty Punch flowers are held on with straight pins.   I wish the little pot had been more reasonably priced, because these would be cute gifts.  It really wasn’t fair – the big 4 inch pot sitting next to it was 79 cents!  Ah well, I would have driven myself crazy making all those little flowers.

Make a little note on your calendar to check in all next week.  I’m participating in my first blog hop and it promises to be full of wonderful inspiration.

Fuzzy Bats and Spooky Eyes

My friend Kellie came over to play on Friday and brought a couple of cards to share with me.  I don’t make many Halloween cards so I don’t buy many Halloween stamps, but her cards just about had me putting in an order with my favorite Stampin’ Up! demo (yeah, ha ha, three guesses who that might be!!).

Kellie's Spooky bats

Since I didn’t make this card, I can’t give you all of the details but she did say she used the Wicked Fun Specialty Designer Series papers and the Wicked Cool stamp set.  I REALLY didn’t plan on getting that set!

The Wicked Fun DSP has flocking on it so the bats are fuzzy…I like those fuzzy bats…not that I really like bats or anything, but how can you not love fuzzy bats??  Just tell me that.

Kellie's Spooky Eyes

Don’t you LOVE these eyes?  They’re the wing from the XL Two Step Bird punch!  I like them even better than Googlie Eyes, and I really love googlie eyes.  The spider web is from that dog-gone Wicked Cool stamp set too.  Hmmmph.

Kellie CASE-d these two cards and even brought me the names of the stampers, so if you love these cards, be sure to Google these two talented women and give them a little love too.  The Eyeballs card was inspired by Sandi Maciver and the Fuzzy Bats are courtesy of Deb Currier.

Have a little Halloween fun!

Simple Circles

I brought home a lot of great samples from convention.  They’ve been a source of inspiration for classes and workshops, and this card is a double dipper.  There were two different cards that used the “circle-as-flower” technique, and I adapted it even further:

Circle Circus Flowers

  • Circle Circus and Teeny Tiny Wishes stamp sets
  • Sahara Sand, Cherry Cobbler, Soft Suede, Pretty in Pink and Whisper White card stock
  • Pretty in Pink, Melon Mambo and Cherry Cobbler Classic ink pads
  • Big Shot and Perfect Polka Dots Embossing Folder
  • XL Two Step Bird  and Modern Label punches;  1 3/4, 1 1/4 and 3/4 inch circle punches

This is about as easy as it gets.  Stamp 3 circles,  punch 3 circles, add 3 little scraps for stems and 3 little leaves (do you recognize the wing and a leaf from the XL Two Step Bird punch?)  Sahara Sand is such a neutral color that it takes what could be a very femine card and makes it relatively neutral.  If you wanted it to be masculine, you’d need to pull out your Shades-of-Blue stamp pads but that wouldn’t be so difficult, would it?

Sweet home for a cardinal

Cardinals are nest builders, not house dwellers, but if your imagination can tolerate a little stretching  I think you’ll enjoy this:

Stampin' Up! milk carton die Two Step Bird punch Bird House

  • Vintage Vogue and I {Heart Hearts} stamp sets
  • Naturals White, Soft Suede, Real Red, Mellow Moss, Basic Black, Pumpkin Pie and Always Artichoke card stock
  • Real Red, Soft Suede and Always Artichoke Classic ink pads
  • Black Stampin’ Write Journaler and White Gel pen
  • Big Shot and Bigz L Milk Carton die
  • Two Step Bird, Heart to Heart and Scallop Edge punches
  • Stampin Sponges, Sponge Daubers, Tombo adhesive and Stampin’ Dimensionals

I need to send you to see two special ladies to thank them for their part in this project.  The first is the Amazing Kim Bolzenthal, who generously sent me a RAK of pre-cut milk cartons.  If you know Kim at all, you’ll know she is a thoughtful, giving person who has a passion for stamping and stampers.  Please leave her a comment and tell her how fabulous she is!

The second person I’d like you to visit is Marie whose charming Goldfinch Birdhouses were my direct inspiration for this project.  I loved her concept and tweaked it just a little to suit my purposes, but she’s the genius behind the design and she deserves the credit.  Please leave her a comment and let her know how brilliant she is!

The cardinal and the little heart are both attached with Stampin’ Dimensionals, but the heart is so small I snipped off a little piece from the strip around the edge of the dimensionals.

Here’s the 411 on the cardinal’s face:  It’s a pain in the, um, tailfeathers but I think it makes a big difference.  After you punch the bird’s body in Real Red, go back and insert a right angle corner of black cardstock into the face portion of the punch at the beak.  The farther in you insert that black corner, the bigger your mask will be.  Punch it and set it someplace you can find it, because it’s not very big.  Do the same thing with a piece of Pumpkin Pie cardstock, but only insert that corner in to the point where it makes a tiny diamond shape with the beak.  Punch this very carefully, because as soon as you punch it is so small it will disappear into the litter on your workspace.  Take a pair of tweezers (yep, I really did that) and use a teeny tiny dot of Tombo to put the Pumpkin Pie beak on the Black mask.  Use a tiny dot of Tombo to attach the mask to the cardinal’s face and use a white gel pen to add an eye.

Go ahead – give it a try – you can do it!

One last Valentine

I’ve saved this post because it was the Valentine I gave my wonderful husband, and it didn’t seem right to post it before he received it.  The idea came from Becky Roberts, whose projects I continue to CASE with reckless abandon.  I fell for this folder as soon as I saw it, and thought it would make a great club project.  Once I developed my own sample, I realized it would not only be a great club project, but would work perfectly for my Valentine.  Here’s the outside:

Valentine Coupon booklet

This uses the I {Heart} Hearts stamp set (don’t forget $2 from the sale of each set goes to the American Red Cross through February 28) and the Very Vintage Jumbo Wheel. There’s also the Big Shot with the Scallop Circles #2 and Originals Circles #2 dies. I used the Full Heart, Heart to Heart, and Scallop Trim Border punches as well, and finished with the Real Red 1/2″ Striped Grosgrain ribbon.

Here’s the inside:

Open Valentine Folder with Tags

Isn’t it clever?  There’s a small Cello Bag attached with Sticky Strip to each side, and I can fit two little tags inside each bag.  You could use the tags as gift tags, but I was inspired to make the tags into coupons.  Each one has a little message on the back, and he can redeem them as he likes.  The possibilities for this idea are endless.

Here are the tags a little closer:

First two tags

I’ve used 5/8″ Satin Ribbon from the Occasions mini on all of the tags, and incorporated the Sending Love Specialty Designer Series Paper as well.

Here are the other two tags:

Second set of tags

These tags use the brand new XL Two Step Bird punch and the fabulous Beautiful Wings Embosslit for the Big Shot.  All these goodies made this project really easy to put together.

If there’s enough interest, I’ll put together a tutorial with dimensions and more instructions.  Becky said in her post that she had made hers and sent them off and didn’t plan a tutorial, so considering all I’ve gained from her blog I think it would be the least I could do.  Either way, enjoy and CASE away!!