A Congratulations Easel Card

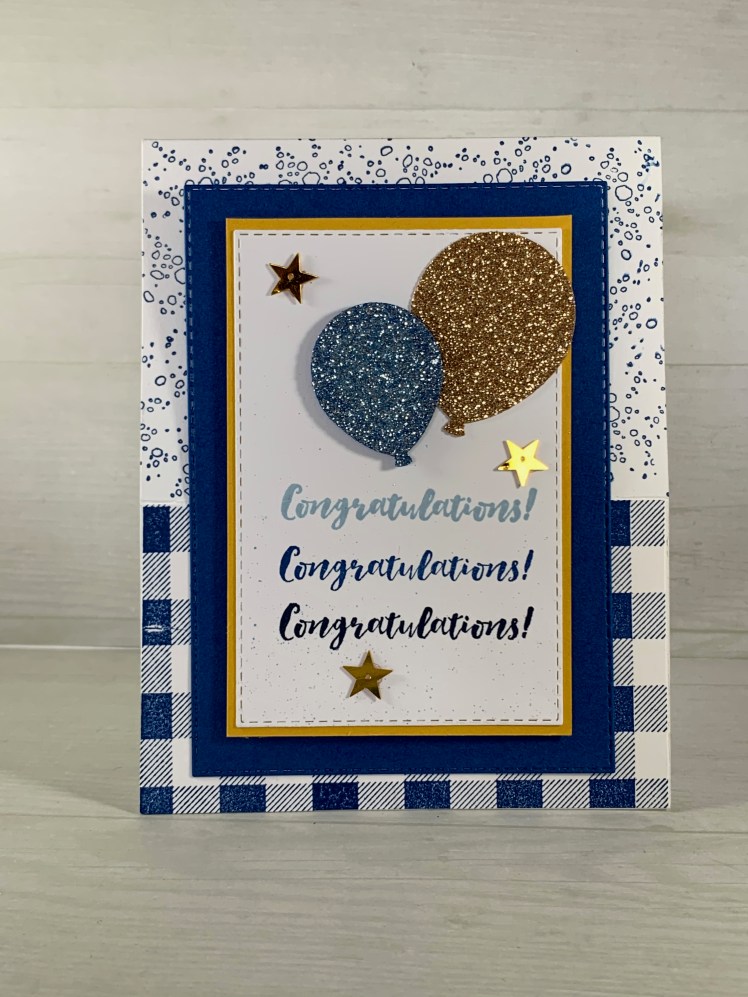
I’ve gotten VERY creative with projects for my clubs the past couple of months, as we’re crafting together via zoom. It’s not quite the same as being together in one place, but it’s much better than not being together at all! Since I can only provide paper and my club members have to go through their stashes to find stamps, ink, and any extras they want, I’ve been working to come up with designs that are flexible. Last month we created an easel card for a graduate:

Maui Stamper Stampin Up Congratulations Easel Technique

This card is more about the concept than the execution. The card base is 4.25″ x 11″ and is scored at 5.5″ and 2.5″. I cut a Whisper White panel to 2.5″ x 4.25″ (the same size as the bottom half of the card front) so that I could be sure and get a perfect Buffalo Check grid. The Stamparatus is an indispensable resource.

The little label from the Ornate Labels dies is the “bumper” for the folded top of the card. It’s mounted on two mini-dimensionals, which are just high enough to hold the easel, but still soft enough to mail with regular first class postage. I’ve used a piece of rogue washi across the card below that bumper, and I can’t begin to tell you anything about it other than the fact that I’ve had it along time!

Maui Stamper Stampin Up Congratulations Easel Technique

On the inside of the card, I created an optional gift card pocket. If your graduate was naughty, well then, leave the pocket off – this is only for graduates who have earned a little reward! The pocket is 4 5/8″ x 2 5/8″ and is scored on 3 sides at 1/2″. Use a circle punch to create a little extra space to slide the card in and out. It looks like it’s upside down, but when you hold the card upright it’s right side up.

There are so many ways to stamp and embellish this card! But if you need a quick and simple version, this will do. And if you need supplies, please visit the Online Store.

February DIY: Lovely Lilypad

WHOOSH!

February is upon us and January is in the rear view. I’m glad there will be an extra day in February this year, because I need it! (See previous post, lol.) Here’s to the turn of the calendar:

I wanted to use the embossed image technique for the Lilypad, but I wasn’t happy with what I was coming up with using the Blender pens, the Aqua painter, or the Stampin’ Blends, so I pulled out the actual, bona fide, genuine article – the paintbrush.

I’m not trained by any stretch of the imagination, so this was absolutely trial and error, but I had a great time and I’m happy with the results so I count it for a win! A little Wink of Stella gives it a little shine.

Do you make your own DIY Calendar? It’s quick and easy, and so gratifying to see on your craft desk every month. Click on “Contact the Maui Stamper” above if you’d like to purchase your own calendar – I sell the pdf for just $5 so you can make as many as you like.

Stop by to see what Crystal and Cheryl are doing for February. And if you’re ready to shop, visit the Online Store!

The Woodland is Rooted in Nature

It’s been a delightful summer in my craft room, and I’m ready to get the show back on the road and share some of it with you. Would you like to see what I’ve been doing?

Maui Stamper Stampin Up Woodland is Rooted in Nature

I seldom use Very Vanilla card bases, and when I look at this one I wonder why! I especially like the way it works with the braided linen, which is just an abundance of linen thread – and you know I love linen thread!!

I have a few great tips for you when you’re working with vellum:

  • The Fine Tip Glue Pen is VELLUM MAGIC. Use it to adhere vellum to any project and it doesn’t show through!!!
  • When I run it through my die cut machine I layer a piece of waxed paper between the paper and the die (and yes, I have a Big Shot, which Stampin’ Up! no longer sells – but something BIGGER is coming!) It helps to release the vellum from the die, especially the Stitched Shapes, which have a tendency to hang onto the die cut.
  • I use my trusty Bone Folder when I’m removing a vellum die cut from the die, since it’s thin and helps to avoid creases in the vellum.
Maui Stamper Stampin Up Woodland is Rooted in Nature

I used sponge daubers to ink the foliage in Granny Apple Green and Shaded Spruce. Once they were inky, I colored the trunk with the Soft Suede Stampin’ Write marker. If you try to color the trunk first, it’s easy to accidentally cover the ink with the daubers. Coloring it second allows you to push off any GAG or SS ink (yup. That’s what I call it. GAG. Love that color.)

Maui Stamper Stampin Up Bonus Days July 2019

Today is the FINAL BONUS DAY!! Skedaddle on over to my Online Store to earn your savings – a $5 voucher for every $50 in merchandise you choose! You’ll be glad you did.

Technicolor Thanks

I love making custom cards, and I had a very special order a couple of weeks ago. I took my inspiration from the graphic design in a proposal to create these thank you cards for the team that put the proposal together:

Maui Stamper Stampin' Up! Artistan Textures Love What You Do

  • Stamps: Love What You Do, Artisan Textures, Handcarved (retired)
  • Color Palette: Whisper White, Gorgeous Grape, Lemon Lime Twist, Tempting Turquoise (retired)
  • Accessories: Big Shot, Subtle Dynamic TIEF (swoon), Watercolor Paper, Ink Refills, Brush, Stampin’ Dimensionals

Maui Stamper Stampin' Up! Artistan Textures Love What You Do

First things first. When I first saw the Subtle Dynamic TIEF in the catalog, I thought it was just a titch TOOO subtle – I couldn’t see anything. But it really sounded like the sort of thing I would love, if it were what it seemed to be – get my drift?

Oh Em Gee.  It is gorgeous. I highly recommend giving your cardstock a very light spritz before running it through the embossing folder. I use rubbing alcohol because it dries very quickly, but you could use water. The results are stunning.

Maui Stamper Stampin' Up! Artistan Textures Love What You Do

I was looking for some DSP to put into that angled section between the two Tempting Turquoise panels, and I started to play with water and ink and the light went on. I used an ordinary paintbrush with ink refills to draw lines across some Watercolor Paper, and I was thrilled with the results. Cutting it into sections really made it pop.

Maui Stamper Stampin' Up! Artistan Textures Love What You Do

I can’t show you the source of my inspiration, but the graphics and colors are similar. (I hope you’ll forgive me for using Tempting Turquoise, but that was the best match and I still had some in my craft room.) There was a LOT of measure twice, cut once-ing and I still had a few things that went wonky on me, but this was a really fun project. You can find inspiration in the most unexpected places…

…but if you want to shop for supplies, it’s easy. Shop HERE.


Colour INKspiration 36: It’s an honour!

Maui Stamper Stampin' Up! Colour INKspiration banner

Welcome to the Colour INKspiration Blog Hop and Colour Challenge #36. I’m quite honoured to be a guest designer with the Colour INKspiration Crew this month. The 2nd and 4th Wednesdays of each month this talented group of crafters design projects focusing on the Stampin’ Up! colour palette. The 2nd Wednesday challenge is currently working through the newly revamped Colour Families (CI #35 was Neutrals) and the 4th Wednesday – like this one –  uses a Pinterest-based image for inspiration. #CI36 features Crushed Curry, Soft Suede, Basic Gray and Silver Foil, with Basic Black, Whisper White, Very Vanilla and Metallics permitted as well.

Maui Stamper Stampin' Up! Colour Inkspiration 36 Palette

(PS doesn’t that adorable little girl look as though she has been asked to eat something she has never seen before and can’t imagine putting in her mouth? Just saying!)

I confess to having been just a bit intimidated at the thought of using Soft Suede and Basic Gray on the same project – a little outside my comfort zone – but this is a challenge, after all!

Maui Stamper Stampin' Up! Colour INKspiration 36 Guest Designer

I think I pulled out most of my craft room and had it spread all over the desk trying to put this together!

Maui Stamper Stampin' Up! Colour INKspiration 36 Guest Designer

I honestly don’t remember where I began! When I stamped the large flower from Flourishing Phrases in Crushed Curry, I immediately thought I should layer it, and once I embarked on that process, I just couldn’t seem to stop. (I used a LOT of Stampin’ Dimensionals on this project!!) I had leaves and berry bits and ribbons all around me, and I just kept arranging and rearranging them until I was happy.

The Stamparatus was indispensable in aligning the sentiment so that I could stamp in both Soft Suede and Crushed Curry. If you haven’t taken the ‘Ratus Leap, treat yourself!

In order to find a balance between light and dark, I used the largest Stitched Shapes Framelit circle to ground my floral abundance. The Silver Foil behind the Woodland DSP also added some light, and I used Wink of Stella (a crafter’s best friend)  to emphasize the trees in the Woodlands TIEF.

All the little bits and pieces are tucked in and adhered with Glue Dots. The Silver Metallic thread is also held fast in the same way, but all of the main layers are adhered with Stampin’ Dimensionals.

Maui Stamper Stampin' Up! Colour INKspiration 36 Guest Designer

The Colour INKspiration Crew is a South Pacific team, but the challenge is international. I hope you’ll give it a try! All entries are posted to the Colour INKpiration Facebook group.

One note for those of you outside Australia and New Zealand: challenges open and close in AEST (Australian Eastern Standard Time). Many of us are on the other side of the International Date Line, and sometimes the math gets a little tricky. You can Google the current time, but I use a free app called Miranda that allows me to select any time in my time zone and see what it is in any other time zone. My family is spread halfway around the world (quite literally) and this app has come in quite handy!

Thanks for stopping by my part of the Pacific. You’re headed West now to Canberra and Monique Fielder, and I know you’ll enjoy her beautiful artwork. If you’re in the U.S. and you’d like to shop for the supplies to create your own version of this card, visit my Online Store.

Maui Stamper Colour Inkspiration Next Button