SUNFLOWER TOTE

The Sunflower 3D Embossing Folder was at the very top of my July Online Exclusives list. It’s the large format 6″ x 8″ folder, so the options are endless for cards as well as 3D projects. I turned it into a sweet little tote.

  • Stamps: Spring Corners
  • Color Palette: Basic White, Darling Duckling, Timid Tiger, Mellow Moss
  • Accessories: Stamp Cut & Emboss Machine, Sunflower 3D Embossing Folder, Spotlight on Nature dies, Spring Corner dies, daubers, 25-27 In Color Flat Pearls, Paper Snips (gone 😭), Mossy Meadow 1/4″ Gold Ribbon, Stampin’ Dimensionals

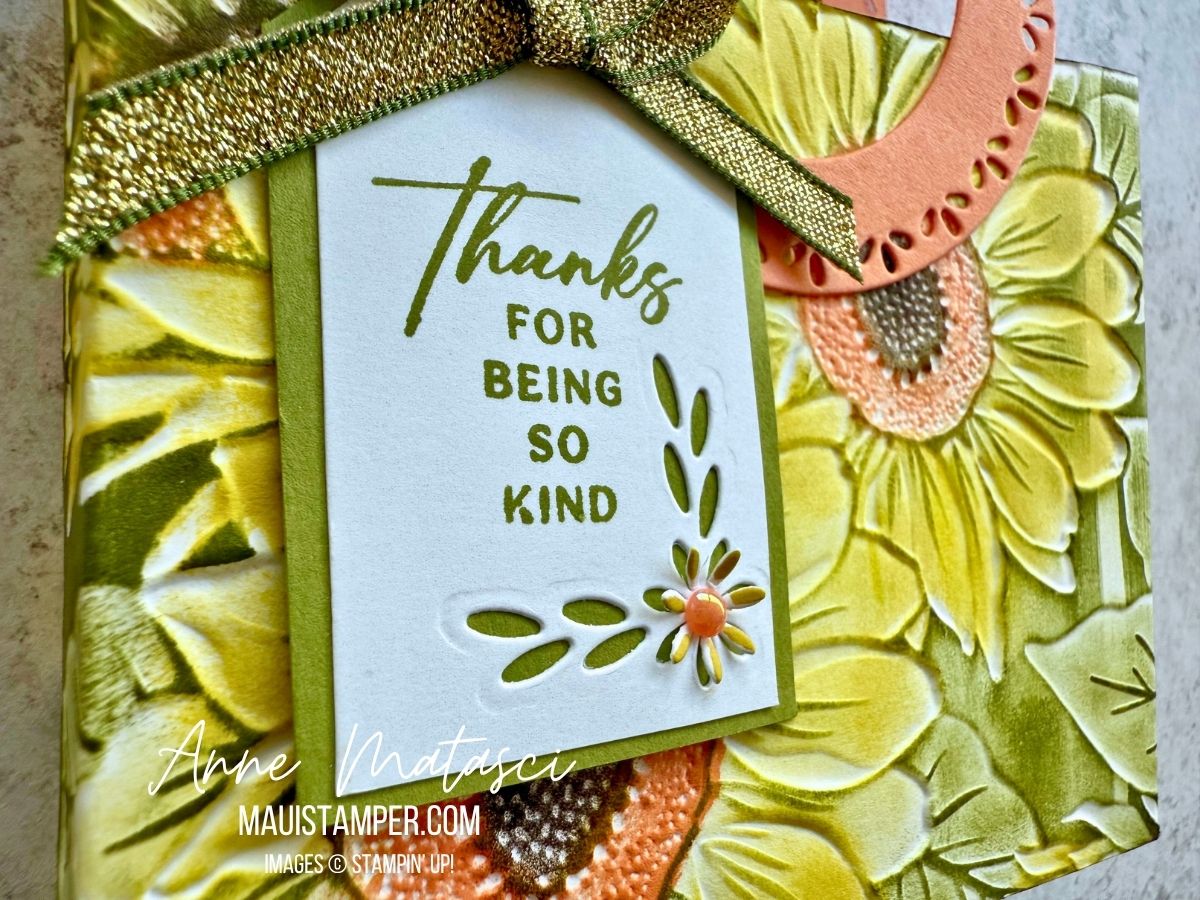
It’s quick work to color the embossing folder with daubers. I began by dragging my Mossy Meadow ink pad lightly across the side of the embossed card stock where the sunflowers were recessed. (It’s called the debossed side, but who knows that?) Add ink to the design using daubers, and the result is a rustic, homespun look. If that’s not your style, use Stampin’ Blends, Watercolors, or Watercolor Pencils – but it will take a lot longer!

The handles are two big Spotlight on Nature circles, cut with a smaller circle centered inside. TIP: if you use washi tape across the circles, you can get an even and repeatable ring. Just be sure to take some of the stickiness off the washi by pressing it onto whatever you’re wearing once or twice so it doesn’t tear the paper when you remove it. There’s something about sending it through the Stamp Cut and Emboss Machine and smashing the daylights out of it that makes it want to stick to paper.

My tag is hand cut. I used a piece of chipboard from the back of a DSP package to make a pattern for the angles at the top. I snipped the corners with my Paper Snips and added the corner die cut from Spring Corners, along with a tiny 25-27 In Color Flat Pearl. A bow with the Mossy Meadow and Gold ribbon finishes it off!

Paper Snips, we will miss you. 😭😭😭 They sold out in a hot minute after Stampin’ Up! announced that they would no longer be available from the manufacturer. Stay tuned for an update on a replacement. In the meantime, take good care of your Snips!

Processing…
Success! You're on the list.

ALONG THESE LINES: A SINGLE ROSE

I have one more image to share from Along These Lines. I love the elegant vertical lines of this rose, and decided to pair it with the stunning Woven Textures DSP. To me, these linear images seem to work well with softer tones, so I chose Petal Pink for my rose.

  • Stamps: Along These Lines, Happy Hibiscus
  • Color Palette: Basic White, Petal Pink, Soft Sea Foam, Memento Black
  • Accessories: Note cards and envelopes, Stamp Cut & Emboss Machine, Textured Notes dies, Stampin’ Blends, Woven Textures DSP, Paper Snips, Linen Thread, Stampin’ Dimensionals

This is our smaller format Note Card. I used my snips to trim out just the word THANKS from the sentiment from Happy Hibiscus. I chose the soft linen-look design from the DSP pack so it wouldn’t overpower the rose. It has the feeling of matted artwork, don’t you think?

Shop the Online store for all your paper crafting needs!

Processing…
Success! You're on the list.

LAST CHANCE FOR BIRD’S EYE VIEW #2

Welcome to my April Last Dance/Last Chance series! I got a little carried away with myself and before I knew it, I had another version of Bird’s Eye View. It’s one of my favorites, so I shouldn’t be surprised. WARNING: This version includes Fussy Cutting.

  • Stamps: Bird’s Eye View, Translucent Florals, Textured Notes
  • Color Palette: Basic White, Misty Moonlight, Pebble Path, Daffodil Delight, Wild Wheat, Memento Black
  • Accessories: Paper Snips, Stampin’ Write Markers, Stampin’ Blends, Adhesive Back Solid Gems (retired), Stampin’ Dimensionals

For some reason I am obsessed with “flicks” from the Stampin’ Write markers. I’ll eventually get over it.

I colored the birds with Stampin’ Write markers and fussy cut the images. They’re pretty straightforward shapes, so the cutting is easy. I perched each bird on a little branch (HINT: place the birds on the panel before stamping the branch or adhering the birds to optimize the branch placement). I added a few gems and I was done.

Bird’s Eye View is available while supplies last. Don’t let these avian goofballs get away!

Processing…
Success! You're on the list.

LAST CHANCE/LAST DANCE FOR BIRD’S EYE VIEW

Welcome back to my April Last Dance/Last Chance series! Bird’s Eye View was an early choice for me back in 2023, and I was delighted to have it in the catalog for a second year. But it’s time to make room for new birdies.

  • Stamps: Bird’s Eye View, Ice Cream Swirl, Attention Shoppers (all Last Chance)
  • Color Palette: Basic White, Timid Tiger (25-27 IC), Darling Duckling (25-27 IC), Strawberry Slush (25-27 IC), Balmy Blue, Memento Black
  • Accessories: Stamp Cut & Emboss Machine, Circle dies (I used the retired Layered Circles), Window Sheets, Blending Brushes, Masking Paper, Stampin’ Write Markers, Paper Snips, Stampin’ Dimensionals

I started by stamping each of the birds on Masking Paper and cut each one out with my snips. After stamping each bird on the card front panel I covered it with its masked image. I created a mask by using a circle die and a window sheet (I tried to punch it, but it was too thick and I was unhappy with the results). I used washi tape to secure the mask over each bird, then created a “color halo” with a Blending Brush. The Balmy Blue Stampin’ Blends added a touch color to the wing on each bird.

I also stamped the “Make A Wish” sentiment from Ice Cream Swirl three times and cut out each word. I could probably have done it with one image, but I’m lazy and didn’t want to pay that much attention to my fussy cutting. There’s a few flicks from the Stampin’ Write marker around behind the sentiments.

I used the birthday cake image and sentiment from Attention Shoppers on the inside. And sharp eyes will notice that the front panel is on Stampin’ Dimensionals. I don’t remember the last time I made a card without them!

Timid Tiger, Darling Duckling and Strawberry Slush are 25-27 In Colors and will be available on May 7th. In the meantime, skit-skat-skoodle-doot* off to the store to pick up Bird’s Eye View, Attention Shoppers, and Ice Cream Swirl before they disappear for good!

*Any Chicka Chicka Boom Boom fans out there??

Processing…
Success! You're on the list.

CORNER IN BLOOM: PETUNIA POP BIRTHDAY

Corner in Bloom is one of my favorite Sale-a-bration stamp sets, and while I’m not certain these flowers are petunias, I’m very happy to see them in Petunia Pop. These are happy flowers!

  • Stamps: Corner in Bloom (SAB 2025), With You in Mind, Elements of Text
  • Color Palette: Basic White, Memento Black, Petunia Pop, Granny Apple Green, Gray Granite
  • Accessories: Paper snips, Stampin’ Blends, 24-26 In Color DSP pack, Iridescent 1/2″ trim, 24-26 In Color Resin Dots, Stampin’ Dimensionals

I’m gonna get real here: this didn’t work out the way I envisioned it. I’m not happy with the script from Elements of Text that was supposed to be in the background but ended up looking like I accidentally made a grocery list on my card. I tried to add it after everything else was done, and I should have taken the time to carefully mask off the sentiment and the flowers. Live and learn!

Instead, I took the time to add these flowers to the inside corners. This set comes with corners and single flowers from each corner, and it was the single flower I used to do this.

We’re halfway through February, and that means we’re on the downhill side of Sale-a-bration 2025. If you’d like to earn Corner in Bloom (or any other SAB selection) for free, head over to the Online Store and do a little shopping.

Processing…
Success! You're on the list.

Stippled Roses with Blending Brushes

My local crafting groups love new techniques, and they really love time saving techniques. Using Blending Brushes to color the Stippled Roses is a perfect example – it’s so much faster than other methods of coloring, and the result is soft and appealing. The amount of shading in these stamps really make a difference when you’re using this technique.

  • Stamps: Stippled Rose, Something Fancy
  • Color Palette: Basic White, Petal Pink, Crumb Cake
  • Accessories: Stippled Rose dies, Stippled Rose DSP (SAB 24), Blending Brushes, Adhesive Backed Cork rounds, Ribbon Duo Combo Pack, Stampin’ Dimensionals, Blender Pen

There are only 2 ink colors on this card: Petal Pink and Crumb Cake. The image is stamped in Crumb Cake since the Blending Brush doesn’t blur the stamped lines the way a Stampin’ Blend would do. And Crumb Cake and Petal Pink are both what I think of as “dusty” colors, so if there’s a little overlap with the brush it doesn’t matter.

After adding color with the Blending Brush, I used the Blender Pen to add a little more depth and detail. You can see it on the leaves: I use the natural shading that’s part of the stamped image to guide my placement.

The sentiment is fussy cut with my snips, but that’s a really quick task. (You DO have a pair of Stampin’ Up! Paper Snips, don’t you?? INDISPENSABLE.) This is a speedy card, and it would be suitable for a lot of different occasions. You could easily swap out the focal point as well.

Don’t miss those Cork Rounds. I was skeptical when I saw them, but I’m a big fan. They’re so different from other embellishments, they’re soft so they don’t add bulk to your card, and they work really well with nature-themed projects. Try them, you’ll like them!

And thank you so much for shopping the Online Store.

It’s everyone’s favorite time of the Stampin’ Up! year – Sale-a-bration! This year we’re featuring an unprecedented variety of products including LOTS of gorgeous, coordinating Designer Series Papers. See a digital copy of the brochure HERE or go straight to the ONLINE STORE.

Say hello to the January April 2024 Mini catalog! See a digital copy HERE, or go straight to the ONLINE STORE.

The February Paper Pumpkin kit contains supplies for spring and Easter themed cards and treat boxes. An exclusive coordinating set of dies coordinates with all 3 first quarter Paper Pumpkin offerings. Subscribe HERE by February 10th.

Paper Pumpkin subscriptions deliver ready-to-go projects to your doorstep every month, but you have ultimate control to skip or cancel 😱 if you decide it’s not for you. Stampin’ Up! also features an exclusive collection of kits that don’t require a subscription. Visit the Online Store to see what’s available.

Processing…
Success! You're on the list.

ADORABLE OWLS in GINGHAM

Gingham!! It’s timeless, it comes in limitless colors, and it’s a versatile design pattern. Today I’ve paired our Country Gingham 6×6 inch Designer Series paper (you need this!!) with some gingham ribbon and our Adorable Owls. I’ve love how it looks – what do you think??

Fun fact: the Gingham pattern was invented in the 1600’s with roots in Asia, possibly Malasia. After over 400 years of enduring popularity, I’d say it’s a pretty solid tradition!

  • Stamps: Adorable Owls (SAB 23), Rays of Light
  • Color Palette: Basic White, Memento Black, Smoky Slate, Crushed Curry, Balmy Blue
  • Accessories: Big Boss, Stylish Shapes dies, Versamark Ink, Stampin’ Blends, Paper Snips, Black & White Gingham ribbon, Fine Sparkle Gems (retired, sorry!) Stampin’ Dimensionals

These are square cards measuring 4 1/4″ x 4 1/4″. You can create an envelope to fit them precisely, but you’ll need to pay extra postage in the US for a non-machinable card. Or you can just grab our medium envelope and mail them in that – they don’t need to fill the whole thing!

Each of these owls has been fussy cut with Paper Snips. I know that’s a deal breaker for some crafters, but it’s not for me. Do what you love and be happy about it. If you don’t like to fussy cut, die cut that circle from Basic White card stock and add some stamping around the edge. Don’t stress, this is FUN.

The “Hoot hoot” owl has a sassy “come hither” backwards glance that cracks me up. And don’t let the prospect of coloring all these owls hold you back. They’re simple, and you can leave lots of white space as I did to simplify the task. Remember, we’re having FUN. (Says the Drill Sergeant Stamper.) The background stamp for this card is Spiral Dye, stamped again in Versamark. That’s one of my favorite ways to add texture – Versamark ink!

This owl was almost a tragedy. I colored the eyes with the Sweet Sorbet Stampin’ Blend marker, since that’s the color of the Gingham DSP. I IMMEDIATELY regretted my choice, as they had that creepy demon-in-the-night sort of look! I toned them down with a couple of the Natural Blends (sorry, don’t remember which ones as I was in a panic!!)

Do you see what I mean? Kinda spooky. But now you know, and you won’t make this mistake. (You’re welcome.)

There’s another mistake you don’t want to make: you don’t want to miss Sale-a-bration 2023! These owls are available as a free selection with a qualifying order, but only until February 28th. They’re not the only option, but I think they’re one of the best! And if you’ve already added them to your stampin’ ensemble, there are 10 new options available as SAB rewards. Whoooo’s ready to SHOP?

Be sure to subscribe by February 10th for your Craft Escape in a box! The February kit has a sunny theme and includes everything you need to make 9 cards and envelopes. These cards are sure to brighten the day and for the first time ever, there are coordinating dies available as an add-on!

Paper Pumpkin subscriptions deliver ready-to-go projects to your doorstep every month, but you have ultimate control to skip or cancel 😱 if you decide it’s not for you. Don’t miss this kit!

New products in the January-April Mini Catalog are flying off the shelves! Even better, when you place a qualifying order you will choose FREE Sale-a-bration products. Sale-a-bration ends February 28th and as always, those products are while supplies last.

Hues of Happiness and the Fussy Cut

Some crafters detest fussy cutting, others find it relaxing. I find myself somewhere in the middle: I can usually do enough fussy cutting for one project, but then I am DONE. The Hues of Happiness Designer Series paper practically begs to be fussy cut.

#mauistamper #stampinup #huesofhappiness #diy #handmadecard #fussycut #birthday #timeworntype
  • Stamps: Go To Greetings, Forever Fern
  • Color Palette: Basic White, Gorgeous Grape, Melon Mambo
  • Accessories: Hues of Happiness DSP, Paper Snips, Big Boss, Timeworn Type EF, Gold Shimmer Ribbon, Stampin’ Dimensionals

There’s a little secret buried on this card front: some of these elements are not complete flowers. Images on the edge of the paper can still be trimmed and overlapped, providing even more options when you fussy cut!

I’m revisiting a favorite old technique here. I’ve used the edge of my snips to fray the edges of my card stock. It’s a way of setting the sentiment apart while allowing me to cut the exact size of paper I need.

This is an old fashioned feeling card, but it has a richness to it as well. The Hues of Happiness DSP has so many uses – you might just need to add it to your craft stash. See all the beautiful designs HERE.

Maui Stamper 2023 DIY Easel Calendar template $5

The 2023 DIY Template is now available! It’s just $5 and you may use it to make as many calendars as you like. It includes a page of covers, 12 monthly calendar blocks (4 to a page), and a set of cutting instructions. The blocks are designed to be cut to 3 1/2″ square.

Contact me to make your payment – I use Square to invoice, and you don’t need an account to use it.

MauiStamper Stampin' Up! Spooky Treats Paper Pumpkin DIY Craft Kit

Be sure to subscribe by September 10th for your Craft Escape in a box! The September kit is perfect to get ready for Trick or Treat. It makes 18 treat boxes for your favorite little ghosties and goblins.

Paper Pumpkin subscriptions deliver ready-to-go projects to your doorstep every month, but you have ultimate control to skip or cancel 😱 if you decide it’s not for you. Don’t miss this kit!

Sale-a-bration 22v2 is up and running! Whether your tastes are whimsical, romantic, or outdoorsy, everyone will find stamps to enjoy for free! But wait – there’s more! Designer series paper and dies that coordinate with our stamps are options when you spend $50 usd. On August 2nd an fresh set of products was added to the rewards offerings. Time to go shopping! See the choices HERE.

Our Mini Catalog is packed with new designs and products to inspire and delight. There’s something for everyone, and one of my favorite Do Not Miss This products is our Embossing Additions Tool Kit with all the tools you’ll need for perfect results. Shop the Mini Catalog and then choose your Sale-a-bration reward!

Stampin’ Up! always has a bonus joining offer during Sale-a-bration, and this one is really special! You’ll receive a gorgeous planner, 3 coordinating notebooks, and an exclusive stamp set to help organize your projects, your priorities, and your plans! You don’t need to make a business out of this to enjoy your new planner.

Becoming a demonstrator is ALWAYS a great value – the kit itself includes $125 of product (you choose every bit of it) for $99. It also includes catalogs and other business supplies should you choose to share what you love doing. But the icing on the cake is the discount that every demonstrator earns on every single order. There’s no long-term commitment – let’s chat and see if this makes sense for you! Contact me to learn more. Ready to sign up? JOIN HERE.

A Cute Chick to Welcome Easter

If you’re lucky enough to have a Kit Kat bar (…break me off a piece!) in your Stay Home Stash, I’ve got a cute idea for you. I found these bars weeks ago, back in the olden days when you walked through a store browsing. I wanted to use this idea for a group, but even then there must have been some panic buying because there were just a few in stock:

Maui Stamper Stampin Up Welcome Easter Kit Kat Bar

The Stitched So Sweetly dies have an awesome assortment of shapes that are really versatile. They’re currently available as a bundle with the So Sentimental stamp set, and I’m crossing my fingers that they’ll carry over to the 2020-2021 Annual Catalog because I have more ideas than time right now!

To create a box for any candy bar, just measure the bar and add a SMIDGE – maybe 1/8″ – to those dimensions for the dimensions of your box. Use the Simply Scored tool to quickly create that box, being sure to leave a 1/4″ tab to adhere the sides, and enough extra in the height of the box to create overlap when you close the flaps. Choose a die that fits inside your largest side and cut out one section. You may have to be a little creative to fit things through your die cutting machine!

Maui Stamper Stampin Up Welcome Easter Kit Kat Bar

It didn’t take long to cut the chick out, but fussy-cutting Happy Easter took a couple of tries. I always want to get it reaaaaaallllly close, and that doesn’t always work!

Maui Stamper Stampin Up Welcome Easter Kit Kat Bar

I hope you have something yummy to enjoy on Easter morning! Mr. Maui Stamper and I will have a delicious home-cooked brunch (who am I kidding, EVERYTHING WE EAT is home cooked these days. SHEESH.) We’re looking forward to an exuberant visit with our family via the wonders of Zoom. We are spread over MANY time zones so coordinating these calls is quite complex. (what is it with me and ALL CAPS today? Apparently I am tired of being alone and feel the need to shout. Sorry.)

We’re still shipping, and Stampin’ Up! is being extremely conscientious about staffing and environment in the warehouse in order to protect the SU team as well as each of you receiving your box o’ happiness. If you need a little something crafty to brighten up your day, you can shop HERE – and mahalo.

Sparkly Ladybugs for March

Little Ladybugs is a charming collection of images suitable for young and old alike. I think that makes it perfect for my March DIY Easel calendar!

Maui Stamper Stampin Up Little Ladybug March 2020 DIY Easel Calendar

I used my Snips to fussy cut all the Ladybugs (Officially Lady Bird Beetle, from the family Coccinellidae. (There are dies, I just didn’t have them at hand!) If you are using anything other than Stampin’ Up! paper snips, do yourself a ginormous favor and spend the $10. You won’t believe how they will Change Your Life.

I’ve seen a lot of them colored with red wings, but I just couldn’t do it. This girl clearly has her hands full with those four roly-polys, and she needs a little sparkle to get through the day. I certainly would.

Maui Stamper Stampin Up Little Ladybug March 2020 DIY Easel Calendar

I’ ve said it before, and I’ll say it again (and again, and again). That field of poppies image from Peaceful Poppies might just be the best image in the entire January – June spring catalog.

If you’d like your own 2020 template, click on “Contact the Maui Stamper” and I’ll send you an invoice. For $5, you can print all the calendar pages you’d like! And for those of you EARLY BIRDS who are looking for 2021, hold on! We’ll get there, I promise, and you’ll be the first to know.

Stop by to see what Cheryl and Crystal are doing for March. If you’re ready to do a little shopping to start the month of right, head over to the Online Store.