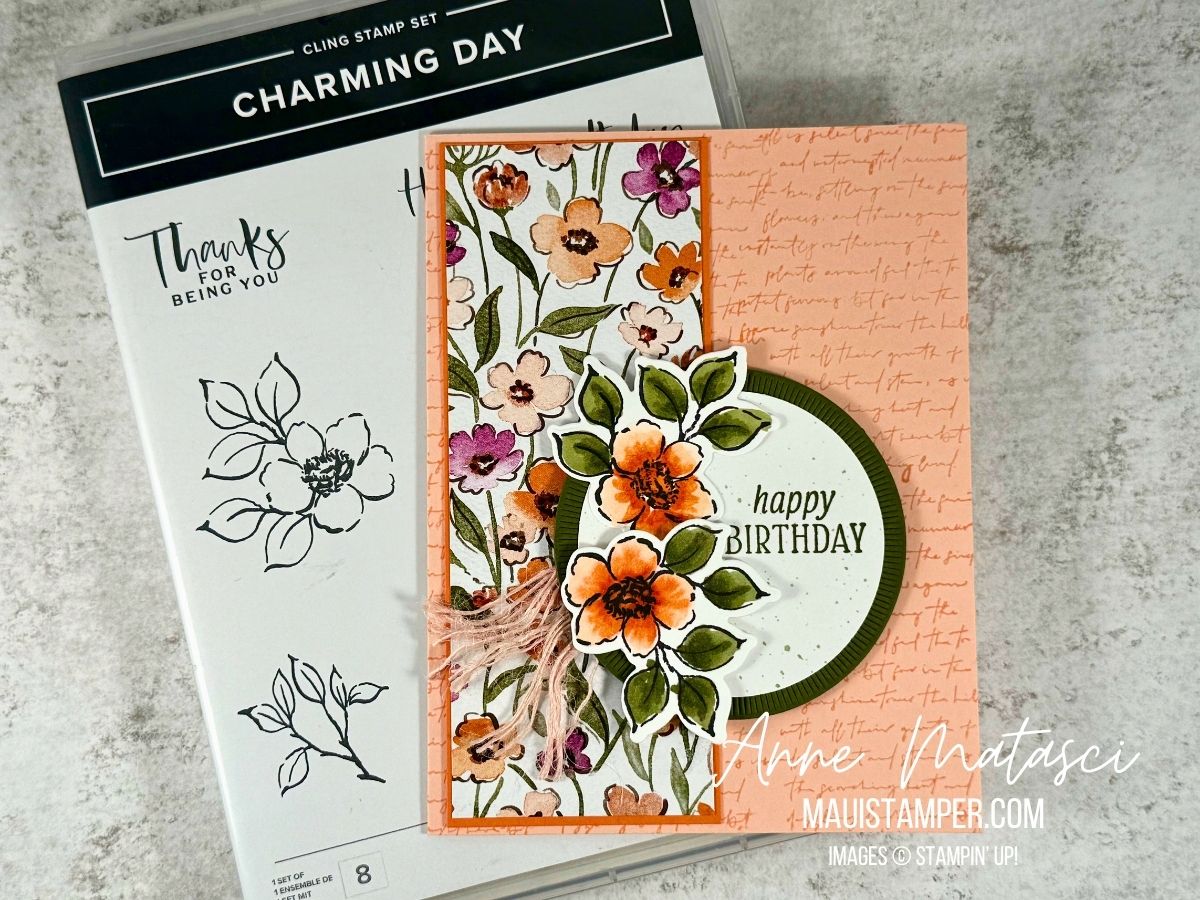
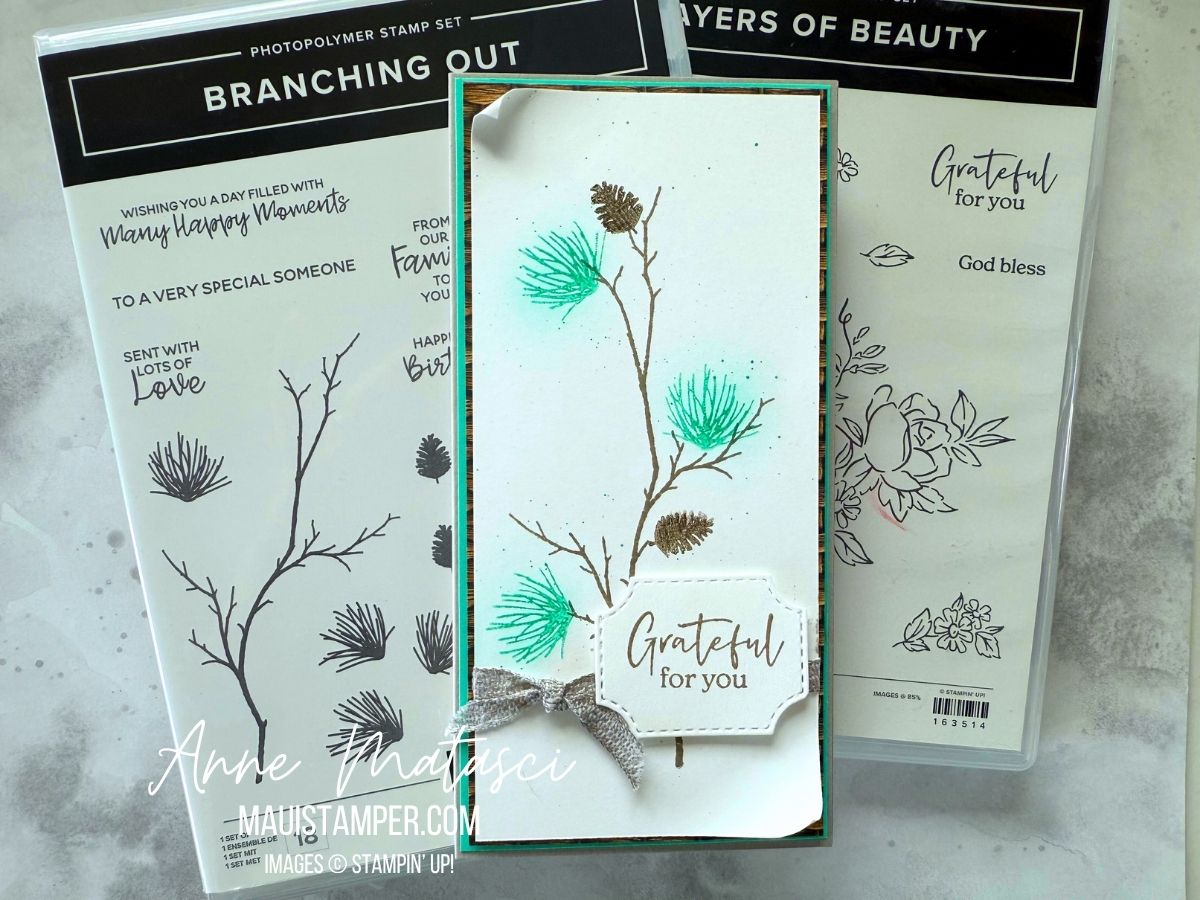
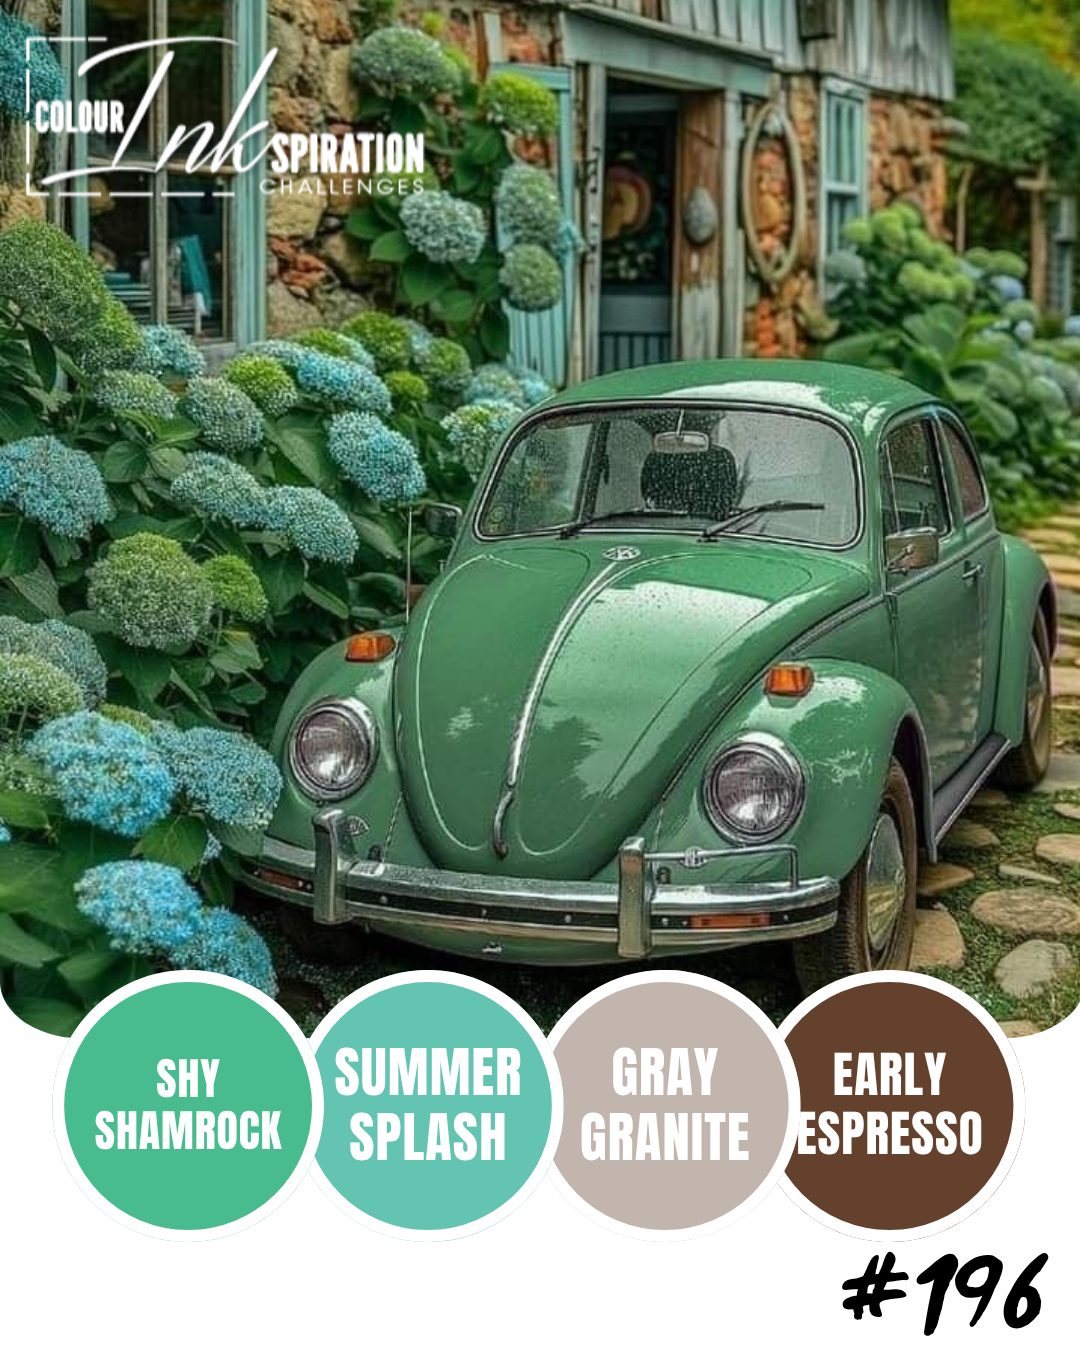
PATTERNS OF FRIENDSHIP: YOUR NEW BEST FRIEND

This big but subtle die is my very best crafting friend right now! I’ve found so many ways to use it, and I love the texture. It’s a flat surface, unlike embossing, so there are no problems adhering images and embellishments. And it’s just gorgeous!

  • Stamps: Gallery Blooms, Beautiful Motifs
  • Color Palette: Basic White, Fresh Freesia, Petaunia Pop, Lost Lagoon, Memento Black
  • Accessories: Stamp Cut & Emboss Machine, Gallery Blooms dies, Patterns of Friendship die, Textured Notes dies, Stampin’ Blends, Petunia Pop Bordered Ribbon, Iridescent Ribbon, Retired In Color dots, Stripes and Florals cards and envelopes, Stampin’ Dimensionals

The Iridescent Ribbon is perfect for coloring with Stampin’ Blends – it’s one of my favorite tricks. Did you notice the subtle lines in the ribbon echo the lines in the Patterns of Friendship die? Gotta love that.

The Stripes and Florals Cards and Envelopes are on the Last Chance list, and they’re discounted, too. They’re another of my favorite tricks for a quick card.

Recently we’ve been experiencing some unannounced retirements of products due to various things outside our control. These items move from “unavailable” to “retired” without transitioning through the Last Chance list. If you love something, don’t wait to order it!

I would be VERY SAD to miss out on Patterns of Friendship. The Gallery Blooms bundle is expected back in stock the week of July 28 (that’s next week!) Beautiful Motifs bundle is currently in stock, and the dies are absolutely gorgeous – don’t miss them!

Processing…
Success! You're on the list.

PATTERNS OF FRIENDSHIP: THE BIG DIE YOU DIDN’T KNOW YOU NEEDED

I initially overlooked Patterns of Friendship because the stamps didn’t stand up and shout at me. But when I started seeing projects with this amazing texture, I went back to the Online Store and looked again, and there she was: the Patterns of Friendship die.

  • Stamps: Gallery Blooms, Elements of Text, Country Flowers (retired)
  • Color Palette: Basic White, Cloud Cover, Fresh Freesia, Daffodil Delight, Granny Apple Green
  • Accessories: Stamp Cut & Emboss Machine, Patterned Friendship dies, Gallery Blooms dies, Textured Notes dies, Stylish Shapes dies, Cloud Cover Faux Linen Ribbon, Floral Impressions DSP, Stampin’ Dimensionals

Have you added one of the In Color Faux Linen Ribbons to your crafty stash? Oh, my – it’s gorgeous! I sliced this one lengthwise and used just a single strand to secure the bundle. That keeps the bow a little softer and mailing-friendly.

Gallery Blooms are perfect for coloring, and I used Stampin’ Blends this time. This closeup reveals a little detail: I used a scrap of Floral Impressions DSP behind the sentiment. It’s a little extra bit of texture in a card that’s already bursting with texture.

The Patterns of Friendship die is 6″ x 6″ so you can cut your panel to run either horizontally or vertically. If you look closely, you’ll see that the rows of little dots are balanced so that a 4″ card stock panel lands exactly between the rows. I love those kind of (semi-OCD) details.

I’m a bit of a texture nerd, so you can imagine how pleased I am with this new die. (Bonus: when you peel the card stock off the die, it makes a very satisfying noise.) There are multiple layers here: the dies, the paper layers, the DSP, and that big crazy ribbon. Have fun with it! You can find everything you need in the Online Store.

Processing…
Success! You're on the list.

CHARMING (BIRTH) DAY

Have you seen Charming Day? It’s a new Online Exclusive, and yes, it’s another flower set. Telling myself “NO more flowers!” doesn’t seem to be working very well. In this case, it was the sentiments and the fonts that pushed me to Add To Cart. 😆

  • Stamps: Charming Day, Spotlight on Nature
  • Color Palette: Basic White, Strawberry Slush, Pretty in Pink, Daffodil Delight, Granny Apple Green
  • Accessories: Stamp Cut & Emboss Machine, Charming Day dies, Impressions Abloom dies, Floral Impressions DSP, Stampin’ Blends, Blending Brush, Stampin’ Dimensionals

I used a couple of tricks to make this easy. I used a Blending Brush with Pretty in Pink ink to create a light wash of color on my Basic White card base, then added a few textural elements from Spotlight in Nature. I inked the words on the sentiment separately so that I could offset them on the card front.

I cut the DSP and the mat to size and used just a little adhesive to hold them in place, then ran them through the Big Boss together. DSP is lighter weight than card stock, so the two pieces cut through cleanly. I pulled out the center ovals, then finished adhering the card stock and DSP and added them to the card front. The stitched frame on the inside fits inside the opening, so it needs to be carefully glued into place.

The Floral Impressions DSP is all about gorgeous florals, but the “B” sides of the papers are gorgeous tone-on-tone designs. So many options! Time to get crafting, friends.

Processing…
Success! You're on the list.

Crafting a Rainbow: My First Pride Card Experience

Today is the final day of Pride month and I’m sharing my first-ever Pride card. I’ll confess it took me a while to create the design, as rainbows aren’t a big part of my style (and therefore my crafting supplies). But once I came up with the concept, this was a very satisfying project.

  • Stamps: None
  • Color Palette: Basic White, Secret Sea, Real Red, Pumpkin Pie, Daffodil Delight, Shaded Spruce, Night of Navy, Highland Heather
  • Accessories: Stamp Cut & Emboss Machine, Alphabet Ala Mode dies, Pattern of Friendship die, Stampin’ Blends, Masking Paper, Stampin’ Dimensionals

The first step was to create the rainbow panel. I measured the height of the Alphabet Ala Mode dies: 1 9/16″, to be precise. I made my panel 2″ high, which meant each stripe was approximately 1/3″ high. Turns out this was easier to do in the metric system, so my panel was 50mm high and each stripe was 8 1/3mm (which was easier to estimate).

I cut a large focal panel with extra space on both the height and width. I marked my distances on the side of my focal panel, and used Masking Paper to block off each stripe. I colored each one with a Stampin’ Blend, and I found I got best results by using a fresh piece of Masking Paper for each edge.

Once the Rainbow panel was complete, I used Washi Tape to secure the letters evenly across the panel before running it through the Stamp Cut and Emboss Machine. I held my breath as I did this step, hoping that a) the letters were straight and b) the Washi wouldn’t stick to the rainbow. WHEW. I was so glad when it worked!

After that, it was super easy. I matted the rainbow, matted a second panel, and created a third panel with the Pattern of Friendship die. Add liberal quantities of Stampin’ Dimensionsals, and it’s done!

You could make someone’s day with this card. Let them know you support them. All products are available in the Online Store.

Processing…
Success! You're on the list.

BEAUTIFUL GALLERY #2

I tell you, I can’t get enough of the Beautiful Gallery DSP! It has a little bit of everything and today’s card showcases that variety. I chose one of the “B” sides of the paper – a brushed gradient of grays. I had lots of inspiration for focal points, but ultimately decided to use the largest floral image from the stamp set.

  • Stamps: Gallery Blooms
  • Color Palette: Very Vanilla, Basic Black, Basic Grey, Gray Granite, Petal Pink
  • Accessories: Stamp Cut & Emboss Machine, Gallery Blooms dies, Petal Pink 3/8″ Scalloped ribbon, Glue Dots, Stampin’ Blends , Stampin’ Dimensionals

I colored the blossom in Petal Pink and the leaves in Gray Granite. Then I took the Gray Granite Blend and went all the way around the edges of the die cut, covering any white paper. The card base is Very Vanilla, but I chose to use Basic White for the die cut to keep the colors true.

The ribbon is tied through a small opening in the die cut and looped once. I used Glue Dots to hold the edges of the ribbon in place.

I considered adding a sentiment to the front, but decided I would wait until I decided who would get this card. I love having a stash of blank cards!

Shop the Online Store for this beautiful new suite.

Processing…
Success! You're on the list.

ALONG THESE LINES: A SINGLE ROSE

I have one more image to share from Along These Lines. I love the elegant vertical lines of this rose, and decided to pair it with the stunning Woven Textures DSP. To me, these linear images seem to work well with softer tones, so I chose Petal Pink for my rose.

  • Stamps: Along These Lines, Happy Hibiscus
  • Color Palette: Basic White, Petal Pink, Soft Sea Foam, Memento Black
  • Accessories: Note cards and envelopes, Stamp Cut & Emboss Machine, Textured Notes dies, Stampin’ Blends, Woven Textures DSP, Paper Snips, Linen Thread, Stampin’ Dimensionals

This is our smaller format Note Card. I used my snips to trim out just the word THANKS from the sentiment from Happy Hibiscus. I chose the soft linen-look design from the DSP pack so it wouldn’t overpower the rose. It has the feeling of matted artwork, don’t you think?

Shop the Online store for all your paper crafting needs!

Processing…
Success! You're on the list.

ALONG THESE LINES: CAKE

How about a Layer Cake on a layered card? I don’t often make square cards, but I was inspired to create a stack with this one. I made it monochromatic, but I was tempted to do it in rainbow colors. Stay tuned for future updates.

  • Stamps: Along These Lines
  • Color Palette: Basic White, Bubble Bath, Petunia Pop, Berry Burst
  • Accessories: Stamp Cut & Emboss Machine, Stylish Shapes dies, Textured Notes dies, In Color DSP, Bordered Ribbon, Stampin’ Blends, Stampin’ Dimensionals

I kept the coloring to a minimum, as these images are pretty intricate. A light color and a simple highlight was all I wanted. I layered a Basic White panel with a color panel and put Stampin’ Dimensionals on the back, then repeated twice more.

The Textured Notes dies are rectangles, but by running the die cut through a second time I was able to create a square. I love the designs on the edges of those dies.

TRUTH: I forgot to add the sentiment before I began stacking the paper with the dimensionals, and I was not brave enough to attempt to add it on the top of the stack! It says Happy Birthday inside.

Find Along These Lines and lots of other glorious new products in the Online Store.

Processing…
Success! You're on the list.

ALONG THESE LINES: BIKES

I received Along These Lines as a Prize Patrol at #OnStage2025Brisbane. I’ll confess that initially, I was not especially excited about the images. But of course, it was a gift, and I was happy to have it – and when I started to think about how I might use it, I felt inspired.

  • Stamps: Along These Lines, With You in Mind
  • Color Palette: Basic White, Poppy Parade, Gray Granite, Basic Black
  • Accessories: Stampin’ Blends, Masking Paper

I began by cutting a few masks of the bike. Next I stamped a couple of images, masked them, and stamped a couple more. I wanted the feeling of a race, but without racers – just the bikes.

I added just a little emphasis with the Gray Granite Stampin’ Blend around the wheels and handlebars. My pop of color was the seat to help each bike stand out.

I want to try this again with multiple colors for the seat, and perhaps with another monochromatic color. I’m thinking I’ll try Azure Afternoon or Crushed Curry – what do you think?

You’ll find Along These Lines – along with a lot of other new products – in the Online Store.

Processing…
Success! You're on the list.

LAST CHANCE; WINTERLY TREE TOPS

Welcome to my April Last Dance/Last Chance series! Here’s another beauty I’m sorry to see retire, because I have really enjoyed these birdies. I don’t know if there are any birds with this exact coloring in the wild, but I claim artistic license and I don’t care.

  • Stamps: Winterly Tree Tops
  • Color Palette: Basic White, Blueberry Bushel, Crumb Cake, Pecan Pie, Wild Wheat
  • Accessories: Stamp Cut & Emboss Machine, Stylish Shapes dies, Timeless Plaid DSP, Stampin’ Blends, Linen Thread, Stampin’ Dimensionals

This square center panel is made with the Stylish Shapes dies, which are NOT on the Last Chance list (whew!!) It’s backed with a Wild Wheat panel, which IS Last Chance as it’s a retiring 23-25 In Color. You know, when I first saw Wild Wheat I had some rather *ahem* uncharitable thoughts about the color, but once I started pairing it with other colors I became a fan. I especially love it with blue, black and grey tones.

The double gate fold is a lot simpler than it looks. Score a 5 1/2″ x 11″ piece of card stock at 2″, 3 3/4″, 7 1/4″ and 9″ to create the side panels. Once you’ve embellished the side panels, add a focal point of almost any shape to one side and you’re done!

At this writing, the Winterly Tree Tops stamps have sold out, but the dies are still available. And of course, Stylish Shapes has its hand in the air saying “choose me, choose me!!” Visit the Online Store and see the updated Last Chance List.

Processing…
Success! You're on the list.

LAST CHANCE for STIPPLED ROSES

Welcome to my April Last Dance/Last Chance series! I’ll confess that I haven’t used Stippled Roses a lot. It’s a lush, romantic set of images, and I don’t usually go that direction. I challenged myself to give it a good Last Chance, and I’d love to know what you think!

  • Stamps: Stippled Roses
  • Color Palette: Basic White, Basic Black, Pretty in Pink
  • Accessories: Stampin’ Blends, Calming Creek Cards & Envelopes

With this style of image, I chose to use an extremely simple design. Basic White card base, Basic Black and Pretty in Pink mats, and a single layer stamped card front. That’s it – not my usual style, but I think it works.

I also did an even MORE pared down version without any color. Unfortunately, this one has a crooked sentiment, but that just proves it’s a handmade card. I’t’s a little extreme ‘m not sure I’ll leave this one as is. What would you do?

This black and white version uses one of the printed card bases and coordinating envelopes from the Calming Creek cards and envelopes. That product is not a Last Chance product.

The Stippled Rose stamps and dies are both discounted, and the discount on the dies is deep. That makes this classic set a really good value! You can create much more elaborate cards, of course, but sometimes a simple card with a bit of color is just what you need. The lovely thing is that it’s completely up to you.

Processing…
Success! You're on the list.