Why you should invest in Ink Refills Part I

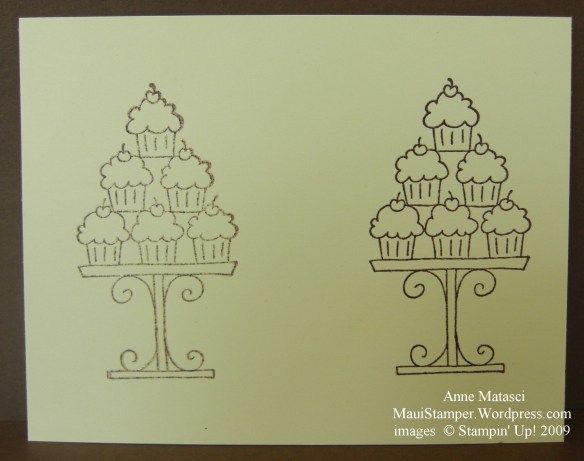
Remember this card?  When I started stamping, I began by embossing the cupcakes with clear embossing powder over Chocolate Chip Classic ink with a little Versamark thrown in to make it sticky.  When I was finished with the heat tool, I looked at the image and thought it seemed a little, well, wimpy.  So I pulled out my Ink Refill and gave my Chocolate Chip ink pad a li’l nip.  Same process – Chocolate Chip Classic ink, Versamark, clear embossing powder and heat gun – and WOW.

Which one got the li'l nip?  (Actual Unretouched Photo!!)

Which one got the li'l nip? (Actual Unretouched Photo!!)

Next time you sit down to stamp, take a look at your images.  It might be time to take your ink pads out for a drink!

My First Mojo

Card challenges can be addicting.   They stretch you to try new techniques, layouts, and colors.  Sometimes they go together so easily that you are exhilarated.  Sometimes you push and pull and struggle and end up throwing the whole thing away (well, I do anyway.  It’s just paper.)

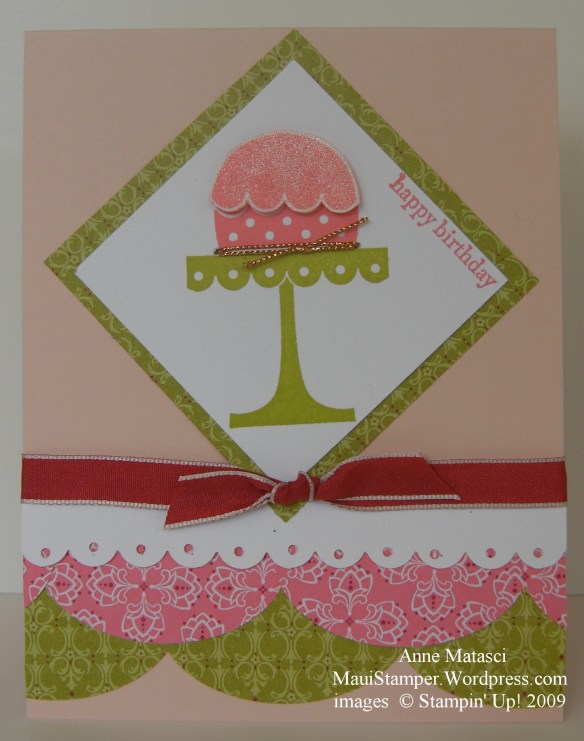
I’ve been following the Mojo Monday blog and challenges for a while but haven’t taken the leap.  This week I jumped – just couldn’t resist those scallops along the bottom.  The Mojo bloggers have such awesome samples that it’s a little tough to get started, but it was fun to play with this sketch.

Mojo Monday 105

Mojo Monday 105

  • Blush Blossom and Whisper White cardstock, retired Stampin’ Up! DSP
  • Cameo Coral, Kiwi Kiss Classic Ink
  • Champagne Mist shimmer paint and sponge daubers
  • Crazy for Cupcakes and Teeny Tiny Wishes Stamp Sets
  • Wide Oval, Scallop edge and 1/16″ circle punches
  • Riding Hood Red taffeta ribbon and Gold cord
  • Stamp-a-ma-jig, crewel needle, Stampin’ Dimensionals

I keep pulling out that darn Kiwi Kiss paper and ink.  I really loved last year’s In Color collection from Stampin’ Up! and I’m having a hard time letting go of it.  Eventually I’ll run out of scraps…but then there will be this year’s In Color collection to deal with.  If it’s not one challenge, it’s another!

Snow Globes

Here on Maui, a Snow Globe is about as close to winter as we get.  Oh, once about every 10 years or so we get a dusting of snow at the top of Haleakala.  It looks really pretty against our beautiful blue sky, but it doesn’t last.  Honestly, if it gets down to 70° here at sea level, we’re all digging in our closets for our “mainland clothes”.

As a result, I don’t do a whole lotta snowman, snowflake, or wintery cards.  But when Crystal spotted the little snowmen in the snow globe on the back cover of the Stampin’ Up! Holiday Mini Catalog, we both fell in love.  How could you not love a snow globe card?

Shimmery Snow Globe Snowmen

Shimmery Snow Globe Snowmen

  • Bashful Blue, Whisper White and Soft Suede cardstock
  • Bashful Blue, Soft Suede and Basic Black Classic ink
  • Frost White Shimmer Paint and sponge daubers
  • The More the Merrier Level III Hostess set, Season of Joy, and Many Merry Messages stamp sets
  • Soft Suede Polka Dot grosgrain ribbon
  • Colored pencils
  • Card template

That card template is a Stampin’ Up! demo perk.  Our demo website has a library of ideas, patterns and templates to make us each look like a creative genius to our customers.  If you ‘d like your own copy of the template, leave me a comment and I’ll make sure you get one.     The template is now available HERE.  The card fits in a regular A2 envelope (the kind you use for a 4 1/4″ x 5 1/2″ card).

A cute little box

Are you tired of seeing cards yet?  This is a simple project that makes a cute small gift.  The box is made from two Scallop Envelopes – exclusive Stampin’ Up! dies – and a couple of small rectangles to fill in the sides.  If you don’t have a Big Shot, you could…well, I just don’t see how you could make something this cute without a Big Shot!

Just for You tote 003_wmk_crop

The cards are 3 x 3 and very simple – stamp, mat and attach.  The box is quick too – attach the envelopes to each other across the bottom, add a couple of sides and voila!  Stamp a sentiment for the front, wrap the ribbon around and attach with a little sticky strip, glue or sew the button on and you’re done.  The envelopes are Stampin’ Up! mini square envelopes.

  • Choo Choo, Teeny Tiny Wishes and Branch Out stamp sets and Right on Track wheel
  • Real Red, So Saffron, and Brocade Blue Classic ink and Close to Cocoa ink cartridge
  • Real Red, So Saffron, Brocade Blue, and Basic Black Stampin’ Write Markers
  • Whisper White, Real Red, So Saffron and Brocade Blue cardstock
  • Big Shot and Scallop Envelope die
  • Oval and Scallop oval punches
  • Real Red narrow grosgrain ribbon, Playground Designer Buttons

Indispensible tools

Sometimes the best tools are the ones you never see.  Oh, I love that Big Shot.  I love the shapes and letters and boxes.   I really love the textures it creates. But the tools that I love are the ones that make me look good.  Tools like the bone folder that give me smooth creases.   Tools like the piercing tool and template that give me nice, straight lines of evenly spaced holes.  Tools like the Stamp-a-ma-jig that enable me to put images and words (especially words!) right where I want them.  I especially love to pick out just a couple of words or a phrase to personalize my message and the only way to do that is with the SAMJ.   What’s even better, each of these tools can fill in for a number of outside-the-box purposes and none of them take up a whole lotta space.  So there’s my commercial for the un-sung heros of the Stamping Universe.

Embossed_Embrace_Life_crop

  • Embrace Life, Itty Bitty Backgrounds, Best Wishes and Teeny Tiny Messages stamp sets
  • Pumpkin Pie, Dusty Durango and Mellow Moss Classic Ink
  • Very Vanilla, Dusty Durango, Mellow Moss, and Pumpkin Pie cardstock, So Saffron DSP (patterns have changed)
  • Elegant Bouquet Embossing Folder and Big Shot
  • Piercing tool and template, Linen thread, Stamp a ma jig
  • Fresh Favorites Buttons, 1/2″ circle punch

More soft thoughts…

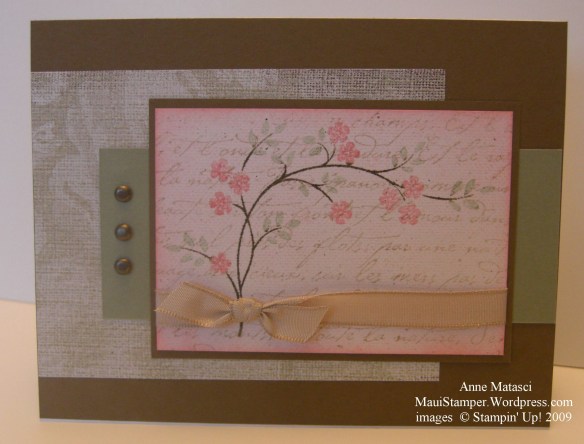
I liked the colors and overall look of yesterday’s card so well that I revisited the same general concept.  I incorporated a sketch challenge from SCS and added Mellow Moss to the Pretty in Pink/Soft Suede combination.  The end result is a card with a similar feeling but a unique look of its own.

I really enjoy the challenge of creating different looks from the same basic supplies.  I like stretching my perspective – it keeps things exciting.

Floral Thoughts_crop

  • Thought and Prayers stamp set, En Francais and Linen (retired) background stamps
  • Pretty in Pink and Sahara Sand Classic Ink
  • Soft Suede, Mellow Moss  and Pretty in Pink Stampin’ Write Markers
  • Soft Suede,  Mellow Moss and Naturals White cardstock and some very old Designer Series Paper
  • Kraft taffeta ribbon (it’s not nearly as yellow-hued in real life)
  • Vintage brads
  • Piercing tool & mat pack (to position brads), Stampin’ Sponges

Thinking of you

Sometimes you need a card with a soft touch.  I’m sending this to a friend whose mother-in-law passed away this week.  It’s always hard to say goodbye, and when you’re saying goodbye to someone who has had a lot of ups and downs over the past few years, there are a lot of different emotions involved.   We had a chance to talk abut those conflicting feelings this week, but I know she’s still processing and I want her to know I’m thinking of her.

This card turned out the way I saw it in my mind.   I was inspired by THIS CARD by Lyssa at Stampin’ Addicts and used the colors from last week’s Color Challenge at SCS.  When looking at a card makes me feel good I think I’ve gotten it right.

Suede_Tree_thoughts_crop

  • Thought and Prayers stamp set
  • Soft Suede, Pretty in Pink and Pink Pirouette Classic Ink
  • Soft Suede and Pretty in Pink Stampin’ Write Markers
  • Soft Suede,  Pretty in Pink and Naturals White cardstock
  • Pretty in Pink taffeta ribbon
  • Oval scallop and hand-held rectangle punch
  • Piercing tool, mat pack, Stampin’ Sponges, Stampin’ Dimensionals

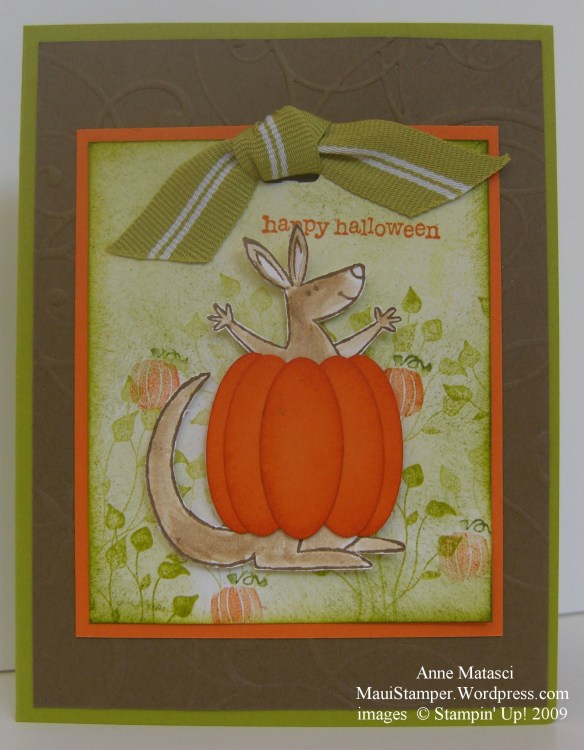
Happy Hallow-Roo!

I have had this cut-out Roo sitting on my desk just waiting to be loved for a good 6 weeks.  About two weeks ago I spotted THIS CARD and thought I might have found a use for my Roo.  I’ve never quite made peace with that bear (What?  You didn’t go look at the card?  Go see…) because, well, there’s something about his unibrow that bothers me.  But I love the Roo so the substitution seemed natural.

Halloween_Roo_crop

Happy Hallo-Roo

  • Build-a-Roo, Teeny Tiny Wishes, Pocket Silhouettes, and Holiday Best (hostess) Stamp Sets
  • Soft Suede, Pumpkin Pie and Kiwi Kiss (ret) Classic Ink
  • Pumpkin Pie and Old Olive Stampin’ Write markers
  • Naturals White, Pumpkin Pie, Soft Suede and Kiwi Kiss (ret) card stock
  • Small oval and Slot punches
  • Kiwi Kiss stripe ribbon (ret)
  • Big Shot and SU Backgrounds 1 Texturz plate
  • Stampin’ Sponges, Dimensionals, Aquapainter

First, I apologize (I’m sorry, I’m sorry, I’m sorry already!) for using Kiwi Kiss.  I couldn’t resist.  It was there on my desk, whimpering about being neglected, and whispering to me that it would be SO perfect.  You could use Old Olive and I’m sure it would be wonderful.  The Kiwi Kiss made me do it.

Second, I have to confess that there was surgery involved.  In fact, I had to cut the Roo in Two.  The pumpkin was too big and I would have had to hide those exuberant arms or those fabulous roo feet.

Third, the pumpkin in the patch is marked from the Trick or Treat stamp in the Holiday Best hostess stamp set.

There.  I think that’s enough commentary.

Happy HalloRoo to you!

Shimmery Dasher

Are you ready for another Christmas card?  I know it’s early…but I like to get thinking about these things.  I like to simmer a bunch of ideas on the back burner and let the best one come to the surface.

This card uses the awesome Champagne Mist shimmer paint again.  I can’t get enough of this product – there are so many ways to use it.  I inked the Dasher stamp in Old Olive and then used a dauber to add a very light coat of shimmer on the antlers.  I stamped it on the ivory panel, then inked it again but didn’t add the shimmer and stamped it on a second piece of cardstock.  Finally, I used a dauber to add a very light layer of shimmer over the entire image.  This leaves messy edges, so I cut out the Dasher and layered it over the first image.  Finally, I used the Aquapainter with a little more shimmer to give Dasher a shimmery pool to stand in.

Olive Shimmer Dasher

  • Elegant Eggplant, Old Olive, Basic Black and Very Vanilla Cardstock
  • Old Olive and Encore Gold ink, Champagne Mist Shimmer Paint
  • Dasher and All Holidays stamp sets
  • Old Olive 1 1/4″ grosgrain stripe ribbon
  • Aquapainter, Stampin’ Dimensionals

Best Ever Chocolate Chip Banana

Did I mention that Crystal makes an absolutely divine banana cake?  Some of you who were at our class on Saturday obviously think so, because I’ve had multiple requests for the recipe.  Without further ado…

Crystal’s Best Ever Chocolate Chip Banana Cake

  • 1 box yellow cake mix
  • 1 box instant banana cream pudding
  • 3/4 cup vegetable oil
  • 4 eggs
  • 1 cup mashed bananas (3 – 4 bananas)
  • 1/2 cup milk
  • 1 tsp baking soda
  • 1 1/2 cups chocolate chips

Grease a 9 x 13 pan.  Combine all ingredients and pour into pan.  Bake 35 to 40 minutes.

This recipe got me thinking about chocolate and bananas, which is a very dangerous thing for me to be doing.  To remove myself from the kitchen, I headed for the Chocolate Chip and Barely Banana cardstock and ink.  (Yes, I know, it’s a very cheesy connection.)  Of course, with all this food on the mind I immediately pulled down my Crazy for Cupcakes stamps.  However, this was NOT a “before you know it the card was done” kind of creation.  I did a lot of fussing and fiddling which does not show in the final product, but the one thing that does show is my Amazing Discovery for Today:

Chocolate Chip with Champagne Mist Shimmer paint

Chocolate Chip with Champagne Mist Shimmer paint

Can you see the shimmer?  It’s hard, I know, but imagine a gorgeous bronzed look with a little sparkle.  This is equal parts Chocolate Chip Classic ink refill and Champagne Mist Shimmer Paint.  When I mixed it together I couldn’t believe my eyes.  I used my Aquapainter to brush it on.  Of course, I couldn’t leave well enough alone – I seldom can – so I tried the same combination using Barely Banana Classic ink refill.  You be the judge:

Best Ever Chocolate Chip Banana cupcakes

Best Ever Chocolate Chip Banana cupcakes

  • Very Vanilla, Cameo Coral, Chocolate Chip and Naturals Ivory cardstock
  • Retired Designer Series Paper
  • Chocolate Chip, Cameo Coral, Barely Banana, and Sahara Sand Classic ink
  • Champagne Mist Shimmer Paint
  • Texture Jumbo Stampin’ Wheel (run through the Sahara Sand ink pad)
  • Versamark ink, Clear Embossing Powder and Heat Tool
  • Chocolate Chip Stampin’ Write Marker
  • Big Shot and Stampin’ Up! Backgrounds I Texturz Plate
  • Double rectangle punch and Chocolate Chip Taffeta ribbon

My faithful but not very sophisticated little point-and-push does not do justice to these colors.  You will have to use your imagination to appreciate how glorious this is!

Somehow, the entire thing reminds me of an ice cream parlor.  This is not the best thing for someone who needs to stay out of the kitchen and away from the chocolate chips and bananas (oh, all right, it’s just the chocolate chips.  we knew that.)  Hope you enjoyed the card.  I’m going for a long walk!